HTML Course : Building Main Content – Section 2
Last Updated :
03 Aug, 2023
Course Navigation

In the last article, we began building the main section of the website and have completed the first section. Let us now move to the section 2 of Main Content.
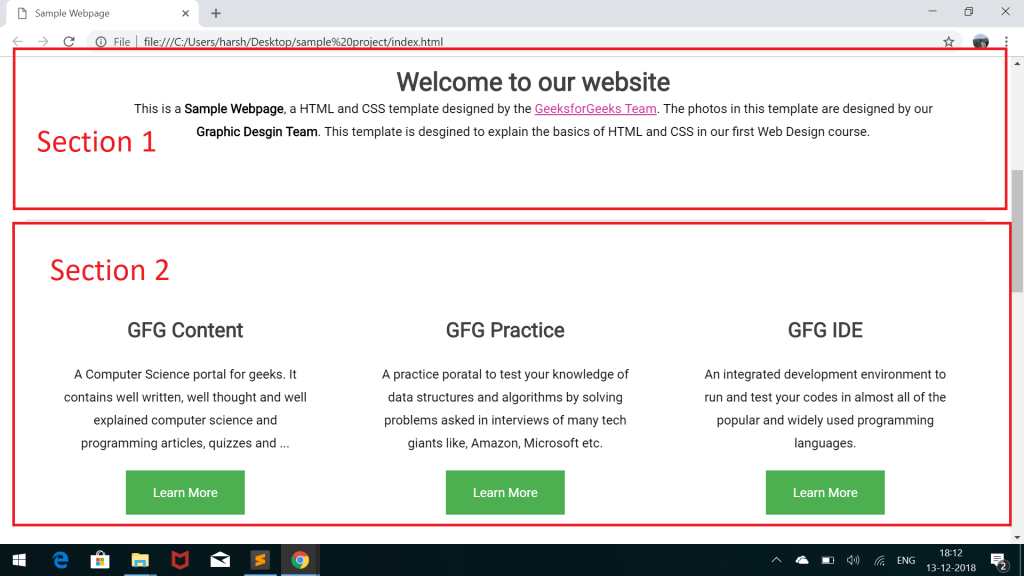
You can see the Section 2 of the Main Content in the below image:
If you observe carefully, you can say that the section 2 is divided into three columns as shown below:

This is also referred to as 3-Column layout in terminology of Web Development.
Let’s start writing HTML for Section 2 of our Website, follow the below steps:
- Declare a parent div with a class named row.
- Declare three div’s inside the parent row div to contain three columns and assign them id’s as column1, column2 and column3 respectively.
- For Each Column:
- Declare a div with class = “column-title”. For the title of the column.
- Declare a paragraph p element for the description of the content.
- Declare an anchor tag <a> to add an external link which will be styled as a button later.
Below is the complete HTML code for the Section 2 of the Main Content:
HTML
<!DOCTYPE html>
<html>
<body>
<section class="container" id="section-2">
<div class="row">
<div id="column1">
<div class="column-title">
<h2>GFG Content</h2>
</div>
<p>
A Computer Science portal for geeks. It
contains well written, well thought and
well explained computer science and
programming articles, quizzes and ...
</p>
<a href=
target="_blank"
class="button">
Learn More
</a>
</div>
<div id="column2">
<div class="column-title">
<h2>GFG Practice</h2>
</div>
<p>
A practice poratal to test your knowledge
of data structures and algorithms by solving
problems asked in interviews of many tech giants
like, Amazon, Microsoft etc.
</p>
<a href=
target="_blank"
class="button">
Learn More
</a>
</div>
<div id="column3">
<div class="column-title">
<h2>GFG IDE</h2>
</div>
<p>
An integrated development environment to
run and test your codes in almost all of
the popular and widely used programming
languages.
</p>
<a href=
target="_blank" class="button">
Learn More
</a>
</div>
</div>
</section>
</body>
</html>
|
If you run the index.html in your browser, you will be able to see something as shown below:

This no where looks close to our final Section 2 in the Main Content. Let’s start adding styles to it.
- Adding basic styles for layout: Firstly, set the overflow to hidden and add all the required margins and paddings. Next is to give the thin 1px border at the top of the section to separate it from the previous section and align all of the text inside it to center.
Add the below CSS code to your style.css:
CSS
#section-2{
overflow: hidden;
margin-top: 5em;
padding-top: 1em;
border-top: 1px solid rgba(0, 0, 0, 0.2);
text-align: center;
}
|
- Aligning Columns In-line: The next step is to align all of the columns in a single line one after the other. To do this, add the below CSS code to your style.css file:
CSS
.row #column1,
.row #column2,
.row #column3{
float: left;
width: 320px;
padding: 80px 40px 80px 40px;
}
|
- Styling the Title of columns: The next good thing to do is to style the title of the columns. To give them appropriate font-sizes and weights apart from the default values. Add the below CSS code to your style.css file:
CSS
.column-title h2{
margin: 1em 0em;
font-size: 1.6em;
font-weight: 700;
}
|
Once you have added the above styles successfully, your Section 2 now will look something as shown below:

It looks good now apart from the buttons at the bottom. The buttons are still appearing as simple links. Let’s make them look good by adding some CSS.
Styling Buttons
To make the buttons look good, do the following:
- Remove text-decoration.
- Align text to center.
- Set the display property to “inline-block”.
- Set appropriate font-size, color and background color of the button.
- Add paddings and margins.
- Set the cursor property to pointer so that whenever the user hovers over the button the mouse pointer will change into a nice looking hand representing a pointer.
- Use the :hover selector to add styles whenever user hovers over the button.
Below is the complete CSS code for the “button” class which you need to add in your style.css file:
CSS
.button {
text-decoration: none;
text-align: center;
display: inline-block;
font-size: 16px;
background-color: #4CAF50;
color: white;
border: 2px solid #4CAF50;
padding: 16px 32px;
margin: 4px 2px;
-webkit-transition-duration: 0.4s;
transition-duration: 0.4s;
cursor: pointer;
}
.button:hover {
background-color: white;
color: #4CAF50;
}
|
Now, the Section 2 of our website is complete and will look something as shown below:

Supported Browser:
- Google Chrome
- Microsoft Edge
- Firefox
- Opera
- Safari
Share your thoughts in the comments
Please Login to comment...