Python Tkinter – Create Button Widget
Last Updated :
23 Apr, 2024
Tkinter is Python’s standard GUI (Graphical User Interface) package. It is one of the most commonly used packages for GUI applications which comes with Python itself. Let’s see how to create a button using Tkinter.
Tkinter Button Widget
The Tkinter Button widget is a graphical control element used in Python’s Tkinter library to create clickable buttons in a graphical user interface (GUI). It provides a way for users to trigger actions or events when clicked.
Importing the tkinter module is the same as importing any other module.
import tkinter
Syntax of Tkinter Button
The syntax to use the button widget is given below.
W = Button(parent, options)
Parameter(options):
- activebackground: Background color when the button is under the cursor.
- activeforeground: Foreground color when the button is under the cursor.
- anchor: Width of the border around the outside of the button
- bd or borderwidth: Width of the border around the outside of the button
- bg or background: Normal background color.
- command: Function or method to be called when the button is clicked.
- cursor: Selects the cursor to be shown when the mouse is over the button.
- text: Text displayed on the button.
- disabledforeground: Foreground color used when the button is disabled.
- fg or foreground: Normal foreground (text) color.
- font: Text font to be used for the button’s label.
- height: Height of the button in text lines
- highlightbackground: Color of the focus highlight when the widget does not have focus.
- highlightcolor: The color of the focus highlight when the widget has focus.
- highlightthickness: Thickness of the focus highlight.
- image: Image to be displayed on the button (instead of text).
- justify: tk.LEFT to left-justify each line; tk.CENTER to center them; or tk.RIGHT to right-justify.
- overrelief: The relief style to be used while the mouse is on the button; default relief is tk.RAISED.
- padx, pady: padding left and right of the text. / padding above and below the text.
- width: Width of the button in letters (if displaying text) or pixels (if displaying an image).
- underline: Default is -1, underline=1 would underline the second character of the button’s text.
- width: Width of the button in letters
- wraplength: If this value is set to a positive number, the text lines will be wrapped to fit within this length.
Methods
- flash(): Causes the button to flash several times between active and normal colors. Leaves the button in the state it was in originally. Ignored if the button is disabled.
- invoke(): Calls the button’s command callback, and returns what that function returns. Has no effect if the button is disabled or there is no callback.
Creating a Button using Tkinter
Python3
# import everything from tkinter module
from tkinter import *

# create a tkinter window
root = Tk()

# Open window having dimension 100x100
root.geometry('100x100')

# Create a Button
btn = Button(root, text = 'Click me !', bd = '5',
                          command = root.destroy)

# Set the position of button on the top of window.
btn.pack(side = 'top')

root.mainloop()
Output
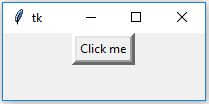
Creation of Button without using TK Themed Widget
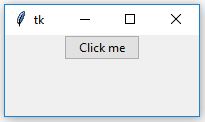
Creation of Button using tk themed widget (tkinter.ttk). This will give you the effects of modern graphics. Effects will change from one OS to another because it is basically for the appearance.
As you can observe that BORDER is not present in 2nd output because tkinter.ttk does not support border. Also, when you hover the mouse over both the buttons ttk.Button will change its color and become light blue (effects may change from one OS to another) because it supports modern graphics while in the case of a simple Button it won’t change color as it does not support modern graphics.
Python3
# import tkinter module
from tkinter import *

# Following will import tkinter.ttk module and
# automatically override all the widgets
# which are present in tkinter module.
from tkinter.ttk import *

# Create Object
root = Tk()

# Initialize tkinter window with dimensions 100x100
root.geometry('100x100')

btn = Button(root, text = 'Click me !',
                command = root.destroy)

# Set the position of button on the top of window
btn.pack(side = 'top')

root.mainloop()
Output
Note: The tkinter.ttk module provides access to the Tk-themed widget set, introduced in Tk 8.5. If Python has not been compiled against Tk 8.5, this module can still be accessed if Tile has been installed. The former method using Tk 8.5 provides additional benefits including anti-aliased font rendering under X11 and window transparency.
The basic idea for tkinter.ttk is to separate, to the extent possible, the code implementing a widget’s behavior from the code implementing its appearance. tkinter.ttk is used to create modern GUI (Graphical User Interface) applications that cannot be achieved by tkinter itself.
Share your thoughts in the comments
Please Login to comment...