How To Use Images as Backgrounds in Tkinter?
Last Updated :
08 Mar, 2024
Prerequisite: Python GUI – tkinter , Frame
In this article, We are going to write a program use image in the background. In Tkinter, there is no in-built function for images, so that it can be used as a background image. It can be done with various methods:
Method 1: Using photoimage methods.
When it comes to GUI based application, images play a vital role. From the application icon to animation, it’s useful.
To display images in labels, buttons, canvases, and text widgets, the PhotoImage class is used, which is present in Tkinter package.
Code:
Python3
from tkinter import *
root = Tk()
root.geometry("400x400")
bg = PhotoImage(file = "Your_image.png")
label1 = Label( root, image = bg)
label1.place(x = 0, y = 0)
label2 = Label( root, text = "Welcome")
label2.pack(pady = 50)
frame1 = Frame(root)
frame1.pack(pady = 20 )
button1 = Button(frame1,text="Exit")
button1.pack(pady=20)
button2 = Button( frame1, text = "Start")
button2.pack(pady = 20)
button3 = Button( frame1, text = "Reset")
button3.pack(pady = 20)
root.mainloop()
|
Output:
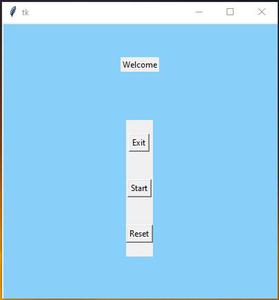
As you can see the background color of buttons and labels have different from the image color.
The solution is to set the background color of buttons and label it as the color of the image with this color “#88cffa” .
Python3
from tkinter import *
root = Tk()
root.geometry("400x400")
bg = PhotoImage( file = "Your_img.png")
label1 = Label( root, image = bg)
label1.place(x = 0,y = 0)
label2 = Label( root, text = "Welcome",
bg = "#88cffa")
label2.pack(pady = 50)
frame1 = Frame( root, bg = "#88cffa")
frame1.pack(pady = 20)
button1 = Button( frame1, text = "Exit")
button1.pack(pady = 20)
button2 = Button( frame1, text = "Start")
button2.pack(pady = 20)
button3 = Button( frame1, text = "Reset")
button3.pack(pady = 20)
root.mainloop()
|
Output:
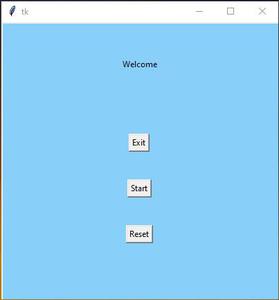
Note: This method will not work for multiple colors in image.
Method 2: Using Canvas methods.
Approach:
- Same as above implementation.
- Add Image file.
- Create Canvas and set width and height.
- Display image using create_image.
- Set text using create_text.
- Create buttons.
- Final step add button using create_window.
Code:
Python3
from tkinter import *
root = Tk()
root.geometry("400x400")
bg = PhotoImage(file = "Your_img.png")
canvas1 = Canvas( root, width = 400,
height = 400)
canvas1.pack(fill = "both", expand = True)
canvas1.create_image( 0, 0, image = bg,
anchor = "nw")
canvas1.create_text( 200, 250, text = "Welcome")
button1 = Button( root, text = "Exit")
button3 = Button( root, text = "Start")
button2 = Button( root, text = "Reset")
button1_canvas = canvas1.create_window( 100, 10,
anchor = "nw",
window = button1)
button2_canvas = canvas1.create_window( 100, 40,
anchor = "nw",
window = button2)
button3_canvas = canvas1.create_window( 100, 70, anchor = "nw",
window = button3)
root.mainloop()
|
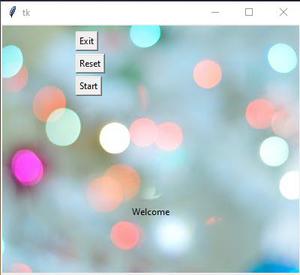
Output:
Share your thoughts in the comments
Please Login to comment...