Gun Detection using Python-OpenCV
Last Updated :
01 Jun, 2023
Gun Detection using Object Detection is a helpful tool to have in your repository. It forms the backbone of many fantastic industrial applications. We can use this project for real threat detection in companies or organizations.
Prerequisites: Python OpenCV
OpenCV(Open Source Computer Vision Library) is a highly optimized library with a focus on Real-Time Applications.
Approach for Gun Detection using OpenCV
Creation of Haarcascade file of Guns:
In OpenCV, creating a Haar cascade file involves the following steps:
Prepare positive and negative images:
- We collect positive images containing the object we want to detect and negative images that do not contain the object.
- We ensure that the positive images are annotated with bounding boxes around the objects of interest.
Create a positive samples file:
- Then we will use the positive images and their annotations to create a positive samples file. This file will contain information about the positive images and their corresponding object-bounding boxes. We can use the opencv_createsamples utility to generate the positive samples file.
Create a negative samples file:
- We will create a negative samples file that lists the paths to the negative images. This file will provide information about the images that do not contain the object.
Train the cascade classifier:
- Also, we will use the positive and negative sample files to train the cascade classifier using the opencv_traincascade utility.
- Specify various parameters like the number of stages, the desired false positive rate, and the minimum and maximum object size.
- The training process will iteratively train the cascade classifier, evaluating its performance at each stage. The training may take a significant amount of time, depending on the complexity of the object and the size of the dataset.
Evaluate the trained classifier:
- After the training is complete, we can evaluate the performance of the trained cascade classifier on a separate test dataset.
- Also, we can adjust the parameters and retrain if necessary to improve the detection accuracy is needed.
Use the trained Haar cascade file:
- Once the training is successful, we will have a trained Haar cascade XML file.
- We can load this file using the cv2.CascadeClassifier class in OpenCV and use it to detect the object of interest in images or video streams.
It’s important to note that training a Haar cascade classifier requires a significant amount of positive and negative samples, careful parameter tuning, and computational resources. For the simplicity of this project, we have already our cascade file.
Note: For The Gun haar cascade created – click here.
Python Code for Detection of Guns using OpenCV
OpenCV comes with a trainer as well as a detector. If you want to train your own classifier for any object like a car, plane, etc. We can use OpenCV to create one. Here we are only dealing with the detection of Guns.
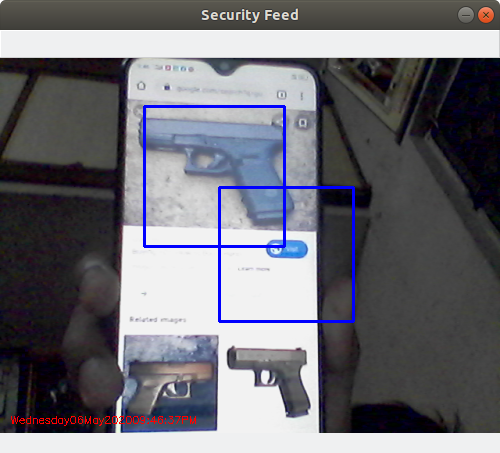
First, we need to load the required XML classifiers. Then load our input image (or video) in grayscale mode. Now we find the guns in the image. If guns are found, it returns the positions of detected guns as Rect(x, y, w, h). Once we get these locations, we can create an ROI(Region of Interest) for the gun.
Python3
import numpy as np
import cv2
import imutils
import datetime
gun_cascade = cv2.CascadeClassifier('cascade.xml')
camera = cv2.VideoCapture(0)
firstFrame = None
gun_exist = False
while True:
ret, frame = camera.read()
if frame is None:
break
frame = imutils.resize(frame, width=500)
gray = cv2.cvtColor(frame, cv2.COLOR_BGR2GRAY)
gun = gun_cascade.detectMultiScale(gray, 1.3, 20, minSize=(100, 100))
if len(gun) > 0:
gun_exist = True
for (x, y, w, h) in gun:
frame = cv2.rectangle(frame, (x, y), (x + w, y + h), (255, 0, 0), 2)
roi_gray = gray[y:y + h, x:x + w]
roi_color = frame[y:y + h, x:x + w]
if firstFrame is None:
firstFrame = gray
continue
cv2.putText(frame, datetime.datetime.now().strftime("%A %d %B %Y %I:%M:%S %p"),
(10, frame.shape[0] - 10),
cv2.FONT_HERSHEY_SIMPLEX,
0.35, (0, 0, 255), 1)
if gun_exist:
print("Guns detected")
plt.imshow(frame)
break
else:
cv2.imshow("Security Feed", frame)
key = cv2.waitKey(1) & 0xFF
if key == ord('q'):
break
camera.release()
cv2.destroyAllWindows()
|
Output:

Gun detection using OpenCV
Share your thoughts in the comments
Please Login to comment...