Python | Smile detection using OpenCV
Last Updated :
04 Jan, 2023
Emotion detectors are used in many industries, one being the media industry where it is important for the companies to determine the public reaction to their products. In this article, we are going to build a smile detector using OpenCV which takes in live feed from webcam. The smile/happiness detector that we are going to implement would be a raw one, there exist many better ways to implement it.
Step # 1: First of all, we need to import the OpenCV library.
import cv2
Step #2: Include the desired haar-cascades.
Haar-cascades are classifiers that are used to detect features (of face in this case) by superimposing predefined patterns over face segments and are used as XML files. In our model, we shall use face, eye and smile haar-cascades, which after downloading need to be placed in the working directory.
All the required Haar-cascades can be found here.
Python3
face_cascade = cv2.CascadeClassifier(cv2.data.haarcascades +'haarcascade_frontalface_default.xml')
eye_cascade = cv2.CascadeClassifier(cv2.data.haarcascades +'haarcascade_eye.xml')
smile_cascade = cv2.CascadeClassifier(cv2.data.haarcascades +'haarcascade_smile.xml')
|
Step #3:
In this step, we are going to build main function which would be performing the smile detection.
- The live feed coming from the webcam/video device is processed frame by frame. We process the gray scale image, as haar-cascades work better on them.
- To detect the face, we use:
Python3
faces = face_cascade.detectMultiScale(gray, 1.3, 5)
|
- where 1.3 is the scaling factor, and 5 is the number of nearest neighbors. We can adjust these factors as per our convenience/results to improve our detector.
- Now for each subsequent face detected, we need to check for smiles.
Python3
def detect(gray, frame):
faces = face_cascade.detectMultiScale(gray, 1.3, 5)
for (x, y, w, h) in faces:
cv2.rectangle(frame, (x, y), ((x + w), (y + h)), (255, 0, 0), 2)
roi_gray = gray[y:y + h, x:x + w]
roi_color = frame[y:y + h, x:x + w]
smiles = smile_cascade.detectMultiScale(roi_gray, 1.8, 20)
for (sx, sy, sw, sh) in smiles:
cv2.rectangle(roi_color, (sx, sy), ((sx + sw), (sy + sh)), (0, 0, 255), 2)
return frame
|
Explanations –
- The face data is stored as tuples of coordinates. Here, x and y define the coordinate of the upper-left corner of the face frame, w and h define the width and height of the frame.
- The cv2.rectangle function takes in the arguments frame, upper-left coordinates of the face, lower right coordinates, the RGB code for the rectangle (that would contain within it the detected face) and the thickness of the rectangle.
- The roi_gray defines the region of interest of the face and roi_color does the same for the original frame.
- In line 7, we apply smile detection using the cascade.
Step #4:
We define main function in this step. After execution, the function can be terminated by pressing the “q” key.
Python3
video_capture = cv2.VideoCapture(0)
while video_capture.isOpened():
_, frame = video_capture.read()
gray = cv2.cvtColor(frame, cv2.COLOR_BGR2GRAY)
canvas = detect(gray, frame)
cv2.imshow('Video', canvas)
if cv2.waitKey(1) & 0xff == ord('q'):
break
video_capture.release()
cv2.destroyAllWindows()
|
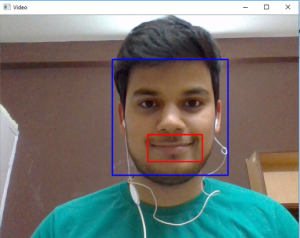
Output:
Share your thoughts in the comments
Please Login to comment...