ToDo webapp using Django
Last Updated :
24 Mar, 2023
Django is a high-level Python Web framework-based web framework that allows rapid development and clean, pragmatic design. today we will create a todo app created to understand the basics of Django. In this web app, one can create notes like Google Keep or Evernote.
Modules required: Django
Basic setup
Step 1: Start a project with the following command
django-admin startproject todo_site
Step 2: Change the directory to todo_site.
cd todo_site
To check whether the server is running or not go to a
Let’s create an app now
Step 3: Create an app with the following command.
python manage.py startapp todo
The directory structure should look like this:
Step 4: Now add the todo app in your todo_site in settings.py
Step 5: Edit urls.py file in todo_site
Python3
from django.contrib import admin
from django.urls import path
from todo import views
urlpatterns = [
path('', views.index, name="todo"),
path('del/<str:item_id>', views.remove, name="del"),
path('admin/', admin.site.urls),
]
|
Step 6: Edit models.py in todo
Python3
from django.db import models
from django.utils import timezone
class Todo(models.Model):
title = models.CharField(max_length=100)
details = models.TextField()
date = models.DateTimeField(default=timezone.now)
def __str__(self):
return self.title
|
Step 7: Edit views.py in todo
Python3
from django.shortcuts import render, redirect
from django.contrib import messages
from .forms import TodoForm
from .models import Todo
def index(request):
item_list = Todo.objects.order_by("-date")
if request.method == "POST":
form = TodoForm(request.POST)
if form.is_valid():
form.save()
return redirect('todo')
form = TodoForm()
page = {
"forms": form,
"list": item_list,
"title": "TODO LIST",
}
return render(request, 'todo/index.html', page)
def remove(request, item_id):
item = Todo.objects.get(id=item_id)
item.delete()
messages.info(request, "item removed !!!")
return redirect('todo')
|
Step 8: Now create a forms.py in todo
Python3
from django import forms
from .models import Todo
class TodoForm(forms.ModelForm):
class Meta:
model = Todo
fields = "__all__"
|
Step 9: Register models to admin
Step 10: Create templates/todo/index.html
HTML
<!DOCTYPE html>
<html lang="en" dir="ltr">
<head>
<meta charset="utf-8">
<title>{{title}}</title>
<meta name="viewport" content="width=device-width, initial-scale=1">
<style>
.card {
box-shadow: 0 4px 8px 0 rgba(0,0,0,0.5),
0 6px 20px 0 rgba(0,0,0,0.39);
background: lightpink;
margin-bottom : 5%;
border-radius: 25px;
padding : 2%;
overflow: auto;
resize: both;
text-overflow: ellipsis;
}
.card:hover{
background: lightblue;
}
.submit_form{
text-align: center;
padding: 3%;
background: pink;
border-radius: 25px;
box-shadow: 0 4px 8px 0 rgba(0,0,0,0.4),
0 6px 20px 0 rgba(0,0,0,0.36);
}
</style>
</head>
<body class="container-fluid">
{% if messages %}
{% for message in messages %}
<div class="alert alert-info">
<strong>{{message}}</strong>
</div>
{% endfor %}
{% endif %}
<center class="row">
<h1><i>__TODO LIST__</i></h1>
<hr />
</center>
<div class="row">
<div class="col-md-8">
{% for i in list %}
<div class="card">
<center><b>{{i.title}}</b></center>
<hr/>
{{i.date}}
<hr/>
{{i.details}}
<br />
<br />
<form action="/del/{{i.id}}" method="POST" style=" padding-right: 4%; padding-bottom: 3%;">
{% csrf_token %}
<button value="remove" type="submit" class="btn btn-primary" style="float: right;"><span class="glyphicon glyphicon-trash"></span> remove</button>
</form>
</div>
{% endfor%}
</div>
<div class="col-md-1"> </div>
<div class="col-md-3" >
<div class="submit_form">
<form method="POST">
{% csrf_token %}
{{forms}}
<center>
<input type="submit" class="btn btn-default" value="submit" />
</center>
</form>
</div>
</div>
</div>
</body>
</html>
|
Step 11: Migrations Files to the Database
python manage.py makemigrations
python manage.py migrate
Step 12: Start the server by typing the following command in the terminal
python manage.py runserver
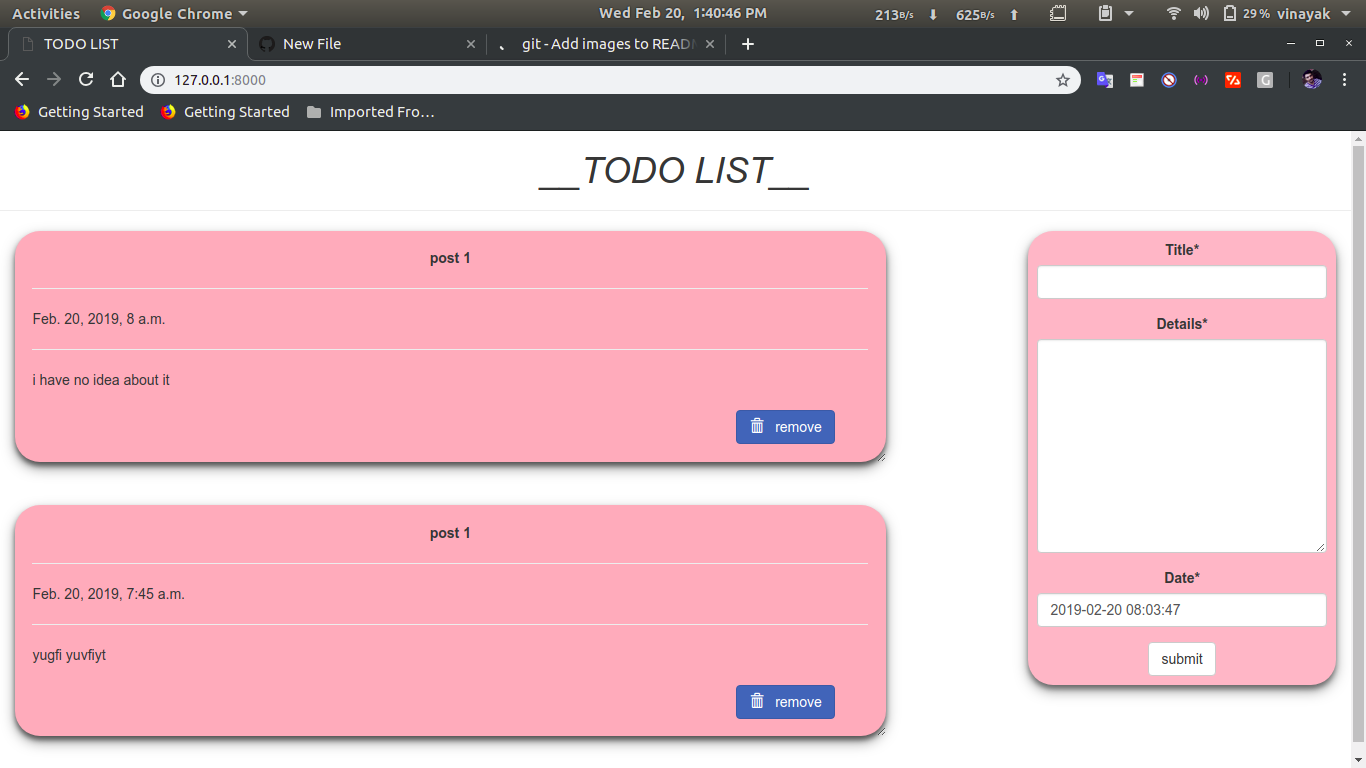
Output:
Open the web browser and enter http://127.0.0.1:8000/ as the URL.
Share your thoughts in the comments
Please Login to comment...