Python | How to use Multiple kv files in kivy
Last Updated :
07 Feb, 2020
Kivy is a platform independent GUI tool in Python. As it can be run on Android, IOS, linux and Windows etc. It is basically used to develop the Android application, but it does not mean that it can not be used on Desktops applications.
In this article, we will see how can we use multiple .kv files in a single Application .
This is the Python program, which uses GridLayout as the root widget. In addition to the main kv file, it loads box1.kv, box2.kv and box3.kv. There are also 2 application variables. These variables are referenced from the main kv file.
👉🏽 Kivy Tutorial – Learn Kivy with Examples.
Basic Approach:

1) import kivy
2) import kivyApp
3) import Gridlayout
4) import Builder
5) Set minimum version(optional)
6) Create Layout class
7) Create App class
8) Set up multiple .kv file
9) return Layout/widget/Class(according to requirement)
10) Run an instance of the class
main.py file of the implementation:
import kivy
from kivy.app import App
from kivy.uix.gridlayout import GridLayout
from kivy.lang import Builder
Builder.load_file('box1.kv')
Builder.load_file('box2.kv')
Builder.load_file('box3.kv')
class main_kv(GridLayout):
pass
class MainApp(App):
def build(self):
self.x = 150
self.y = 400
return main_kv()
if __name__=='__main__':
MainApp().run()
|
The main kv file contains a GridLayout with 3 columns. These 3 Columns contains different AnchorLayouts. These all are defined in the main.kv file.
Now the main.kv file:
<main_kv>:
cols: 3
AnchorLayout:
anchor_x: 'left'
anchor_y: 'center'
canvas:
Color:
rgb: [1, 0, 0]
Rectangle:
pos: self.pos
size: self.size
Box1:
size_hint: [None, None]
size: [app.x, app.y]
AnchorLayout:
anchor_x: 'center'
anchor_y: 'center'
canvas:
Color:
rgb: [0, 1, 0]
Rectangle:
pos: self.pos
size: self.size
Box2:
size_hint: [None, None]
size: [app.x, app.y]
AnchorLayout:
anchor_x: 'right'
anchor_y: 'center'
canvas:
Color:
rgb: [0, 0, 1]
Rectangle:
pos: self.pos
size: self.size
Box3:
size_hint: [None, None]
size: [app.x, app.y]
|
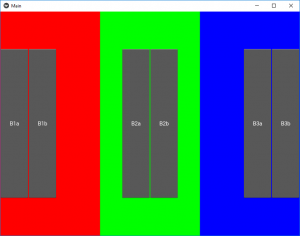
Now as shown in the Outputs there are different buttons in each grid to create Buttons
in every grid we are using Different .kv files.
box1.kv file –
<Box1@BoxLayout>:
Button:
text: 'B1a'
Button:
text: 'B1b'
|
box2.kv file –
<Box2@BoxLayout>:
Button:
text: 'B2a'
Button:
text: 'B2b'
|
box3.kv file –
<Box3@BoxLayout>:
Button:
text: 'B3a'
Button:
text: 'B3b'
|
Output :
Share your thoughts in the comments
Please Login to comment...