Python | Relative Layout in Kivy
Last Updated :
09 Dec, 2021
Kivy is a platform-independent GUI tool in Python. As it can be run on Android, IOS, Linux and Windows, etc. It is basically used to develop the Android application, but it does not mean that it can not be used on Desktop applications.
Kivy Tutorial – Learn Kivy with Examples.
Relative Layout:
- Relative layout is just similar to the FloatLayout the difference is that its child widget are positioned relative to the layout.
- This layout operates in the same way as FloatLayout does, but the positioning properties (x, y, center_x, right, y, center_y, and top) are relative to the Layout size and not the window size.
- In reality, regardless of absolute and relative positioning, the widgets are moved when the position of the layout changes.
- When the widget with position=(0, 0) is added to RelativeLayout, Now if the position of RelativeLayout is changed the child widget will also move. The Child widget coordinates remains same i.e (0, 0) as they are always relative to the parent layout.
- The available pos_hint keys (x, center_x, right, y, center_y, and top) are useful for aligning to edges or centering.
For example:
pos_hint: {‘center_x’:.5, ‘center_y’:.5} would align a Widget in the middle, no matter what the size of the window is.
The first thing we need to do to use a RelativeLayout is to import it.
from kivy.uix.relativelayout import RelativeLayout
Note:
This layout allows you to set relative coordinates for children. If you want absolute positioning, use the FloatLayout. In RelativeLayout each child widget size and position has to be given. This also does the dynamic placement.
We can do relative positioning by:
pos_hint: provide hint of position
We can define upto 8 keys i.e. it takes arguments in form of dictionary.
pos_hint = {“x”:1, “y”:1, “left”:1, “right”:1, "center_x":1, "center_y":1,
           “top”:1, “bottom”:1("top":0)}
Note:
Floatlayout and RelativeLayout both support absolute and relative positioning depending upon whether pos_hint or pos is used. But If you want absolute positioning, use the FloatLayout.
Basic Approach to create Relative Layout:

1) import kivy
2) import kivyApp
3) import button
4) import Relativelayout
5) Set minimum version(optional)
6) create App class:
        - define build() function
7) return Layout/widget/Class(according to requirement)
8) Run an instance of the class
Implementation of approach using pos :
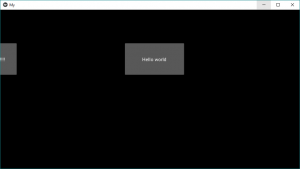
It simply assigns the position to the button. As Relativelayout does not depends on the window size it gets fixed to that position now if you do the window size small it may disappear rather than adjusting itself.
Python3
import kivy
from kivy.app import App
from kivy.uix.button import Button
from kivy.uix.relativelayout import RelativeLayout
from kivy.config import Config
Config.set('graphics', 'resizable', True)
class MyApp(App):
def build(self):
Rl = RelativeLayout()
btn = Button(text ='Hello world',
size_hint =(.2, .2),
pos =(396.0, 298.0))
btn1 = Button(text ='Hello world !!!!!!!!!',
size_hint =(.2, .2),
pos =(-137.33, 298.0))
Rl.add_widget(btn)
Rl.add_widget(btn1)
return Rl
if __name__ == "__main__":
MyApp().run()
|
Output:
Now if you want that the button adjusts itself according to window pos_hint is used.
Implementation Approach by using pos_hint
Python3
import kivy
from kivy.app import App
from kivy.uix.button import Button
from kivy.uix.relativelayout import RelativeLayout
from kivy.config import Config
Config.set('graphics', 'resizable', True)
class Relative_Layout(App):
def build(self):
rl = RelativeLayout()
b1 = Button(size_hint =(.2, .2),
pos_hint ={'x':0, 'y':0},
text ="B1")
b2 = Button(size_hint =(.2, .2),
pos_hint ={'right':1, 'y':0},
text ="B2")
b3 = Button(size_hint =(.2, .2),
pos_hint ={'center_x':.5, 'center_y':.5},
text ="B3")
b4 = Button(size_hint =(.2, .2),
pos_hint ={'x':0, 'top':1},
text ="B4")
b5 = Button(size_hint =(.2, .2),
pos_hint ={'right':1, 'top':1},
text ="B5")
rl.add_widget(b1)
rl.add_widget(b2)
rl.add_widget(b3)
rl.add_widget(b4)
rl.add_widget(b5)
return rl
if __name__ == "__main__":
Relative_Layout().run()
|
Output:

Share your thoughts in the comments
Please Login to comment...