Open In App

Python | BoxLayout widget in Kivy

Improve
Improve
Like Article
Like
Save
Share
Report

Kivy is a platform independent GUI tool in Python. As it can be run on Android, IOS, Linux and Windows, etc. It is basically used to develop the Android application, but it does not mean that it can not be used on Desktops applications.
 

???????? Kivy Tutorial – Learn Kivy with Examples.

Now in this article, we will learn about the use of BoxLayout widget in kivy and how to add some features like color, size etc to it.
BoxLayout: 
BoxLayout arranges widgets in either in a vertical fashion that is one on top of another or in a horizontal fashion that is one after another. When you will not provide any size-hint then the child widgets divides the size of its parent widget equally or accordingly.
 

Basic Approach to follow while creating button : 
1) import kivy 
2) import kivyApp 
3) import BoxLayout 
4) set minimum version(optional) 
5) Add widgets 
6) Extend the class 
7) Return layout 
8) Run an instance of the class

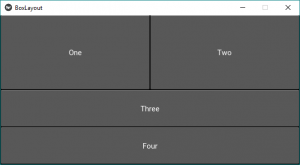
Below is the code to use BoxLayout: 
 

Python3


# code to show how to use nested boxlayouts.
 
# import kivy module
import kivy
   
# this restricts the kivy version i.e
# below this kivy version you cannot
# use the app or software
kivy.require("1.9.1")
   
# base Class of your App inherits from the App class.
# app:always refers to the instance of your application
from kivy.app import App
   
# creates the button in kivy
# if not imported shows the error
from kivy.uix.button import Button
 
# BoxLayout arranges children in a vertical or horizontal box.
# or help to put the children at the desired location.
from kivy.uix.boxlayout import BoxLayout
   
# class in which we are creating the button by using boxlayout
# defining the App class
class BoxLayoutApp(App):
       
    def build(self):
 
        # To position oriented widgets again in the proper orientation
        # use of vertical orientation to set all widgets 
        superBox = BoxLayout(orientation ='vertical')
 
        # To position widgets next to each other,
        # use a horizontal BoxLayout.
        HB = BoxLayout(orientation ='horizontal')
         
        btn1 = Button(text ="One")
        btn2 = Button(text ="Two")
 
        # HB represents the horizontal boxlayout orientation
        # declared above
        HB.add_widget(btn1)
        HB.add_widget(btn2)
 
        # To position widgets above/below each other,
        # use a vertical BoxLayout.
        VB = BoxLayout(orientation ='vertical')
 
        btn3 = Button(text ="Three")
        btn4 = Button(text ="Four")
 
        # VB represents the vertical boxlayout orientation
        # declared above
        VB.add_widget(btn3)
        VB.add_widget(btn4)
 
        # superbox used to again align the oriented widgets
        superBox.add_widget(HB)
        superBox.add_widget(VB)
 
        return superBox
 
# creating the object root for BoxLayoutApp() class 
root = BoxLayoutApp()
   
# run function runs the whole program
# i.e run() method which calls the
# target function passed to the constructor.
root.run()


Output: 


Some modification like add colour, fix size in Box layout widget: 
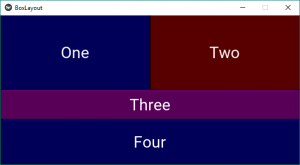
 

Python3


# code to show how to use nested boxlayouts.
 
# import kivy module
import kivy
 
# to choose the colors randomly
# every time you run it shows different color
import random 
 
# this restricts the kivy version i.e
# below this kivy version you cannot
# use the app or software
kivy.require("1.9.1")
   
# base Class of your App inherits from the App class.
# app:always refers to the instance of your application
from kivy.app import App
   
# creates the button in kivy
# if not imported shows the error
from kivy.uix.button import Button
 
# BoxLayout arranges children in a vertical or horizontal box.
# or help to put the children at the desired location.
from kivy.uix.boxlayout import BoxLayout
 
# declaring the colours you can use directly also
red = [1, 0, 0, 1]
green = [0, 1, 0, 1]
blue =  [0, 0, 1, 1]
purple = [1, 0, 1, 1]
   
# class in which we are creating the button
class BoxLayoutApp(App):
       
    def build(self):
 
        # To position oriented widgets again in the proper orientation
        # use of vertical orientation to set all widgets 
        superBox = BoxLayout(orientation ='vertical')
 
        # To position widgets next to each other,
        # use a horizontal BoxLayout.
        HB = BoxLayout(orientation ='horizontal')
 
        colors = [red, green, blue, purple]
         
        # styling the button boxlayout
        btn1 = Button(text ="One",
                      background_color = random.choice(colors),
                      font_size = 32,
                      size_hint =(0.7, 1))
        btn2 = Button(text ="Two",
                      background_color = random.choice(colors),
                      font_size = 32,
                      size_hint =(0.7, 1))
 
        # HB represents the horizontal boxlayout orientation
        # declared above
        HB.add_widget(btn1)
        HB.add_widget(btn2)
 
        # To position widgets above/below each other,
        # use a vertical BoxLayout.
        VB = BoxLayout(orientation ='vertical')
 
        btn3 = Button(text ="Three",
                      background_color = random.choice(colors),
                      font_size = 32,
                      size_hint =(1, 10))
        btn4 = Button(text ="Four",
                      background_color = random.choice(colors),
                      font_size = 32,
                      size_hint =(1, 15))
 
        # VB represents the vertical boxlayout orientation
        # declared above
        VB.add_widget(btn3)
        VB.add_widget(btn4)
 
        # superbox used to again align the oriented widgets
        superBox.add_widget(HB)
        superBox.add_widget(VB)
 
        return superBox
 
# creating the object root for BoxLayoutApp() class 
root = BoxLayoutApp()
   
# run function runs the whole program
# i.e run() method which calls the
# target function passed to the constructor.
root.run()


Output:
Picture1: 
 

Picture2: 
 

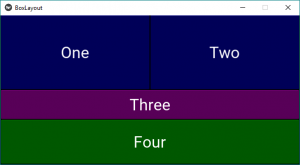
Note: Every time you run the code it provides you the different color outputs as in the pictures.


Last Updated : 19 Oct, 2021
Like Article
Save Article
Previous
Next
Share your thoughts in the comments
Similar Reads