Python | Slider widget in Kivy
Last Updated :
29 Jun, 2021
Kivy is a platform independent GUI tool in Python. As it can be run on Android, IOS, linux and Windows etc. It is basically used to develop the Android application, but it does not mean that it can not be used on Desktops applications.
???????? Kivy Tutorial – Learn Kivy with Examples.
Slider:
To work with the slider you first have to import the module which consists all features, functions of the slider i.e.
Module: kivy.uix.slider
The Slider widget looks like same we are using in android to increase the brightness, volume etc. It supports horizontal and vertical orientations, min/max values and a default value. Kivy supports several slider widget options for customizing the cursor, cursor image, border, background to be used in different orientations, region between the minimum value and the maximum value.
Kivy also supports to deal in term of Normalized value (range 0 to 1) rather than the real ranges supported by the slider.
Basic Approach to follow while creating Slider :
1) import kivy
2) import kivy App
3) import gridlayout(not compulsory according to need)
4) import Label(not compulsory according to need)
5) import Slider
6) import Numeric property
7) set minimum version(optional)
8) Extend the class
9) Add and return a widget
10) Run an instance of the class
Below is the code implementing slider:
Python3
import kivy
kivy.require("1.9.1")
from kivy.app import App
from kivy.uix.gridlayout import GridLayout
from kivy.uix.slider import Slider
from kivy.uix.label import Label
from kivy.properties import NumericProperty
class WidgetContainer(GridLayout):
def __init__(self, **kwargs):
super(WidgetContainer, self).__init__(**kwargs)
self.cols = 4
self.brightnessControl = Slider(min = 0, max = 100)
self.add_widget(Label(text ='brightness'))
self.add_widget(self.brightnessControl)
self.add_widget(Label(text ='Slider Value'))
self.brightnessValue = Label(text ='0')
self.add_widget(self.brightnessValue)
self.brightnessControl.bind(value = self.on_value)
def on_value(self, instance, brightness):
self.brightnessValue.text = "% d"% brightness
class SliderExample(App):
def build(self):
widgetContainer = WidgetContainer()
return widgetContainer
root = SliderExample()
root.run()
|
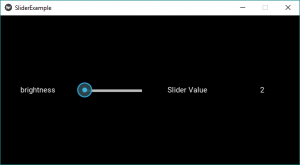
Output:
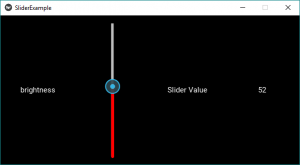
To add some styling and coloring to the slider, just replace the line no 42 with the below and add some new features also if you want. For text, styling uses the proper commands in text portion.
Python3
self.brightnessControl = Slider(min = 0, max = 100,
orientation ='vertical',
value_track = True,
value_track_color =[1, 0, 0, 1])
|
Output:
Video to explain how slider works –
Share your thoughts in the comments
Please Login to comment...