Python | StackLayout in Kivy
Last Updated :
25 Aug, 2021
Kivy is a platform independent GUI tool in Python. As it can be run on Android, IOS, linux and Windows etc. It is basically used to develop the Android application, but it does not mean that it can not be used on Desktops applications.
???????? Kivy Tutorial – Learn Kivy with Examples.
StackLayout:
To use StackLayout first import StackLayout by below command:
from kivy.uix.stacklayout import StackLayout
It is quite confusing to understand the difference between Stack and Boxlayout.
StackLayout can organize widgets with more complexity than BoxLayout Boxlayout can organize widgets either in a vertical or horizontal way. But with the StackLayout, you can combine the orientations. There are 4 row-wise and 4 column wise orientations.
More flexible that Boxlayout(1D)

StackLayout Orientation (2D):
 - right to left or left to right
 - top to bottom or bottom to top
 - 'rl-bt', 'rl-tb', lr-bt', 'lr-tb'(Row wise)
 - 'bt-rl', 'bt-lr', 'tb-rl', 'tb-lr'(Column wise)
The four row-wise orientations and four column-wise orientation are shown in below pictures.
Basic Approach to create Stack layout :

1) import kivy
2) import kivyApp
3) import Button
4) import Stacklayout
5) Set minimum version(optional)
6) create App class
7) return widget
8) Run an instance of the class
Implementation of the Approach:
Python3
import kivy
kivy.require("1.9.1")
from kivy.app import App
from kivy.uix.button import Button
from kivy.uix.stacklayout import StackLayout
class StackLayoutApp(App):
def build(self):
'lr-bt', 'bt-lr', 'rl-bt', 'bt-rl']
SL = StackLayout(orientation ='lr-tb')
btn1 = Button(text ="B1",
font_size = 20,
size_hint =(.2, .1))
btn2 = Button(text ="B2",
font_size = 20,
size_hint =(.2, .1))
btn3 = Button(text ="B3",
font_size = 20,
size_hint =(.2, .1))
btn4 = Button(text ="B4",
font_size = 20,
size_hint =(.2, .1))
btn5 = Button(text ="B5",
font_size = 20,
size_hint =(.2, .1))
btn6 = Button(text ="B6",
font_size = 20,
size_hint =(.2, .1))
btn7 = Button(text ="B7",
font_size = 20,
size_hint =(.2, .1))
btn8 = Button(text ="B8",
font_size = 20,
size_hint =(.2, .1))
btn9 = Button(text ="B9",
font_size = 20,
size_hint =(.2, .1))
btn10 = Button(text ="B10",
font_size = 20,
size_hint =(.2, .1))
SL.add_widget(btn1)
SL.add_widget(btn2)
SL.add_widget(btn3)
SL.add_widget(btn4)
SL.add_widget(btn5)
SL.add_widget(btn6)
SL.add_widget(btn7)
SL.add_widget(btn8)
SL.add_widget(btn9)
SL.add_widget(btn10)
return SL
if __name__ == '__main__':
StackLayoutApp().run()
|
Output:
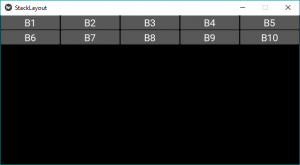
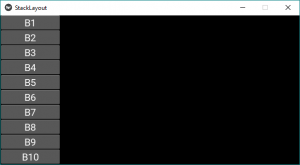
This is for the orientation ‘lr-tb’. First the widgets are added left-to-right and then top-to-bottom.
Note: If want to change orientation, just change the orientation in line no 31 with any of the below orientations –
For row wise orientation use:
  -'lr-tb'
  -'lr-bt'
  -'rl-tb'
  -'rl-bt'

For column wise orientation use:
  -'tb-lr'
  -'tb-rl'
  -'bt-lr'
  -'bt-rl'
Below there are picture output all the orientations above –
For row wise orientation use:
'lr-tb'
Output:
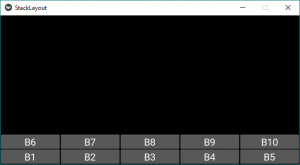
'lr-bt'
Output:
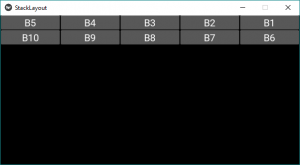
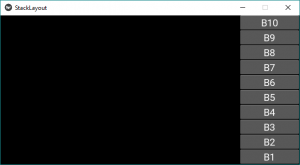
'rl-tb'
Output:
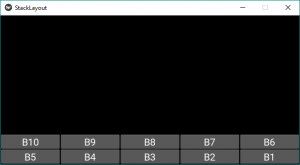
'rl-bt'
Output:
For column wise orientation use:
'tb-lr'
Output:
'tb-rl'
Output:

'bt-lr'
Output:

'bt-rl'
Output:
Share your thoughts in the comments
Please Login to comment...