Python | Float Layout in Kivy
Last Updated :
25 Oct, 2021
Kivy is a platform independent GUI tool in Python. As it can be run on Android, IOS, linux and Windows etc. It is basically used to develop the Android application, but it does not mean that it can not be used on Desktops applications.
👉🏽 Kivy Tutorial – Learn Kivy with Examples.
FloatLayout:
Floatlayout allows us to place the elements relatively based on the current window size and height especially in mobiles i.e. Floatlayout allow us to place the elements using something called relative position. This means rather than defining the specific position or the coordinates we will place everything using the percentage w.r.t the size of window. When we change the dimensions of the window everything placed in the window will adjust its size and position accordingly. This makes the Application more reliable and scalable to window size.
Note: FloatLayout honors the pos_hint and the size_hint properties of its children.
The first thing we need to do to use a FloatLayout is import it.
from kivy.uix.floatlayout import FloatLayout
Basic Approach:

1) import kivy
2) import kivyApp
3) import button
4) import Floatlayout
5) Set minimum version(optional)
6) create App class
7) return Layout/widget/Class(according to requirement)
8) Run an instance of the class
For example, a FloatLayout with a size of (300, 300) is created:
layout = FloatLayout(size=(300, 300))
By default, all widgets have their size_hint = (1, 1), so this below button will adopt the same size as the layout:
button = Button(text='Hello world')
layout.add_widget(button)
To create a button having a specific width and height of layout placed at a particular position you can do like below –
Implementation of the Approach:
Python3
import kivy
from kivy.app import App
from kivy.uix.button import Button
from kivy.uix.floatlayout import FloatLayout
from kivy.config import Config
Config.set('graphics', 'resizable', True)
class MyApp(App):
def build(self):
Fl = FloatLayout()
btn = Button(text ='Hello world',
size_hint =(.3, .2),
pos =(300, 200))
Fl.add_widget(btn)
return Fl
if __name__ == "__main__":
MyApp().run()
|
Output: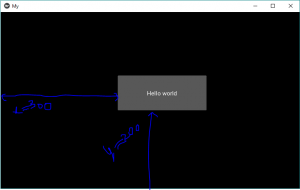
Note: Now if you change the size of window, it changes its position relatively and size also. This layout can be used for an application. Most of the time, you will use the size of the Window.
Dynamic Placements –
Now there is something missing or the above code is not perfect you can say. We still need to add the placement for the buttons.
We have 2 properties to create dynamic placement:
1) pos_hint: provide hint of position
We can define upto 6 keys i.e. it takes arguments in form of dictionary.
pos_hint = {“x”:1, “y”:1, “left”:1, “right”:1, “top”:1, “bottom”:1}
2) size_hint: provide hint of size
Contains two arguments i.e. width and height
Note:
- You can only use values between 0-1 for both size_hint and pos_hint. Where 0 = 0% and 1 = 100%.
- The coordinate system in kivy works from the bottom left! This will be important when placing our objects. (i.e (0, 0) is the bottom left).
Code to implement dynamic positioning:
Python3
import kivy
from kivy.app import App
from kivy.uix.button import Button
from kivy.uix.floatlayout import FloatLayout
from kivy.config import Config
Config.set('graphics', 'resizable', True)
class MyApp(App):
def build(self):
Fl = FloatLayout()
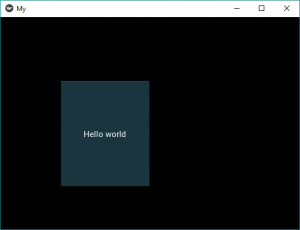
btn = Button(text ='Hello world', size_hint =(.3, .5),
background_color =(.3, .6, .7, 1),
pos_hint ={'x':.2, 'y':.2 })
Fl.add_widget(btn)
return Fl
if __name__ == "__main__":
MyApp().run()
|
Output:
Video Output:
Reference:
https://kivy.org/doc/stable/api-kivy.uix.floatlayout.html
https://techwithtim.net/tutorials/kivy-tutorial/floatlayout/
Share your thoughts in the comments
Please Login to comment...