Python | Adding image in Kivy using .kv file
Last Updated :
18 Apr, 2023
Kivy is a platform independent GUI tool in Python. As it can be run on Android, IOS, linux, and Windows, etc. It is basically used to develop the Android application, but it does not mean that it can not be used on Desktops applications.
Kivy Tutorial – Learn Kivy with Examples.
Image Widget:
The Image widget is used to display an image. To use the image widget you must have to import :
from kivy.uix.image import Image, AsyncImage (not necessary while working with .kv file)
because the module kivy.uix.image have all the functionality related to images.
Images can be loaded to the Application via two types:
1) Synchronous Loading: Loading image from the system (must be from the folder in which .py and .kv file is saved)
2) Asynchronous Loading: To load an image asynchronously (for example from an external webserver)
Note: By default, the image is centered and fits inside the widget bounding box. If you don’t want that, you can set allow_stretch to True and keep_ratio to False.
Basic Approach to create multiple layout in one file:
1) import kivy
2) import kivyApp
3) import image
4) import BoxLayout
5) set minimum version(optional)
6) Create the Layout class
7) Create App class
8) Create .kv file:
          1) Add BoxLayout
          2) Add Label
          3) Add Image
          4) Resizing, Positioning etc of Image
9) return instance of the layout class
10) Run an instance of the class
So in the below code, we will explain How to load Synchronous and Asynchronous images. Also How to resize, Positioning, Label, etc the image with some more stuff.
.py file –
Python3
import kivy
from kivy.app import App
kivy.require('1.9.0')
from kivy.uix.boxlayout import BoxLayout
from kivy.config import Config
Config.set('graphics', 'resizable', True)
class Imagekv(BoxLayout):
pass
class MyApp(App):
def build(self):
return Imagekv()
if __name__ == '__main__':
MyApp().run()
|
.kv file implementation –
Python3
<Imagekv>:
orientation:'vertical'
BoxLayout:
padding:5
Image:
source: 'download.jpg'
size_hint_x: 0.4
allow_stretch: True
Label:
text:"Python"
font_size:11
bold:True
Label:
text:"Programming Language"
font_size:10
Label:
canvas.before:
Color:
rgba: (1, 1, 1, 1)
Rectangle:
size: self.size
pos: self.pos
size_hint_y: None
height: 1
BoxLayout:
padding:5
Image:
source:"downloading.jpg"
size_hint_x: 0.4
allow_stretch: True
Label:
text:"Image"
font_size:11
bold:True
Label:
text:"Python Image"
font_size:10
Label:
canvas.before:
Color:
rgba: (1, 1, 1, 1)
Rectangle:
size: self.size
pos: self.pos
size_hint_y: None
height: 1
BoxLayout:
padding:5
AsyncImage:
width: 100
allow_stretch: True
Label:
text:" Asynchronous Image "
font_size:11
bold:True
Label:
text:"Kivy Logo"
font_size:10
Label:
canvas.before:
Color:
rgba: (1, 1, 1, 1)
Rectangle:
size: self.size
pos: self.pos
size_hint_y: None
height: 1
BoxLayout:
padding:5
AsyncImage:
size_hint_y: None
width: 100
allow_stretch: True
Label:
text:"Asynchronous Image "
font_size:11
bold:True
Label:
text:" Webserver image "
font_size:10
|
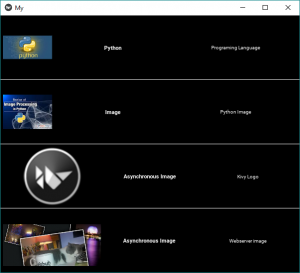
Output:
Share your thoughts in the comments
Please Login to comment...