How to use multiple UX Widgets in kivy | Python
Last Updated :
19 Oct, 2021
Kivy is a platform-independent GUI tool in Python. As it can be run on Android, IOS, linux and Windows etc. It is basically used to develop the Android application, but it does not mean that it can not be used on Desktops applications.
???????? Kivy Tutorial – Learn Kivy with Examples.
UX Widgets:
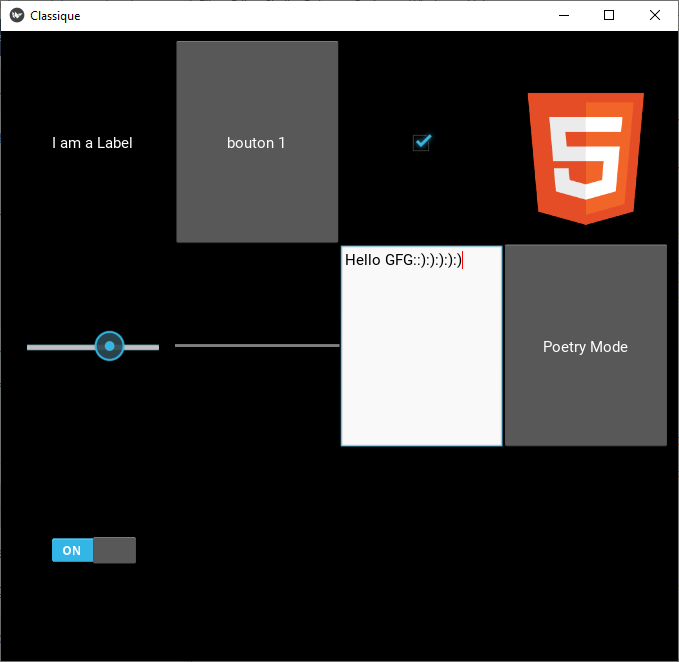
Classical user interface widgets, ready to be assembled to create more complex widgets. There are multiple UX Widgets such as Label, Button, CheckBox, Image, Slider, Progress Bar, Text Input, Toggle button, Switch.
- Label: The Label widget is for rendering text. It supports ascii and unicode strings.
- Button: The Button is a Label with associated actions that are triggered when the button is pressed (or released after a click/touch).
- CheckBox: CheckBox is a specific two-state button that can be either checked or unchecked.
- Image: The Image widget is used to display an image.
- Slider: The Slider widget looks like a scrollbar. It supports horizontal and vertical orientations, min/max values and a default value.
- Progress Bar: ProgressBar widget is used to visualize the progress of some task.
- TextInput: The TextInput widget provides a box for editable plain text.
- Toggle Button: The ToggleButton widget acts like a checkbox. When you touch or click it, the state toggles between ‘normal’ and ‘down’ (as opposed to a Button that is only ‘down’ as long as it is pressed).
- Switch: The Switch widget is active or inactive, like a mechanical light switch.
Here, we are going to use almost all these UX widgets So that you can understand how to use them in a single code.
Basic Approach:
1) import kivy
2) import kivyApp
3) import window
4) Set minimum version(optional)
5) Create the App class
6) Create the .kv file
7) Make the run method/ run the App
Implementation of the Approach:
.py file:
Python3
import kivy
from kivy.app import App
kivy.require('1.9.0')
from kivy.core.window import Window
Window.size = (1120, 630)
class ClassiqueApp(App):
def build(FloatLayout):
pass
if __name__ == '__main__':
ClassiqueApp().run()
|
.kv file:
Python3
GridLayout:
cols: 4
rows: 3
padding: 10
Label:
text: "I am a Label"
Button:
text: "button 1"
CheckBox:
active: True
Image:
source: 'html.png'
Slider:
min: -100
max: 100
value: 25
ProgressBar:
min: 50
max: 100
TextInput:
text: "Enter the text"
ToggleButton:
text: " Poetry Mode "
Switch:
active: True
|
Output:
Share your thoughts in the comments
Please Login to comment...