Python | Switch widget in Kivy using .kv file
Last Updated :
19 Oct, 2021
Kivy is a platform independent GUI tool in Python. As it can be run on Android, IOS, linux and Windows etc. It is basically used to develop the Android application, but it does not mean that it can not be used on Desktops applications.
???????? Kivy Tutorial – Learn Kivy with Examples.
Switch widget:
The Switch widget is active or inactive, as a mechanical light switch. The user can swipe to the left/right to activate/deactivate it.
The value represented by the switch is either True or False. That is the switch can be either in On position or Off position.
To work with Switch you must have to import:
from kivy.uix.switch import Switch
Attaching Callback to Switch:
- A switch can be attached with a call back to retrieve the value of the switch.
- The state transition of a switch is from either ON to OFF or OFF to ON.
- When switch makes any transition the callback is triggered and new state can be retrieved i.e came and any other action can be taken based on the state.
- By default, the representation of the widget is static. The minimum size required is 83*32 pixels.
- The entire widget is active, not just the part with graphics. As long as you swipe over the widget’s bounding box, it will work.
Basic Approach:

1) import kivy
2) import kivyApp
3) import Switch
4) import Gridlayout
5) import Label
6) Set minimum version(optional)
7) create Layout class(In this you create a switch):
        --> define the callback of the switch in this
8) create App class
9) create .kv file (name same as the app class):
        1) create boxLayout
        2) Give Label
        3) Create Switch
        4) Bind a callback if needed
10) return Layout/widget/Class(according to requirement)
11) Run an instance of the class
Below is the Implementation:
We have explained how to create button, attach a callback to it and how to disable a button after making it active/inactive.
main.py file:
Python3
import kivy
from kivy.app import App
kivy.require('1.9.0')
from kivy.uix.switch import Switch
from kivy.uix.gridlayout import GridLayout
from kivy.uix.label import Label
class SimpleSwitch(GridLayout):
rows = 4
def switch_callback(self, switchObject, switchValue):
if(switchValue):
print('Switch is ON:):):)')
else:
print('Switch is OFF:(:(:(')
class SwitchApp(App):
def build(self):
return SimpleSwitch()
if __name__ == '__main__':
SwitchApp().run()
|
.kv file : in this we have done the callbacks and done the button disable also.
Python3
<SimpleSwitch>:
BoxLayout:
size_hint_y: None
height: '48dp'
Label:
text: 'Switch normal'
Switch:
active: False
on_active: root.switch_callback(self, self.active)
BoxLayout:
size_hint_y: None
height: '48dp'
Label:
text: 'Switch active'
Switch:
active: True
on_active: root.switch_callback(self, self.active)
BoxLayout:
size_hint_y: None
height: '48dp'
Label:
text: 'Switch off & disabled'
Switch:
disabled: True
active: False
BoxLayout:
size_hint_y: None
height: '48dp'
Label:
text: 'Switch on & disabled'
Switch:
disabled: True
active: True
|
Output:
Image 1:

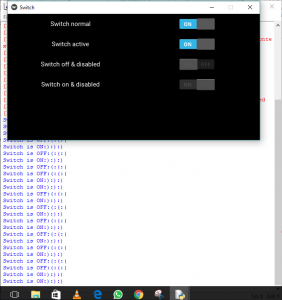
Image 2:
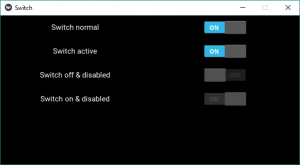
Image to show callbacks:
Like Article
Suggest improvement
Share your thoughts in the comments
Please Login to comment...