GridLayouts in Kivy | Python
Last Updated :
21 Oct, 2021
Kivy is a platform independent as it can be run on Android, IOS, Linux and Windows, etc. Kivy provides you the functionality to write the code for once and run it on different platforms. It is basically used to develop the Android application, but it does not mean that it can not be used on Desktop applications.
Use this command To install kivy:
pip install kivy
Kivy Tutorial – Learn Kivy with Examples.
Gridlayout is the function which creates the children and arrange them in a matrix format. It takes the available space(square) and divides that space into rows and columns then add the widgets accordingly to the resulting cells or grids.
We can not explicitly place the widgets in a particular column/row. Each child is assigned a particular position automatically determined by the layout configuration and the child index in children list. A gridlayout must contain at least on input constraints i.e. cols and rows. If we do not specify the cols or rows to it, the layout gives you an exception.
Column and Row –
Now the Columns represent the width and the rows represents the height just like matrix.
- Initial the size is given by the col_default_width and row_default_height properties. We can force the default size by setting the col_force_default or row_force_default property. This will force the layout to ignore the width and size_hint properties of children and use the default size.
- To customize the size of a single column or row, use cols_minimum or rows_minimum.
- It is not necessary to give both rows and columns, it depends on the requirement. We can provide either both or anyone accordingly.
In the given below example, all the widgets will have the same or equal size. By default, the size is (1, 1) so the child will take full size of the parent.
Python3
import kivy
from kivy.app import App
from kivy.uix.gridlayout import GridLayout
class MainWidget(GridLayout):
pass
class myApp(App):
def build(self):
return MainWidget()
if __name__ == '__main__':
myApp().run()
|
Note : For understanding how to use .kv files, just visit this.
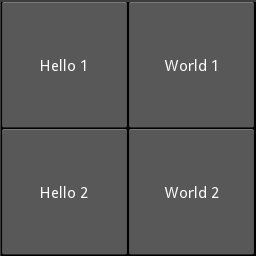
Code #1:
Python3
<MainWidget>:
cols: 2
rows: 2
Button:
text: 'Hello 1'
Button:
text: 'World 1'
Button:
text: 'Hello 2'
Button:
text: 'World 2'
|
Output:
Note: To run this code you have to make the main.py python file for the above python code and another file my.kv file.
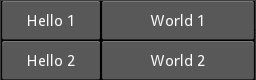
Code #2:
Now let’s fix the size of the buttons to 100px instead of the default size_hint_x = 1.
Python3
<MainWidget>:
cols: 2
rows: 2
Button:
text: 'Hello 1'
size_hint_x: None
width: 100
Button:
text: 'World 1'
Button:
text: 'Hello 2'
size_hint_x: None
width: 100
Button:
text: 'World 2'
|
Output :

Code #3:
We can also fix the row height to a specific size.
Python3
<MainWidget>:
cols: 2
rows: 2
row_force_default: True
row_default_height: 40
Button:
text: 'Hello 1'
size_hint_x: None
width: 100
Button:
text: 'World 1'
Button:
text: 'Hello 2'
size_hint_x: None
width: 100
Button:
text: 'World 2'
|
Output:
Share your thoughts in the comments
Please Login to comment...