Saving Operated Video from a webcam using OpenCV
Last Updated :
04 Jan, 2023
OpenCV is a vast library that helps in providing various functions for image and video operations. With OpenCV, we can perform operations on the input video. OpenCV also allows us to save that operated video for further usage. For saving images, we use cv2.imwrite() which saves the image to a specified file location. But, for saving a recorded video, we create a Video Writer object.
Firstly, we specify the fourcc variable. FourCC is a 4-byte code used to specify the video codec. List of codes can be obtained at Video Codecs by FourCC. The codecs for Windows is DIVX and for OSX is avc1, h263. FourCC code is passed as cv2.VideoWriter_fourcc(*’MJPG’) for MJPG and cv2.VideoWriter_fourcc(*’XVID’) for DIVX.
Then, the cv2.VideoWriter() function is used.
cv2.VideoWriter( filename, fourcc, fps, frameSize )
The parameters are :
- filename: Specifies the name of the output video file.
- fourcc: (for recording) Defining the codec
- fps: Defined frame rate of the output video stream
- frameSize: Size of the video frames
import numpy as np
import cv2
cap = cv2.VideoCapture(0)
fourcc = cv2.VideoWriter_fourcc(*'XVID')
out = cv2.VideoWriter('output.avi', fourcc, 20.0, (640, 480))
while(True):
ret, frame = cap.read()
hsv = cv2.cvtColor(frame, cv2.COLOR_BGR2HSV)
out.write(hsv)
cv2.imshow('Original', frame)
cv2.imshow('frame', hsv)
if cv2.waitKey(1) & 0xFF == ord('a'):
break
cap.release()
out.release()
cv2.destroyAllWindows()
|
Output:
The output screen shows up two windows. The window named ‘Original’ shows input frames, whereas the ‘frame’ window shows the operated video sequence.
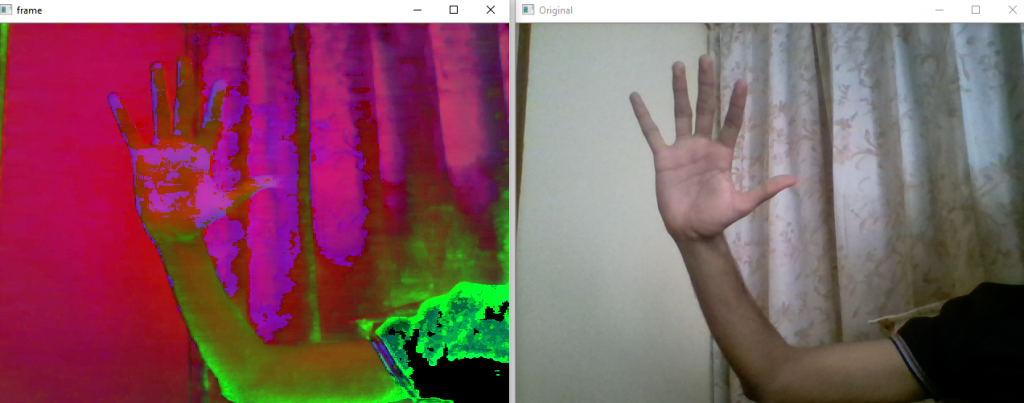
Also, a video is recorded and saved with the name ‘output’ in the same file location with predefined frame rate and frame size.
It is generally of the format .avi. The video saved is like this:Output Video
The input video can be operated in other color spaces too, like in grayscale
import numpy as np
import cv2
cap = cv2.VideoCapture(0)
fourcc = cv2.VideoWriter_fourcc(*'XVID')
out = cv2.VideoWriter('output.avi', fourcc, 20.0, (640, 480))
while(True):
ret, frame = cap.read()
gray = cv2.cvtColor(frame, cv2.COLOR_BGR2GRAY)
out.write(gray)
cv2.imshow('Original', frame)
cv2.imshow('frame', gray)
if cv2.waitKey(1) & 0xFF == ord('a'):
break
cap.release()
cv2.destroyAllWindows()
|
Output:
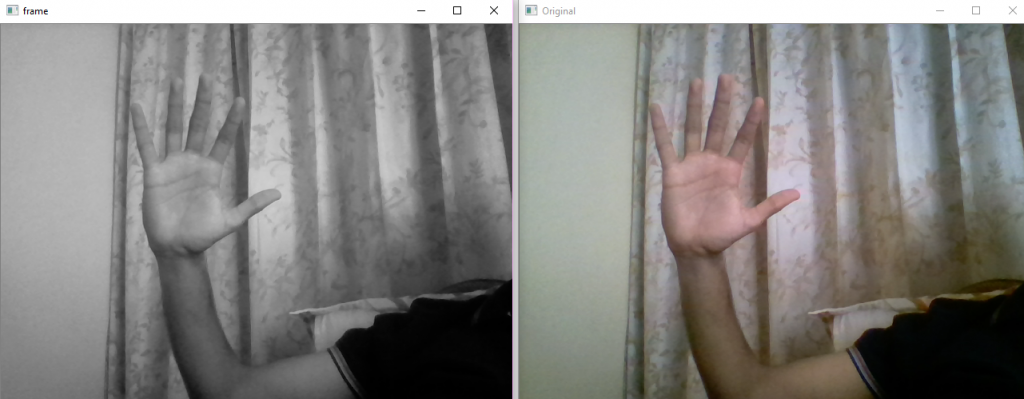
A video file of this operated video is saved in the same file location as we saw above.
This method can help us to create our own dataset for training data in projects / models, to record from our webcam and do necessary operations and also create the video in different color spaces.
Kindly refer this link for visualizing content in different color spaces:
https://www.geeksforgeeks.org/python-visualizing-image-in-different-color-spaces/
References:
- https://docs.opencv.org/3.4/dd/d9e/classcv_1_1VideoWriter.html
- https://docs.opencv.org/3.1.0/dd/d43/tutorial_py_video_display.html
- https://en.wikipedia.org/wiki/FourCC
- https://opencv-python-tutroals.readthedocs.io/en/latest/py_tutorials/py_imgproc/py_colorspaces/py_colorspaces.html
Share your thoughts in the comments
Please Login to comment...