Live face-recognition is a problem that automated security division still face. With the advancements in Convolutions Neural Networks and specifically creative ways of Region-CNN, it’s already confirmed that with our current technologies, we can opt for supervised learning options such as FaceNet, YOLO for fast and live face-recognition in a real-world environment.
To train a supervised model, we need to get datasets of our target labels which is still a tedious task. We need an efficient and automated solution for the dataset generation with minimal labeling effort by user intervention.
Proposed Solution –
Introduction: We are proposing a dataset generation pipeline which takes a video clip as source and extracts all the faces and clusters them to limited and accurate sets of images representing a distinct person. Each set can easily be labeled by human input with ease.
Technical Details: We are going to use opencv lib for per second frames extraction from input video clip. 1 second seems appropriate for covering relevant data and limited frames for processing.
We will use face_recognition library (backed by dlib) for extracting the faces from the frames and align them for feature extractions.
Then, we will extract the human observable features and cluster them using DBSCAN clustering provided by scikit-learn.
For the solution, we will crop out all the faces, create labels and group them in folders for users to adapt them as a dataset for their training use-cases.
Challenges in implementation: For a larger audience, we plan to implement the solution for execution in CPU rather than an NVIDIA GPU. Using an NVIDIA GPU may increase the efficiency of the pipeline.
CPU implementation of facial embedding extraction is very slow (30+ sec per images). To cope up with the problem, we implement them with parallel pipeline executions (resulting in ~13sec per image) and later merge their results for further clustering tasks. We introduce tqdm along with PyPiper for progress updates and the resizing of frames extracted from input video for smooth execution of pipeline.
Input: Footage.mp4
Output:
Required Python3 modules:
os, cv2, numpy, tensorflow, json, re, shutil, time, pickle, pyPiper, tqdm, imutils, face_recognition, dlib, warnings, sklearn
Snippets Section:
For the contents of the file FaceClusteringLibrary.py, which contains all the class definitions, following are the snippets and explanation of their working.
Class implementation of ResizeUtils provides function rescale_by_height and rescale_by_width.
“rescale_by_width” is a function that takes ‘image’ and ‘target_width’ as input. It upscales/downscales the image dimension for width to meet the target_width. The height is automatically calculated so that aspect ratio stays the same. rescale_by_height is also the same but instead of width, it targets height.
Python3
class ResizeUtils:
def rescale_by_height(self, image, target_height,
method = cv2.INTER_LANCZOS4):
w = int(round(target_height * image.shape[1] / image.shape[0]))
return (cv2.resize(image, (w, target_height),
interpolation = method))
def rescale_by_width(self, image, target_width,
method = cv2.INTER_LANCZOS4):
h = int(round(target_width * image.shape[0] / image.shape[1]))
return (cv2.resize(image, (target_width, h),
interpolation = method))
|
Following is the definition of FramesGenerator class. This class provides functionality to extract jpg images by reading the video sequentially. If we take an example of an input video file, it can have a framerate of ~30 fps. We can conclude that for 1 second of video, there will be 30 images. For even a 2 minute video, the number of images for processing will be 2 * 60 * 30 = 3600. It’s a too much high number of images to process and may take hours for complete pipeline processing.
But there comes one more fact that faces and people may not change within a second. So considering a 2-minute video, generating 30 images for 1 second is cumbersome and repetitive to process. Instead, we can just take only 1 snap of image in 1 second. The implementation of “FramesGenerator” dumps only 1 image per second from a video clip.
Considering the dumped images are subject to face_recognition/dlib processing for face extraction, we try to keep a threshold of the height no greater than 500 and width capped to 700. This limit is imposed by the “AutoResize” function that further calls rescale_by_height or rescale_by_width to reduce the size of the image if limits are hit but still preserves the aspect ratio.
Coming to the following snippet, AutoResize function tries to impose a limit to given image’s dimension. If the width is greater than 700, we down-scale it to keep the width 700 and keep maintaining aspect ratio. Another limit set here is, the height must not be greater than 500.
Python3
class FramesGenerator:
def __init__(self, VideoFootageSource):
self.VideoFootageSource = VideoFootageSource
def AutoResize(self, frame):
resizeUtils = ResizeUtils()
height, width, _ = frame.shape
if height > 500:
frame = resizeUtils.rescale_by_height(frame, 500)
self.AutoResize(frame)
if width > 700:
frame = resizeUtils.rescale_by_width(frame, 700)
self.AutoResize(frame)
return frame
|
Following is the snippet for GenerateFrames function. It queries the fps to decide among how many frames, 1 image can be dumped. We clear the output directory and start iterating throughout the frames. Before dumping any image, we resize the image if it hits the limit specified in AutoResize function.
Python3
def GenerateFrames(self, OutputDirectoryName):
cap = cv2.VideoCapture(self.VideoFootageSource)
_, frame = cap.read()
fps = cap.get(cv2.CAP_PROP_FPS)
TotalFrames = cap.get(cv2.CAP_PROP_FRAME_COUNT)
print("[INFO] Total Frames ", TotalFrames, " @ ", fps, " fps")
print("[INFO] Calculating number of frames per second")
CurrentDirectory = os.path.curdir
OutputDirectoryPath = os.path.join(
CurrentDirectory, OutputDirectoryName)
if os.path.exists(OutputDirectoryPath):
shutil.rmtree(OutputDirectoryPath)
time.sleep(0.5)
os.mkdir(OutputDirectoryPath)
CurrentFrame = 1
fpsCounter = 0
FrameWrittenCount = 1
while CurrentFrame < TotalFrames:
_, frame = cap.read()
if (frame is None):
continue
if fpsCounter > fps:
fpsCounter = 0
frame = self.AutoResize(frame)
filename = "frame_" + str(FrameWrittenCount) + ".jpg"
cv2.imwrite(os.path.join(
OutputDirectoryPath, filename), frame)
FrameWrittenCount += 1
fpsCounter += 1
CurrentFrame += 1
print('[INFO] Frames extracted')
|
Following is the snippet for FramesProvider class. It inherits “Node”, which can be used to construct the image processing pipeline. We implement “setup” and “run” functions. Any arguments defined in “setup” function can have the parameters, which will be expected by constructor as parameters at the time of object creation. Here, we can pass sourcePath parameter to the FramesProvider object. “setup” function only runs once. “run” function runs and keeps emitting data by calling emit function to processing pipeline till close function is called.
Here, in the “setup”, we accept sourcePath as an argument and iterate through all the files in the given frames directory. Whichever file’s extension is .jpg (which will be generated by the class FrameGenerator), we add it to “filesList” list.
During the calls of run function, all the jpg image paths from “filesList” are packed with attributes specifying unique “id” and “imagePath” as an object and emitted to the pipeline for processing.
Python3
class FramesProvider(Node):
def setup(self, sourcePath):
self.sourcePath = sourcePath
self.filesList = []
for item in os.listdir(self.sourcePath):
_, fileExt = os.path.splitext(item)
if fileExt == '.jpg':
self.filesList.append(os.path.join(item))
self.TotalFilesCount = self.size = len(self.filesList)
self.ProcessedFilesCount = self.pos = 0
def run(self, data):
if self.ProcessedFilesCount < self.TotalFilesCount:
self.emit({'id': self.ProcessedFilesCount,
'imagePath': os.path.join(self.sourcePath,
self.filesList[self.ProcessedFilesCount])})
self.ProcessedFilesCount += 1
self.pos = self.ProcessedFilesCount
else:
self.close()
|
Following is the class implementation of “FaceEncoder” which inherits “Node”, and can be pushed in image processing pipeline. In the “setup” function, we accept “detection_method” value for “face_recognition/dlib” face recognizer to invoke. It can have “cnn” based detector or “hog” based one.
The “run” function unpacks the incoming data into “id” and “imagePath”.
Subsequently, it reads the image from “imagePath”, runs the “face_location” defined in “face_recognition/dlib” library to crop out aligned face image, which is our region of interest. An aligned face image is a rectangular cropped image that has eyes and lips aligned to a specific location in the image (Note: The implementation may differ with other libraries e.g. opencv).
Further, we call “face_encodings” function defined in “face_recognition/dlib” to extract the facial embeddings from each box. This embeddings floating values can help you reach the exact location of features in an aligned face image.
We define variable “d” as an array of boxes and respective embeddings. Now, we pack the “id” and the array of embeddings as “encoding” key in an object and emit it to the image processing pipeline.
Python3
class FaceEncoder(Node):
def setup(self, detection_method = 'cnn'):
self.detection_method = detection_method
def run(self, data):
id = data['id']
imagePath = data['imagePath']
image = cv2.imread(imagePath)
rgb = cv2.cvtColor(image, cv2.COLOR_BGR2RGB)
boxes = face_recognition.face_locations(
rgb, model = self.detection_method)
encodings = face_recognition.face_encodings(rgb, boxes)
d = [{"imagePath": imagePath, "loc": box, "encoding": enc}
for (box, enc) in zip(boxes, encodings)]
self.emit({'id': id, 'encodings': d})
|
Following is an implementation of DatastoreManager which again inherits from “Node” and can be plugged into the image processing pipeline. The aim for the class is to dump the “encodings” array as pickle file and use “id” parameter to uniquely name the pickle file. We want the pipeline to run multithreaded.
To exploit the multithreading for performance improvement, we need to properly separate out the asynchronous tasks and try to avoid any need of synchronization. So, for maximum performance, we independently let the threads in the pipeline to write the data out to individual separate file without interfering any other thread operation.
In case you are thinking how much time it saved, in used development hardware, without multithreading, the average embedding extraction time was ~30 seconds. After the multithreaded pipeline, (with 4 threads) it decreased to ~10 seconds but with the cost of high CPU usage.
Since the thread takes around ~10 seconds, frequent disk writes do not occur and it does not hamper our multithreaded performance.
Another case, if you are thinking why pickle is used instead of JSON alternative? The truth is JSON is a better alternative to pickle. Pickle is very unsafe for data storage and communication. Pickles can be maliciously modified for embedding executable codes in Python. The JSON files are human readable and faster for encoding and decoding. The only thing pickle is good at is the error-free dumping of python objects and contents into binary files.
Since we are not planning to store and distribute the pickle files, and for error-free execution, we are using pickle. Else, JSON and other alternatives are strongly recommended.
Python3
class DatastoreManager(Node):
def setup(self, encodingsOutputPath):
self.encodingsOutputPath = encodingsOutputPath
def run(self, data):
encodings = data['encodings']
id = data['id']
with open(os.path.join(self.encodingsOutputPath,
'encodings_' + str(id) + '.pickle'), 'wb') as f:
f.write(pickle.dumps(encodings))
|
Following is the implementation of class PickleListCollator. It is designed to read arrays of objects in multiple pickle files, merge into one array and dump the combined array into a single pickle file.
Here, there is only one function GeneratePickle which accepts outputFilepath which specifies the single output pickle file which will contain the merged array.
Python3
class PicklesListCollator:
def __init__(self, picklesInputDirectory):
self.picklesInputDirectory = picklesInputDirectory
def GeneratePickle(self, outputFilepath):
datastore = []
ListOfPickleFiles = []
for item in os.listdir(self.picklesInputDirectory):
_, fileExt = os.path.splitext(item)
if fileExt == '.pickle':
ListOfPickleFiles.append(os.path.join(
self.picklesInputDirectory, item))
for picklePath in ListOfPickleFiles:
with open(picklePath, "rb") as f:
data = pickle.loads(f.read())
datastore.extend(data)
with open(outputFilepath, 'wb') as f:
f.write(pickle.dumps(datastore))
|
The following is the implementation of FaceClusterUtility class. There’s a constructor defined which takes “EncodingFilePath” with value as a path to merged pickle file. We read the array from the pickle file and try to cluster them using “DBSCAN” implementation in “scikit” library. Unlike k-means, the DBSCAN scan does not require the number of clusters. The number of clusters depends on the threshold parameter and will automatically be calculated.
The DBSCAN implementation is provided in “scikit” and also accepts the number of threads for computation.
Here, we have a function “Cluster”, that will be invoked to read the array data from the pickle file, run “DBSCAN”, print the unique clusters as unique faces and return the labels. The labels are unique values representing categories, which can be used to identify the category for a face present in array. (The array contents come from pickle file).
Python3
class FaceClusterUtility:
def __init__(self, EncodingFilePath):
self.EncodingFilePath = EncodingFilePath
def Cluster(self):
InputEncodingFile = self.EncodingFilePath
if not (os.path.isfile(InputEncodingFile) and
os.access(InputEncodingFile, os.R_OK)):
print('The input encoding file, ' +
str(InputEncodingFile) +
' does not exists or unreadable')
exit()
NumberOfParallelJobs = -1
print("[INFO] Loading encodings")
data = pickle.loads(open(InputEncodingFile, "rb").read())
data = np.array(data)
encodings = [d["encoding"] for d in data]
print("[INFO] Clustering")
clt = DBSCAN(eps = 0.5, metric ="euclidean",
n_jobs = NumberOfParallelJobs)
clt.fit(encodings)
labelIDs = np.unique(clt.labels_)
numUniqueFaces = len(np.where(labelIDs > -1)[0])
print("[INFO] # unique faces: {}".format(numUniqueFaces))
return clt.labels_
|
Following is the implementation of TqdmUpdate class which inherits from “tqdm”. tqdm is a Python library that visualizes a progress bar in console interface.
The variables “n” and “total” are recognized by “tqdm”. The values of these two variables are used to calculate the progress made.
The parameters “done” and “total_size” in “update” function are provided values when bound to update event in the pipeline framework “PyPiper”. The super().refresh() invokes the implementation of “refresh” function in “tqdm” class which visualizes and updates the progress bar in console.
Python3
class TqdmUpdate(tqdm):
def update(self, done, total_size = None):
if total_size is not None:
self.total = total_size
self.n = done
super().refresh()
|
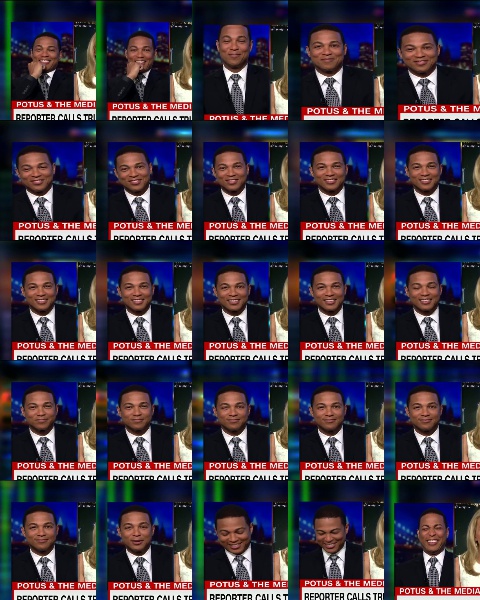
Following is the implementation of FaceImageGenerator class. This class provides functionality to generate a montage, cropped portrait image and an annotation for future training purpose (e.g. Darknet YOLO) from the labels that result after clustering.
The constructor expects EncodingFilePath as the merged pickle file path. It will be used to load all the face encodings. We are now interested in the “imagePath” and face coordinates for generating the image.
The call to “GenerateImages” does the intended job. We load the array from the merged pickle file. We apply the unique operation on labels and loop throughout the labels. Inside the iteration of the labels, for each unique label, we list down all the array indexes having the same current label.
These array indexes are again iterated to process each face.
For processing face, we use the index to obtain the path for the image file and coordinates of the face.
The image file is loaded from the path of the image file. The coordinates of the face are expanded to a portrait shape (and we also ensure it does not expand more than the dimensions of the image) and it is cropped and dumped to file as a portrait image.
We start again with original coordinates and expand a little to create annotations for future supervised training options for improved recognition capabilities.
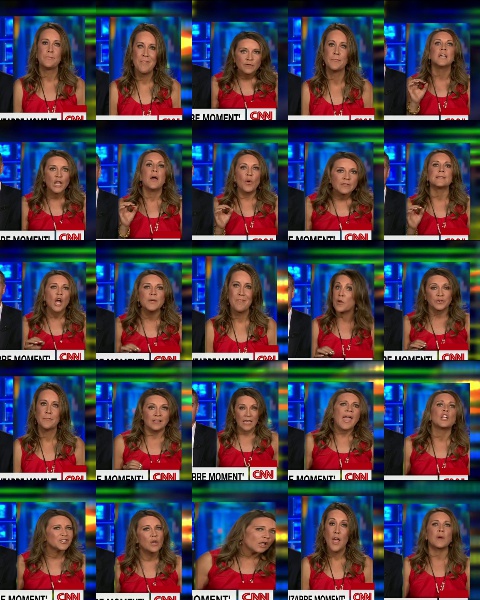
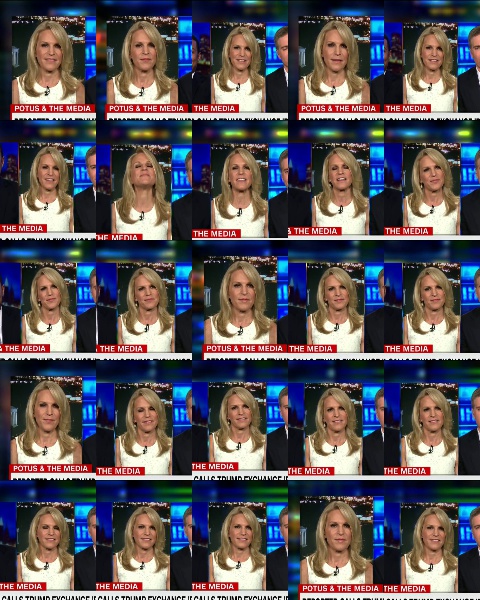
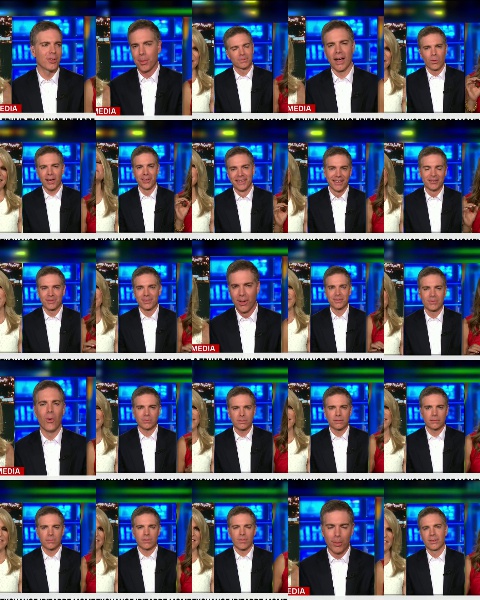
For annotation, we just designed it for “Darknet YOLO”, but it can also be adapted for any other framework. Finally, we build a montage and write it out into an image file.
Python3
class FaceImageGenerator:
def __init__(self, EncodingFilePath):
self.EncodingFilePath = EncodingFilePath
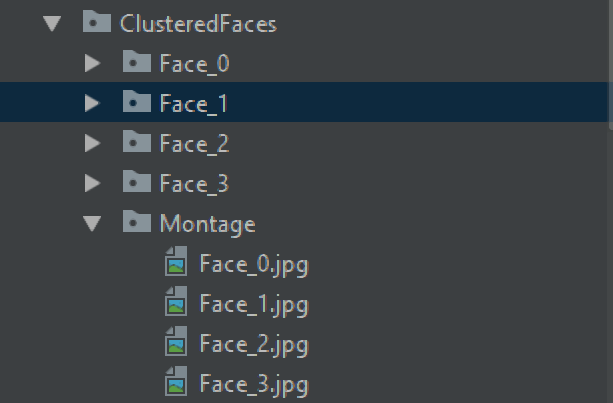
def GenerateImages(self, labels, OutputFolderName = "ClusteredFaces",
MontageOutputFolder = "Montage"):
output_directory = os.getcwd()
OutputFolder = os.path.join(output_directory, OutputFolderName)
if not os.path.exists(OutputFolder):
os.makedirs(OutputFolder)
else:
shutil.rmtree(OutputFolder)
time.sleep(0.5)
os.makedirs(OutputFolder)
MontageFolderPath = os.path.join(OutputFolder, MontageOutputFolder)
os.makedirs(MontageFolderPath)
data = pickle.loads(open(self.EncodingFilePath, "rb").read())
data = np.array(data)
labelIDs = np.unique(labels)
for labelID in labelIDs:
print("[INFO] faces for face ID: {}".format(labelID))
FaceFolder = os.path.join(OutputFolder, "Face_" + str(labelID))
os.makedirs(FaceFolder)
idxs = np.where(labels == labelID)[0]
portraits = []
counter = 1
for i in idxs:
image = cv2.imread(data[i]["imagePath"])
(o_top, o_right, o_bottom, o_left) = data[i]["loc"]
height, width, channel = image.shape
widthMargin = 100
heightMargin = 150
top = o_top - heightMargin
if top < 0: top = 0
bottom = o_bottom + heightMargin
if bottom > height: bottom = height
left = o_left - widthMargin
if left < 0: left = 0
right = o_right + widthMargin
if right > width: right = width
portrait = image[top:bottom, left:right]
if len(portraits) < 25:
portraits.append(portrait)
resizeUtils = ResizeUtils()
portrait = resizeUtils.rescale_by_width(portrait, 400)
FaceFilename = "face_" + str(counter) + ".jpg"
FaceImagePath = os.path.join(FaceFolder, FaceFilename)
cv2.imwrite(FaceImagePath, portrait)
widthMargin = 20
heightMargin = 20
top = o_top - heightMargin
if top < 0: top = 0
bottom = o_bottom + heightMargin
if bottom > height: bottom = height
left = o_left - widthMargin
if left < 0: left = 0
right = o_right + widthMargin
if right > width:
right = width
AnnotationFilename = "face_" + str(counter) + ".txt"
AnnotationFilePath = os.path.join(FaceFolder, AnnotationFilename)
f = open(AnnotationFilePath, 'w')
f.write(str(labelID) + ' ' +
str(left) + ' ' + str(top) + ' ' +
str(right) + ' ' + str(bottom) + "\n")
f.close()
counter += 1
montage = build_montages(portraits, (96, 120), (5, 5))[0]
MontageFilenamePath = os.path.join(
MontageFolderPath, "Face_" + str(labelID) + ".jpg")
cv2.imwrite(MontageFilenamePath, montage)
|
Save the file as FaceClusteringLibrary.py, which will contain all the class definitions.
Following is file Driver.py, which invokes the functionalities to create a pipeline.
Python3
from FaceClusteringLibrary import *
if __name__ == "__main__":
framesGenerator = FramesGenerator("Footage.mp4")
framesGenerator.GenerateFrames("Frames")
CurrentPath = os.getcwd()
FramesDirectory = "Frames"
FramesDirectoryPath = os.path.join(CurrentPath, FramesDirectory)
EncodingsFolder = "Encodings"
EncodingsFolderPath = os.path.join(CurrentPath, EncodingsFolder)
if os.path.exists(EncodingsFolderPath):
shutil.rmtree(EncodingsFolderPath, ignore_errors = True)
time.sleep(0.5)
os.makedirs(EncodingsFolderPath)
pipeline = Pipeline(
FramesProvider("Files source", sourcePath = FramesDirectoryPath) |
FaceEncoder("Encode faces") |
DatastoreManager("Store encoding",
encodingsOutputPath = EncodingsFolderPath),
n_threads = 3, quiet = True)
pbar = TqdmUpdate()
pipeline.run(update_callback = pbar.update)
print()
print('[INFO] Encodings extracted')
CurrentPath = os.getcwd()
EncodingsInputDirectory = "Encodings"
EncodingsInputDirectoryPath = os.path.join(
CurrentPath, EncodingsInputDirectory)
OutputEncodingPickleFilename = "encodings.pickle"
if os.path.exists(OutputEncodingPickleFilename):
os.remove(OutputEncodingPickleFilename)
picklesListCollator = PicklesListCollator(
EncodingsInputDirectoryPath)
picklesListCollator.GeneratePickle(
OutputEncodingPickleFilename)
time.sleep(0.5)
EncodingPickleFilePath = "encodings.pickle"
faceClusterUtility = FaceClusterUtility(EncodingPickleFilePath)
faceImageGenerator = FaceImageGenerator(EncodingPickleFilePath)
labelIDs = faceClusterUtility.Cluster()
faceImageGenerator.GenerateImages(
labelIDs, "ClusteredFaces", "Montage")
|
Montage Output:
Troubleshooting –
Question1: The whole pc freezes when extracting facial embedding.
Solution: The solution is to decrease the values in frame resize function when extracting frames from an input video clip. Remember, decreasing the values too much will result in improper face clustering. Instead of resizing frame, we can introduce some frontal face detection and clip out the frontal faces only for improved accuracy.
Question2: The pc becomes slow while running the pipeline.
Solution: The CPU will be used at a maximum level. To cap the usage, you can decrease the number of threads specified at pipeline constructor.
Question3: The output clustering is too much inaccurate.
Solution: The only reason for the case can be the frames extracted from the input video clip will have very faces with a very small resolution or the number of frames is very less (around 7-8). Kindly get a video clip with bright and clear images of faces in it or for the latter case, get a 2-minute video or mod with source code for video frames extraction.
Refer Github link for complete code and additional file used : https://github.com/cppxaxa/FaceRecognitionPipeline_GeeksForGeeks
References:
1. Adrian’s blog post for face clustering
2. PyPiper guide
3. OpenCV manual
4. StackOverflow
Share your thoughts in the comments
Please Login to comment...