How To Put Text Over An Image In Google Docs
Last Updated :
29 Dec, 2023
How to add caption to images – Quick Steps
- Open Google Docs >> Select a Document
- Click on Insert Tab
- Select Drawing >> New
- Insert Image in Drawing Section
- Click on Text Box Icon
- Enter Text >> Click on “Save and Close”
Discover a cool trick for your Google Docs! Learn how to easily add text on top of images to make your documents look awesome. Follow our simple steps to give your work a professional touch and make it more interesting. No more boring documents – let’s make your stories stand out.
How To Put Text Over An Image In Google Docs
Step 1: Open Google Docs and Select Document
Open Google Docs on your Desktop and select a document in which you want to insert text over an image, you can also go with your existing document or you can create a new one.
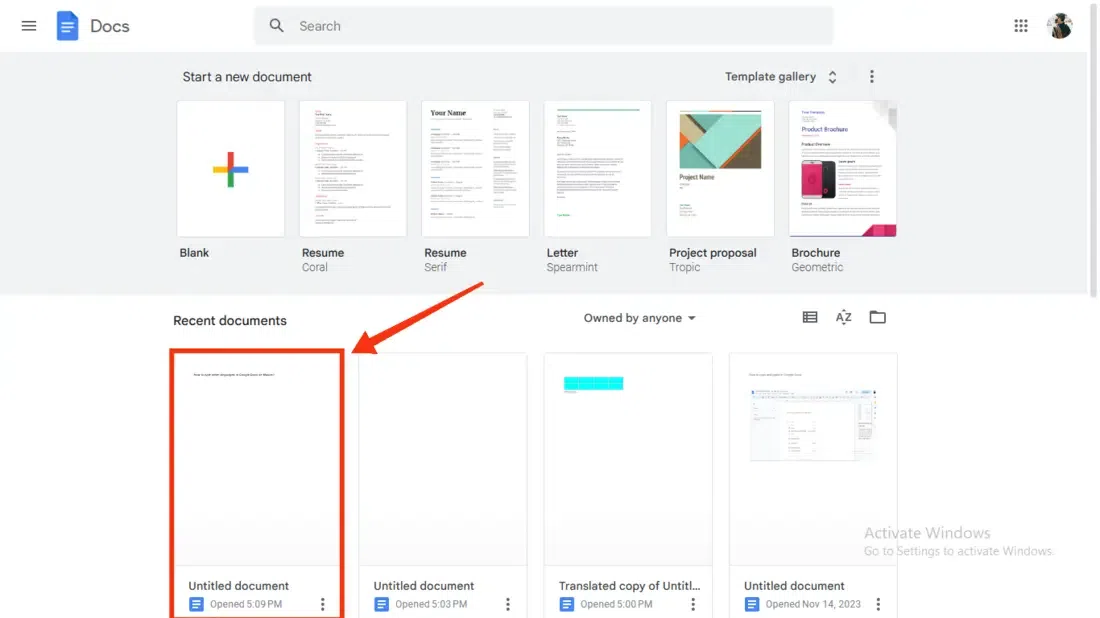
Open Google Docs >> Select Document
Step 2: Click on Insert Tab
After opening Google Docs on your Desktop go to the Drawing sections of Google Docs to do so click on the “Insert” tab located in the toolbar.
.webp)
Click on Insert Tab
Step 3: Select “Drawing” and New
When you click on the Insert tab a drop-down menu will appear containing many options among them select “Drawing” >> “New” option to go to the Drawing section of the Google Docs.
.webp)
Select Drawing >> New
Step 4: Click on the Image Icon
When you open the Drawing section click on the “Image” Icon located in the toolbar to import the image to the Google Docs.
.webp)
Click on Image Icon
Step 5: Click on the “Choose an Image to Upload” button
Now click on the “Choose an Image to upload” button, this will open the images of your computer and then you can select the desired image on which you want to put text.
.webp)
Click on the “Choose an Image to Upload” button
Step 6: Click on Text Icon
Wait until your image is uploaded and then click on the “Text” icon located at the toolbar to open a text box so that you can enter text in it.
.webp)
Click on Text Icon
Step 7: Enter Text and Click on “Save and Close”
Now enter the text that you want to be shown on the image and click on the “Save and Close” button to place your drawing into the document.
.webp)
Type your Text >> Click “Save and Close”
Step 8: Text Placed Over Image
Now text has been placed over an image and your image is also placed into the document.
.webp)
Text Placed Over Image
How To Put Text Over An Image In Google Docs on Mobile
Step 1: Open Google Docs and Select Document
Open Google Docs on your mobile phone and select a document to edit it or you can choose a new document to perform actions on it.
.webp)
Open Google Docs >> Select Document
Step 2: Click on the plus (+) Icon
After opening your Google Docs click on the “+” icon located at the top of the interface to open insertion options.
.webp)
Click on “+” Icon
Step 3: Select “Image” Option
When you click on the “+” icon a menu of options will appear among options select “Image” to insert an image to the document.
.webp)
Click on Image Icon
Step 4: Select “From Photos”
Now select the field from which you want to import your image to Google Docs. To import the image from your device select “From Photos” or you can go with the other options.
.webp)
Select “From Photos”
Step 5: Select Image and Click on Three Dots
When your image is inserted into the document then select the image and click on the “Three Dots” to view the other options.
.webp)
Click on Image >> Click on Three Dots
Step 6: Select Image Options
Now a menu will appear containing the options from that select the “Image Options”.
.webp)
Select Image Options
Step 7: In Text Wrap select Inline option
Now in the Wrap Text section select the “Inline” option, it will align your text onto the image inserted by you.
.webp)
In Text Wrap >> Select Inline Option
Conclusion
Placing Text over an image in Google Docs gives your image a better caption and is displayed attractive and it can be done in some easy and simple steps mentioned above. All you have to do is open your Google Docs select a document that you want to edit and then click on the Insert tab located in the toolbar. After clicking on the Insert tab select the “Drawing” >> New from the drop-down menu and move to the drawing section of Google Docs. In this section insert an image from your computer and start editing it to place text over an image click on the text box located at the toolbar and you will be able to add text over an image. After adding text to an image click on the “Save and Close” button.
FAQs
Can I place text directly over an image in Google Docs?
No, Google Docs doesn’t gives a feature of placing text over an image directly, you have to perform other actions.
Can I place text directly over an image in Google Docs?
Yes, to do so click on the Text box and search for the alignment options and select the left or right alignment of your text.
Can I adjust the transparency of the text box to make the text more visible over the image?
No, the tranceparency of the text box is default in the Google Docs and you can’t change or edit the transparency.
Share your thoughts in the comments
Please Login to comment...