There are times when you want to write a thesis, report, or simply do your work in an organized way for clarity. It may even be the case that you want to do some projects for your school or college work, etc. For such work editing every step takes lots of time and effort. There is no need to do all this manually when Google Docs has provided you the option of Modern Language Association for this purpose and makes your work considerably easy.
What is MLA or Modern Language Association?
MLA is the Modern Language Association, an easy way to cite. It is the technique that was set up by people to format their papers and assignments uniformly. There are many versions for MLA formatting and the latest version for MLA formatting is the 9th version which is the easiest version for MLA formatting. It is double-spaced throughout the paper and anybody can easily use this for their work purpose in a few easy steps.
Guidelines for MLA Formatting on Google Docs
There are certain Guidelines for MLA formatting, which are as follows:
- Times New Roman (Size 12 pt.) should be the font for MLA formatting as there will be no chance for mistakes if the font is set as Times New Roman.
- Double line spacing
- 1\2 ” indent from the left margin for every new paragraph.
- For every paragraph first, the sentence is indented.
- 1” Page margins.
- Titles should be capitalized.
Now that you have understood what is MLA and how it works it is time to apply MLA formatting to your documents. Using Google Docs, MLA formatting can be applied to your documents in two ways. The first one is with the usage of a Template and another without a Template.
Two methods of MLA formatting are as follows:
MLA Formatting on Google Docs with Template
MLA formatting in Google Docs can be done by using the template which is available in Google Docs itself. These templates are easy to use as the format is already designed. You just have to select the template of your choice and then can easily change the words of the template with your own words.
It is an easy method to write assignments in MLA format by just using the template.
Step 1: Open Google Docs
Open Google Docs on your browser and go to its home page by signing in.
.webp)
Open Google Docs
Step 2: Click on Template Gallery
After logging in the Google Docs, find the template gallery option shown in the top right corner and click on it.
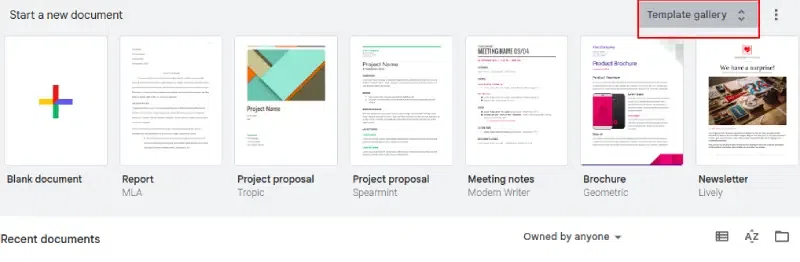
Click on Template Gallery
Step 3: Select Report Template
As you click on the template gallery, you will find lots of template options provided by Google. Select the Report MLA template from those and open it. Now the header will be available.
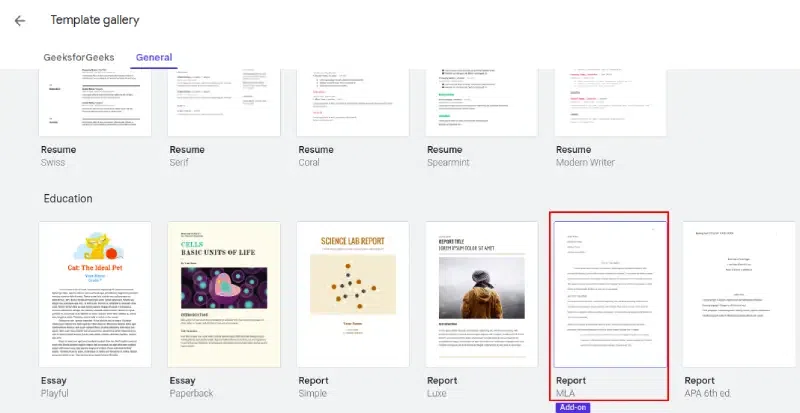
Select Report Template
Step 4: Type your the Last Name and Replace Other Information
Type your last name beyond the page number. Replace the name, professor’s name, subject name, and date on the template according to you.
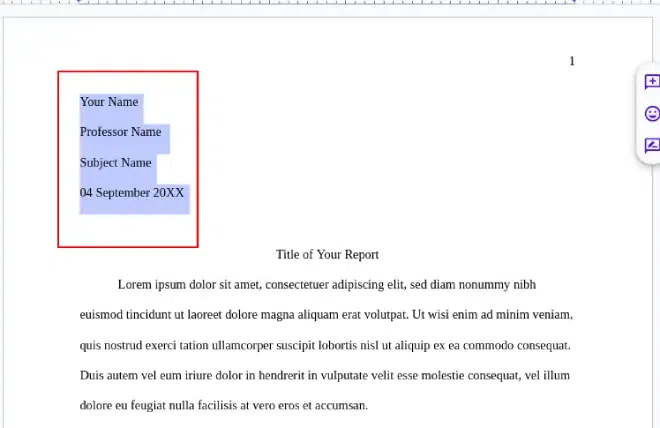
Type your the Last Name and Replace Other Information
Step 5: Replace the Text
Replace the whole text on the template with your text.
.webp)
Replace the Text
Step 6: Make Changes in Work Cited
As you scroll down, you will see the work cited section, change the sample text to the citation information for the sources that are used in the paper. It includes the author’s last name, comma first name, and the medium of the paper.
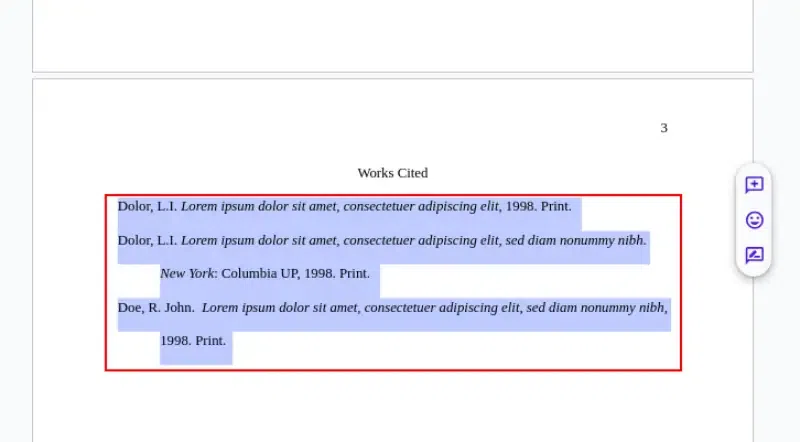
Make Changes in Work Cited
MLA Formatting on Google Docs Without Templates
If you do not wish to use templates for your formatting then you can also do this. MLA formatting in Google Docs is possible without Templates also. However, this will be a little elaborate to do so.
Step 1: Open New Document
Open Google Docs on your computer or laptop. Open the new document or an already existing one where you want to apply MLA Formatting.
Open New Document
Step 2: Select Font Type and Size
Choose your font type to be Times New Roman and then change the font size to 12 points.
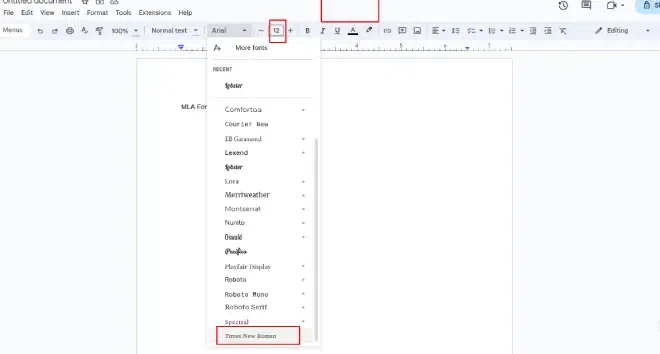
Select Font Type and Size
Step 3: Go to Insert, Click on Headers & Footers and Select Header
Click on the Insert tab and then select the option of headers and footers and then header.
Insert> Headers and Footers> Header.
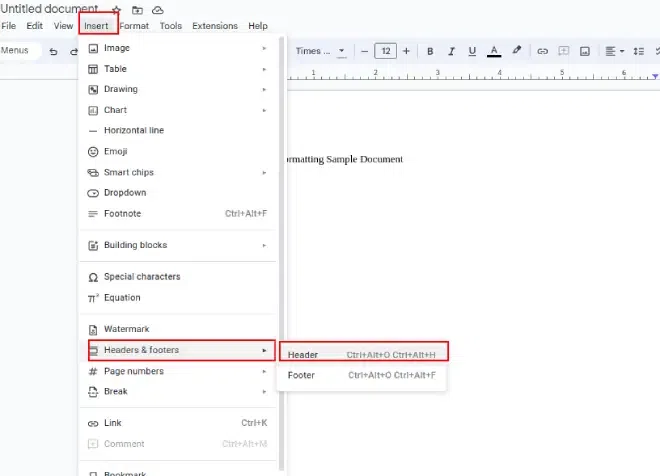
Go to Insert, Click on Headers & Footers and Select Header
(Make sure the font is the same as selected earlier.)
Step 4: Select Alignment
Select right align and type your last name.
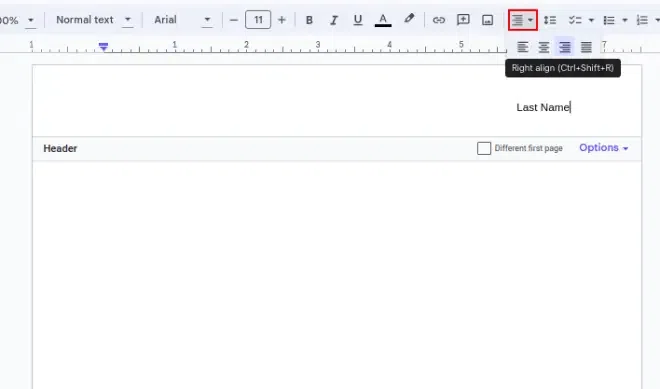
Select Alignment
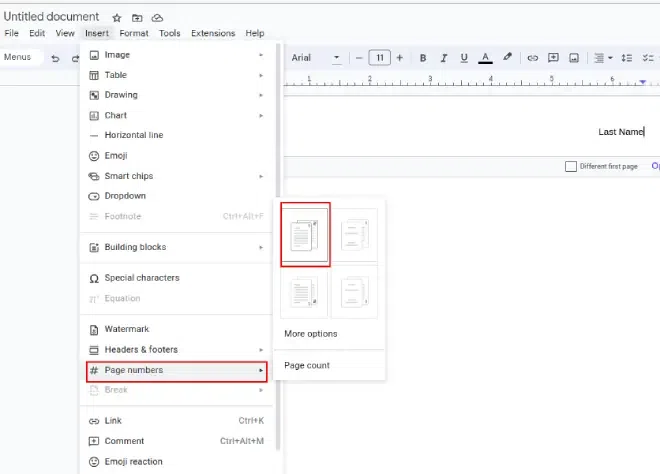
Step 5: Click on Page Numbers and Select desired Page
Then click Insert, page numbers, and add the one that displays.
Click on Page Numbers and Select desired Page
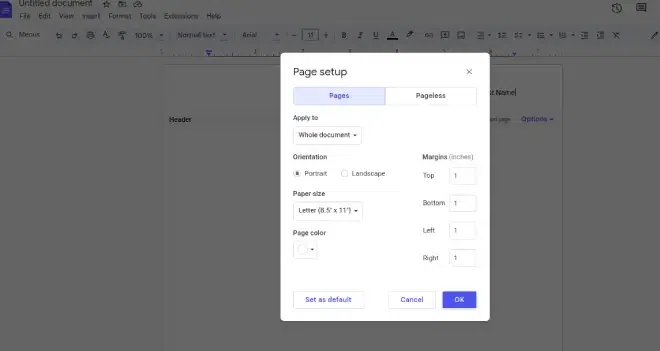
Step 6: Set the margin
Then, go to file, page set up, and then set the margin to 1 inch or 2.54 cm.
Set the margin
Note: Usually, margins are set to 1 inch by default, but we reccommend to check it once.
Step 7: Go to Line & Paragraph Spacing and Select Double
Click on-line spacing, a dropdown menu will appear, select double among the given options and also if there are spaces after paragraph then in the same dropdown also select remove space after paragraph.
.webp)
Go to Line & Paragraph Spacing and Select Double
Step 8: Enter Details of the Report
On the MLA heading include your name, the professor’s name, the course name, and the due date of the assignment all on separate lines. Press enter on the keyboard once, then write the tittle of the text.
Keep the text simple and classy, no need to use bold or italics or underline. Capitalize all words in the title except for small words like articles, prepositions, and conjunctions.
Step 9: Change Alignment and Indentation
Press enter on the keyboard, and then align the text to the left. Indent the sentences, by dragging the ruler on top of the document. After this drag the rectangle to half an inch or 1.27 cm.
.webp)
Change Alignment and Indentation
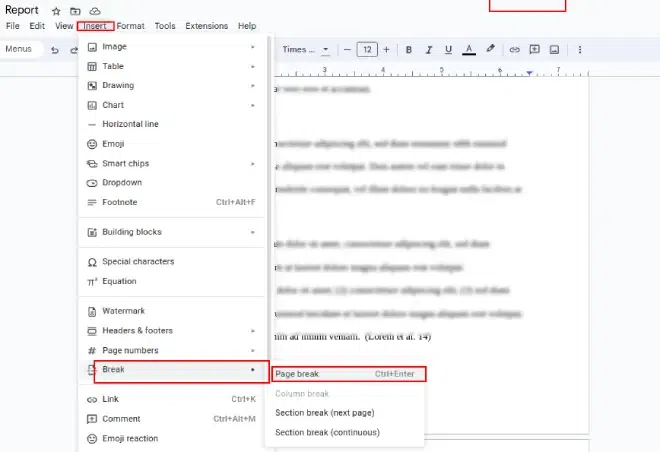
Step 10: Go to Insert, Click on Break and Select Page Break
Access the Insert Tab. A dropdown will appear. Click on break, and then select Page Break from the further displayed dropdown.
Go to Insert, Click on Break and Select Page Break
How to Create a Work Cited Page
This starts on a separate page. The work cited titles are centrally aligned, and the citation of every title is alphabetically arranged. However, the format of each work cited page is different. One should use hanging indents if there is more than one line or text on citations.
Citations must include Author’s last name, and comma first name or if the author publishes with the first name it must include that, and the and it must include the medium of the paper.
Conclusion
MLA formatting is needed very often in our work reports and projects. It is a modern language to submit information and gather it in an organized manner and a unique way of formatting papers and creating citations. To get handy with this formatting is very useful in daily life and can save a lot of time making reports, thesis, and assignments easily.
It can be done with or without a template however, using a template makes it an easier assignment as it can be simply done by replacing the sample text with your text. It is a unique way of formatting papers and creating citations.
FAQs
How do you cite in MLA Format?
1. Author
2. Title of Source
3. Title of Container
4. Version
5. Number
6. Publisher
7. Publication Date
8. Location
9. Access Date
How do you Format a citation in Google Docs?
1. Go to Tools and Select Citations
2. A sidebar will appear. Select a style guide.
3. Enter the information and click Add citation source.
4. Sources are saved and available within the sidebar.
Why do we use MLA format?
If using MLA format it will help in increasing readability and report becomes more understandable. It also creates citations which help in preventing plagarism.
Share your thoughts in the comments
Please Login to comment...