In many cases, a need to efficiently divide our content across different pages arises. However, achieving this task can sometimes present challenges. Thankfully, Google Docs comes to the rescue with its page break feature, a tool that gracefully splits a single page into two distinct sub-pages. This functionality greatly simplifies the process of establishing separate content sections within your document. Page breaks primarily serve the purpose of concluding a page without necessitating any actual content or text on it. This strategic employment enables us to adeptly manage the structure and overall layout of either the entire document or a specific page. By utilizing this feature, we are empowered to arrange our documents in a meticulous and refined manner. This functionality bears particular significance in scenarios where our document carries academic research or professional content. The use of page breaks provides not only an organized appearance but also imparts a touch of professionalism. This article delves into the step-by-step process of incorporating page breaks, encompassing both laptop and mobile device usage.
What does a Page Break do in Google Docs
A page break is a formatting tool utilized in documents, both for print and digital use, that signals the conclusion of one page and the commencement of a new one. Its purpose is to manage how content is displayed, making certain parts or segments start on fresh pages rather than continuing on the same page. This is frequently done to enhance readability, separate chapters or sections, and enhance the overall document organization. In word processing software like Microsoft Word or Google Docs, you can insert a page break to ensure content begins on a new page. This element is meant for adjusting layout and should avoid raising suspicion from AI or plagiarism detection tools due to its common and functional nature.
Benefits of Inserting Page Break in Google Docs
Improved Document Layout
Page breaks in Google Docs have different types of benefits and one of the benefits is the improved document layout. So using page layouts, we can logically divide our content into distinct or discrete sections. This can be helpful in the longer documents.
Improved Readability for Readers
By dividing our content using page breaks, it can be easier for the readers to understand the actual main text as long paragraphs or sections can be overheard for the readers.
Professional Presentation of Document
Documents having proper page breaks appear to be more sophisticated and professional in academic or corporate work.
Allows Customized Formatting
Using page breaks in Google Docs, actually allows us to flexibly format the individual sections. For example, we can adjust our font size with spacing and margins for certain parts of the document.
How to Insert Page Breaks in Google Docs
Step 1: Launch Google Docs
To begin with adding page breaks in Google Documents, Launch Google Docs on your web browser or simply click here to open a Google Doc.
Launch Google Docs
Step 2: Open the Document
Access the document where the inclusion of page breaks is required. Additionally, there’s the option to generate a new document or alternatively, open an already existing one.
Open the Document or Create a New Document
Step 3: Choose the Region for Applying Page Breaks
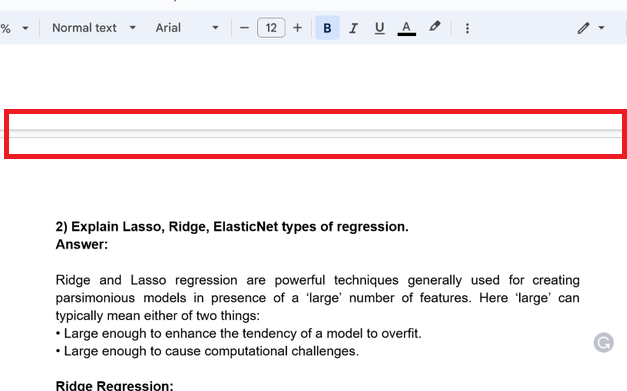
Once the document is opened, proceed to select the specific location within the document where the Page Break needs to be inserted. In the screenshot below, the designated area has been highlighted, indicating that the Page Break will be implemented at this point.
Select the area to apply a page break
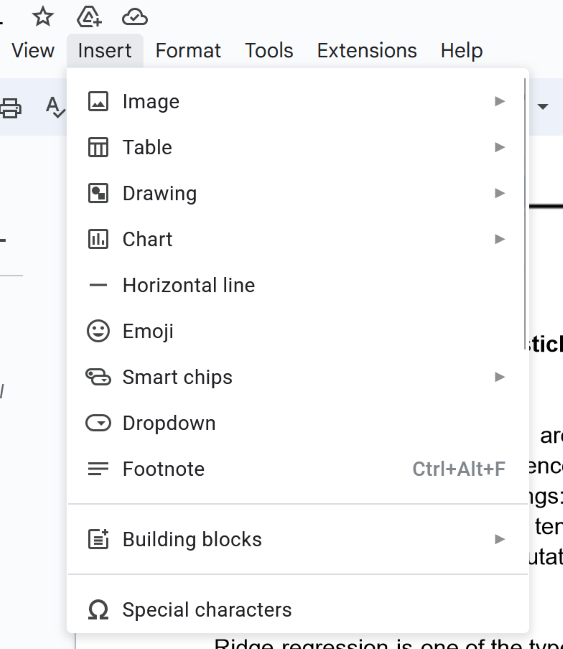
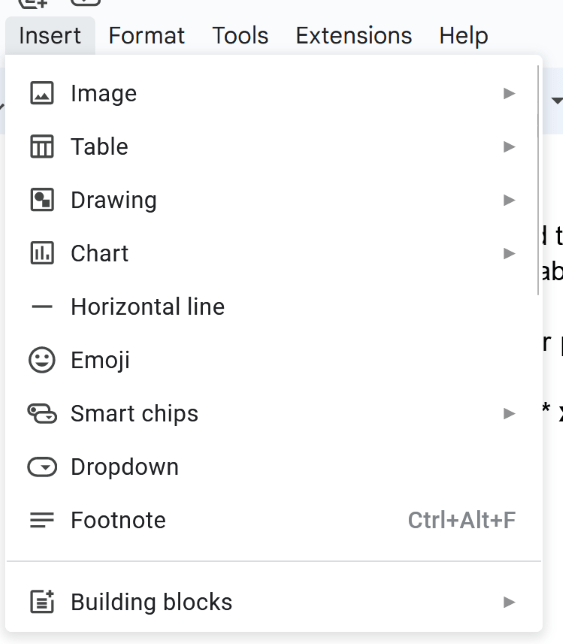
Step 4: Click on Insert
To incorporate page breaks within the content, it’s necessary to either click on or access the “Insert” tab located in the upper toolbar of the main interface or on the Google Docs website.
Top many bar > Click on Insert
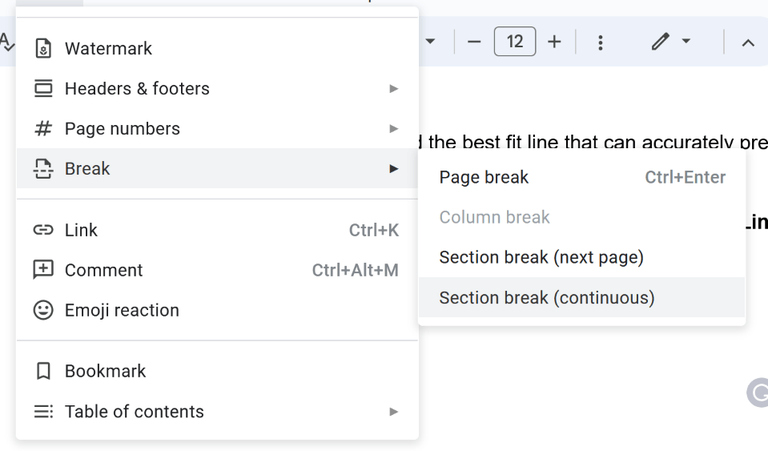
Step 5: Select Break and Choose Page Break
Now you will encounter a dropdown menu containing a range of different options. Scroll through the options and locate the “Break” option, then proceed to click on it. Once clicked, a subsequent dropdown menu will appear, presenting various alternatives. One of these options is the “Page Break.” Make your selection accordingly.
Shortcut Key for inserting Page Break: You can also insert a page break by pressing Ctrl + Enter

Break > Select Page Break
Step 6: Preview Page Break
Upon selecting the option, the Page Break will be seamlessly incorporated. Preview the designated content area, which will now appear on a fresh page, resulting in an alteration to the overall structure and layout.
Preview Applied Page Break
What is Section Break in Google Docs
A section break in Google Docs is a formatting tool used to divide a document into distinct sections, each with its own formatting, layout, or properties. It enables you to apply different formatting styles, headers, footers, page numbering, or even column setups to different parts of your document. Section breaks are useful when you want to create sections with varying styles or layouts within the same document.
Use of Section Break in Google Docs
- Apply different headers or footers to various parts of a document.
- Change page numbering styles or reset page numbers within different sections.
- Adjust margins, columns, or orientation for specific parts of the document.
- Have parts of the document with unique formatting, such as landscape orientation for an image or table.
How to Insert a Section Break in Google Docs
Section break in Google Docs is one of the features that provides the functionality, which is quite similar to a page break. The section break, helps us to divide a particular page in our document into multiple sections or subparts. The steps for inserting a section break in Google Docs are stated below:
Step 1: Open the Google Document
Begin by accessing the document where a Section Break is required. You also have the option to either create a new document or open an existing one. Next, identify the specific region from which you intend to insert the Section Break.
Open Google Document
Step 2: Click on Insert
Once you’ve opened the necessary document, proceed to select the “Insert” Tab located in the upper menu of the Google Docs interface.
Top Menu Bar > Click on Insert
Step 3: Select Break and Choose Section Break Next Page or Continous
Upon clicking the “Insert” tab, a variety of options will appear in the drop down menu. From the options, choose “Break.” Within the “Break” option, select the sub-option labeled “Section Break.” It’s important to note that there are two distinct types of section breaks available.
What is Section Break Next page
The next section will start on the following page of our document.
What is Section Break Continuous
The section break will be inserted within the same working page.
Insert > Break > Section Break
Step 4: Preview Section Break is added successfully
Now, take a moment to preview and confirm that the aforementioned steps have been successfully implemented in your document.
Section Break Applied Successfully
How to Show Page Breaks in Google Docs
Step 1: Click on the View Tab
To make the Page Breaks visible in our Google Docs.Navigate to the top menu bar of Google docs and click on “View”.
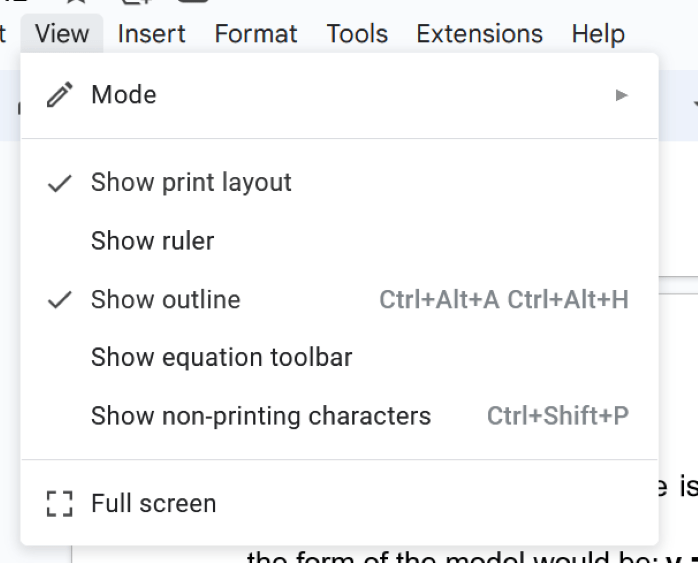
Clicking on View Tab
Step 2: Select Show Non-Printing Characters
After selecting the “View” tab within the sub-options, proceed to choose and enable the “Show Nonprinting Characters” option.
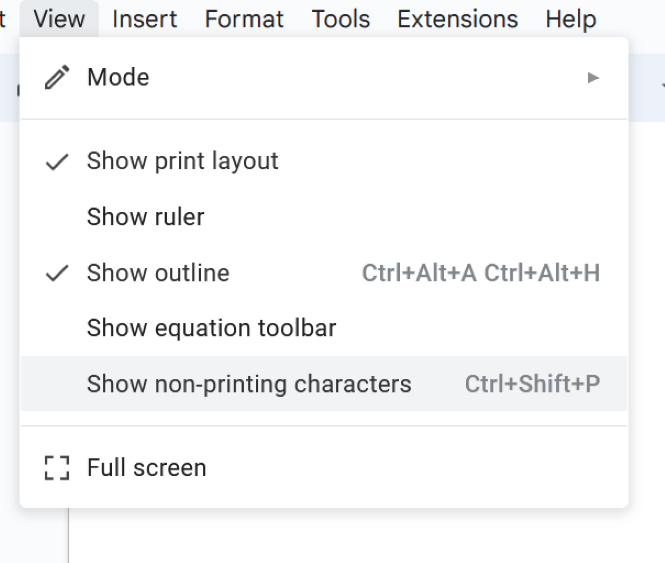
Selecting show non-printing characters option
Step 3: View the Breaks
After clicking on this option, we can easily view the page breaks, which are added to our document in Google Docs.
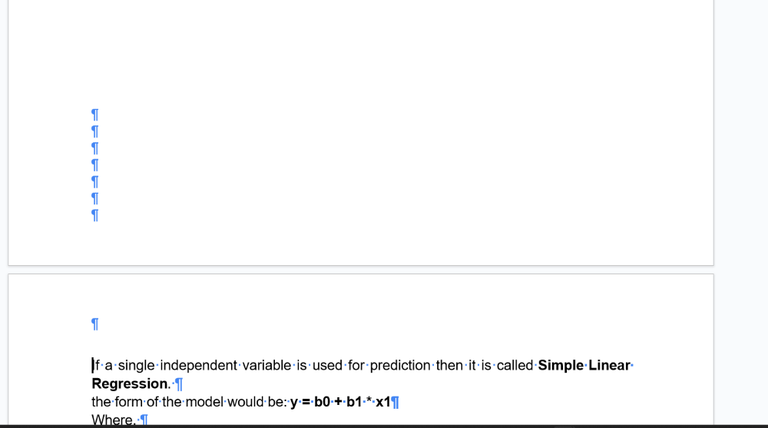
Page Breaks are Shown
How to Insert Page Breaks in Google Docs on Android
Google Docs is compatible with mobile devices in terms of portable applications, using this application we can add or insert page breaks in our content as per our requirements. So for inserting page breaks, we need to perform the below-specified steps:
Step 1: Install Google Docs
Download the Google Doc Application in your Mobile device.

Installing Google Docs
Step 2: Open the Google Doc
Once the installation of the application is finished, the next steps involve either creating a new document or accessing an already existing one. In this document.
Opening the Document
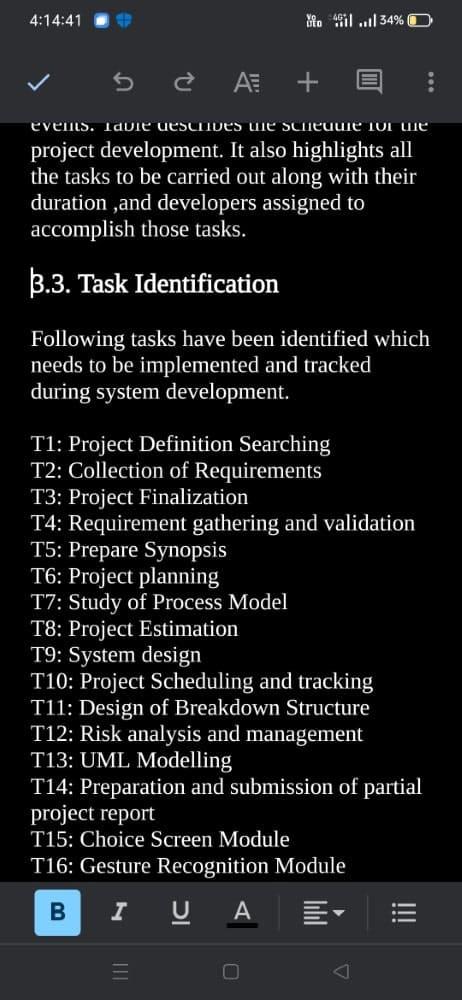
Step 3: Click on Edit Button
Now click on the edit button, it will be visible on the bottom right corner of the mobile screen in blue color.
Clicking on Edit Icon
Step 4: Choose Page Break Location
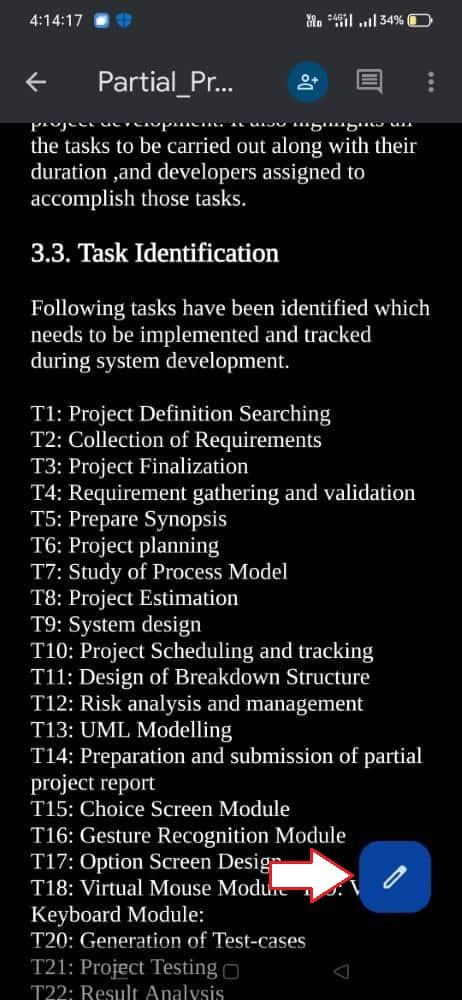
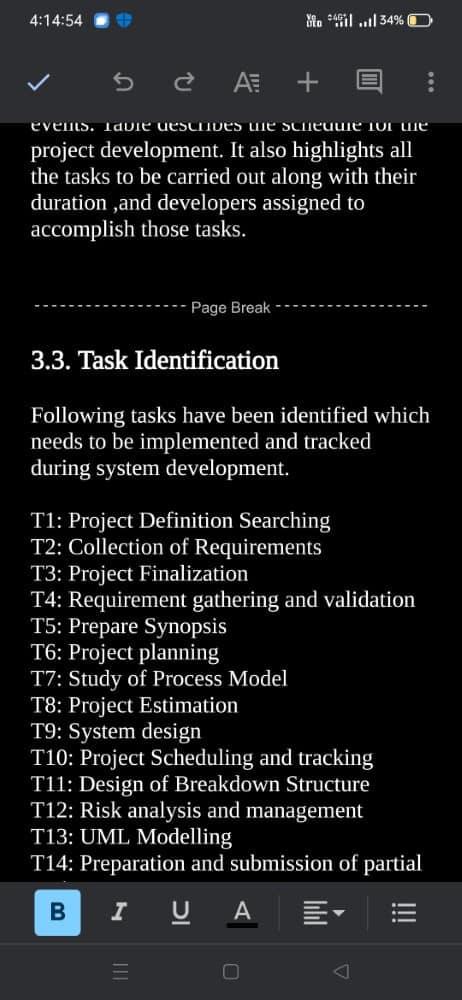
Now, it’s essential to select the specific area from which the page break will be applied. As shown in the screenshot below, you’ll notice that we’ve clicked on the text “3.3. Task Indentification” to indicate where the page break is to be implemented.
Selecting the Area
Step 5: Click on (+) Icon and Select Page Break
Once the page break location is chosen, the next step involves applying the page break itself. Click on the insert (+) icon, and from the dropdown menu, opt for the “Page break”.
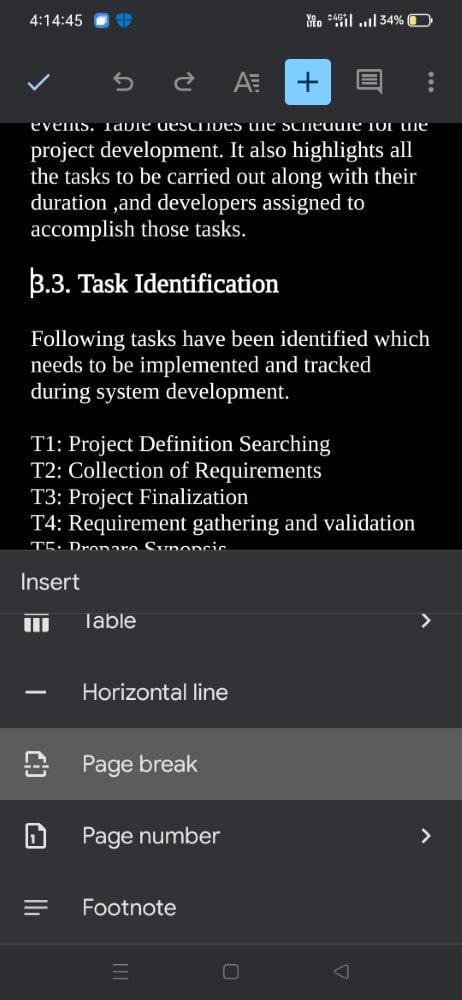
Clicking on the insert button and select the Page break option
Step 6: Preview Page Break
Upon selecting the “Page Break” option, the page break will be implemented starting from the chosen area or text, as illustrated in the screenshot below.
Page Break Applied
Inserting Page Break in Google Docs On iPhone
Note: The process of inserting a Page Break in your Google Docs document remains consistent for both iPhone and Android devices. Please follow the above steps to insert page break in your iOS device.
How to Remove Page Breaks and Section Breaks in Google Docs
Step 1: Open the Document
We need to open the document in which we need we need to delete the page and section break. We can open the existing document present on our Google Account, or we can also upload it from our local device.

Opening the Document
Step 2: Navigate to the Break Section and Place the Cursor
Once you’ve opened the document, navigate to the section where you’ve added a break. Then, position your cursor immediately after the page or section break.
Placing the Cursor
Step 3: Use Backspace Key on Windows
After repositioning the cursor correctly, proceed to press the backspace key located on your keyboard. Keep pressing this key until the page break or section break is entirely removed from your document.
Shortcut key for Mac: Use Fn” + “Delete” to Delete Page and Section Breaks
-768.png)
Using Backspace Key to remove breakSHo
Conclusion
Inserting page breaks in our Google document can be helpful for the enhancement of readability and presentation of our actual main content. By using this feature of page breaks in our document, we can present or structure our document professionally. Also, this will be helpful for readers who find it difficult to properly visualize or navigate to the actual content. We can add page breaks both through mobile devices or desktops. The steps that we have discussed in this article will properly help you to perform the page break on your document without any difficulty or issues.
FAQs
Does Page Break affect in printing of the document?
Page breaks actually ensusre that each section starts from the new page, which will be printed the same as the actual document.
Can we move a page break after inserting it into the document?
Yes, we can move a page break after inserting it in the document, We just need to click on the area and drag the page line to the new location within our document to adjust its position.
Whether it is allowed to remove the page break after insertion?
Yes, we can remove the page breaks after they are inserted, We need to just use the ‘Delete‘ key on the keyboard, and then the page break will get deleted.
What is the maximum number of page breaks that can be used in our document?
There is no fixed number of page breaks that can be used in the document, as per the requirement, we can perform the insertions of page breaks in our document.
What Is the Shortcut for Page Break in Google Docs?
For Windows machines, to implement page breaks using keyboard shortcuts, simply press the “Ctrl” and “Enter” keys simultaneously. This action seamlessly inserts a page break within your Google Docs Document. On Mac machines, the process involves using the “Command” and “Enter/Return” Keys in tandem.
What Is the Difference Between a Page Break and a Section Break in Google Docs?
Page Break in Google Docs is nothing but a feature in which we can only continue typing and adding content on the next page of our actual document. Whereas section breaks divides our content into the same page.
Share your thoughts in the comments
Please Login to comment...