Any group of individual objects that are represented as a single unit is known as a Java Collection of Objects. In Java, a separate framework named the “Collection Framework” has been defined in JDK 1.2 which holds all the Java Collection Classes and Interface in it.
In Java, the Collection interface (java.util.Collection) and Map interface (java.util.Map) are the two main “root” interfaces of Java collection classes.
What You Should Learn in Java Collections?
What is a Framework in Java?
A framework is a set of classes and interfaces which provide a ready-made architecture. In order to implement a new feature or a class, there is no need to define a framework. However, an optimal object-oriented design always includes a framework with a collection of classes such that all the classes perform the same kind of task.
Need for a Separate Collection Framework in Java
Before the Collection Framework(or before JDK 1.2) was introduced, the standard methods for grouping Java objects (or collections) were Arrays or Vectors, or Hashtables. All of these collections had no common interface. Therefore, though the main aim of all the collections is the same, the implementation of all these collections was defined independently and had no correlation among them. And also, it is very difficult for the users to remember all the different methods, syntax, and constructors present in every collection class.
Let’s understand this with an example of adding an element in a hashtable and a vector.
Example:
Java
import java.io.*;
import java.util.*;
class CollectionDemo {
public static void main(String[] args)
{
int arr[] = new int[] { 1, 2, 3, 4 };
Vector<Integer> v = new Vector();
Hashtable<Integer, String> h = new Hashtable();
v.addElement(1);
v.addElement(2);
h.put(1, "geeks");
h.put(2, "4geeks");
System.out.println(arr[0]);
System.out.println(v.elementAt(0));
System.out.println(h.get(1));
}
}
|
As we can observe, none of these collections(Array, Vector, or Hashtable) implements a standard member access interface, it was very difficult for programmers to write algorithms that can work for all kinds of Collections. Another drawback is that most of the ‘Vector’ methods are final, meaning we cannot extend the ’Vector’ class to implement a similar kind of Collection. Therefore, Java developers decided to come up with a common interface to deal with the above-mentioned problems and introduced the Collection Framework in JDK 1.2 post which both, legacy Vectors and Hashtables were modified to conform to the Collection Framework.
Advantages of the Java Collection Framework
Since the lack of a collection framework gave rise to the above set of disadvantages, the following are the advantages of the collection framework.
- Consistent API: The API has a basic set of interfaces like Collection, Set, List, or Map, all the classes (ArrayList, LinkedList, Vector, etc) that implement these interfaces have some common set of methods.
- Reduces programming effort: A programmer doesn’t have to worry about the design of the Collection but rather he can focus on its best use in his program. Therefore, the basic concept of Object-oriented programming (i.e.) abstraction has been successfully implemented.
- Increases program speed and quality: Increases performance by providing high-performance implementations of useful data structures and algorithms because in this case, the programmer need not think of the best implementation of a specific data structure. He can simply use the best implementation to drastically boost the performance of his algorithm/program.
Hierarchy of the Collection Framework in Java
The utility package, (java.util) contains all the classes and interfaces that are required by the collection framework. The collection framework contains an interface named an iterable interface which provides the iterator to iterate through all the collections. This interface is extended by the main collection interface which acts as a root for the collection framework. All the collections extend this collection interface thereby extending the properties of the iterator and the methods of this interface. The following figure illustrates the hierarchy of the collection framework.
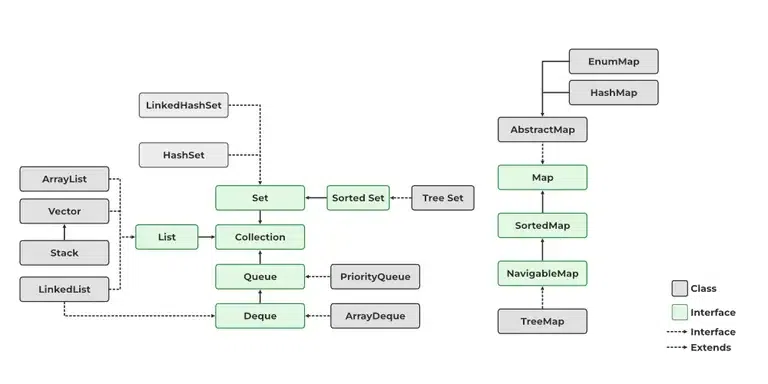
Before understanding the different components in the above framework, let’s first understand a class and an interface.
- Class: A class is a user-defined blueprint or prototype from which objects are created. It represents the set of properties or methods that are common to all objects of one type.
- Interface: Like a class, an interface can have methods and variables, but the methods declared in an interface are by default abstract (only method signature, nobody). Interfaces specify what a class must do and not how. It is the blueprint of the class.
Methods of the Collection Interface
This interface contains various methods which can be directly used by all the collections which implement this interface. They are:
|
Method
|
Description
|
| add(Object) |
This method is used to add an object to the collection. |
| addAll(Collection c) |
This method adds all the elements in the given collection to this collection. |
| clear() |
This method removes all of the elements from this collection. |
| contains(Object o) |
This method returns true if the collection contains the specified element. |
| containsAll(Collection c) |
This method returns true if the collection contains all of the elements in the given collection. |
| equals(Object o) |
This method compares the specified object with this collection for equality. |
| hashCode() |
This method is used to return the hash code value for this collection. |
| isEmpty() |
This method returns true if this collection contains no elements. |
| iterator() |
This method returns an iterator over the elements in this collection. |
max()
|
This method is used to return the maximum value present in the collection. |
| parallelStream() |
This method returns a parallel Stream with this collection as its source. |
| remove(Object o) |
This method is used to remove the given object from the collection. If there are duplicate values, then this method removes the first occurrence of the object. |
| removeAll(Collection c) |
This method is used to remove all the objects mentioned in the given collection from the collection. |
| removeIf(Predicate filter) |
This method is used to remove all the elements of this collection that satisfy the given predicate. |
| retainAll(Collection c) |
This method is used to retain only the elements in this collection that are contained in the specified collection. |
| size() |
This method is used to return the number of elements in the collection. |
| spliterator() |
This method is used to create a Spliterator over the elements in this collection. |
| stream() |
This method is used to return a sequential Stream with this collection as its source. |
| toArray() |
This method is used to return an array containing all of the elements in this collection. |
Interfaces that extend the Java Collections Interface
The collection framework contains multiple interfaces where every interface is used to store a specific type of data. The following are the interfaces present in the framework.
This is the root interface for the entire collection framework. The collection interface extends the iterable interface. Therefore, inherently, all the interfaces and classes implement this interface. The main functionality of this interface is to provide an iterator for the collections. Therefore, this interface contains only one abstract method which is the iterator. It returns the
Iterator iterator();
This interface extends the iterable interface and is implemented by all the classes in the collection framework. This interface contains all the basic methods which every collection has like adding the data into the collection, removing the data, clearing the data, etc. All these methods are implemented in this interface because these methods are implemented by all the classes irrespective of their style of implementation. And also, having these methods in this interface ensures that the names of the methods are universal for all the collections. Therefore, in short, we can say that this interface builds a foundation on which the collection classes are implemented.
This is a child interface of the collection interface. This interface is dedicated to the data of the list type in which we can store all the ordered collections of the objects. This also allows duplicate data to be present in it. This list interface is implemented by various classes like ArrayList, Vector, Stack, etc. Since all the subclasses implement the list, we can instantiate a list object with any of these classes.
For example:
List <T> al = new ArrayList<> ();
List <T> ll = new LinkedList<> ();
List <T> v = new Vector<> ();
Where T is the type of the object
The classes which implement the List interface are as follows:
ArrayList provides us with dynamic arrays in Java. Though, it may be slower than standard arrays but can be helpful in programs where lots of manipulation in the array is needed. The size of an ArrayList is increased automatically if the collection grows or shrinks if the objects are removed from the collection. Java ArrayList allows us to randomly access the list. ArrayList can not be used for primitive types, like int, char, etc. We will need a wrapper class for such cases.
Let’s understand the ArrayList with the following example:
Java
import java.io.*;
import java.util.*;
class GFG {
public static void main(String[] args)
{
ArrayList<Integer> al = new ArrayList<Integer>();
for (int i = 1; i <= 5; i++)
al.add(i);
System.out.println(al);
al.remove(3);
System.out.println(al);
for (int i = 0; i < al.size(); i++)
System.out.print(al.get(i) + " ");
}
}
|
Output
[1, 2, 3, 4, 5]
[1, 2, 3, 5]
1 2 3 5
The LinkedList class is an implementation of the LinkedList data structure which is a linear data structure where the elements are not stored in contiguous locations and every element is a separate object with a data part and address part. The elements are linked using pointers and addresses. Each element is known as a node.
Let’s understand the LinkedList with the following example:
Java
import java.io.*;
import java.util.*;
class GFG {
public static void main(String[] args)
{
LinkedList<Integer> ll = new LinkedList<Integer>();
for (int i = 1; i <= 5; i++)
ll.add(i);
System.out.println(ll);
ll.remove(3);
System.out.println(ll);
for (int i = 0; i < ll.size(); i++)
System.out.print(ll.get(i) + " ");
}
}
|
Output
[1, 2, 3, 4, 5]
[1, 2, 3, 5]
1 2 3 5
A vector provides us with dynamic arrays in Java. Though, it may be slower than standard arrays but can be helpful in programs where lots of manipulation in the array is needed. This is identical to ArrayList in terms of implementation. However, the primary difference between a vector and an ArrayList is that a Vector is synchronized and an ArrayList is non-synchronized.
Let’s understand the Vector with an example:
Java
import java.io.*;
import java.util.*;
class GFG {
public static void main(String[] args)
{
Vector<Integer> v = new Vector<Integer>();
for (int i = 1; i <= 5; i++)
v.add(i);
System.out.println(v);
v.remove(3);
System.out.println(v);
for (int i = 0; i < v.size(); i++)
System.out.print(v.get(i) + " ");
}
}
|
Output
[1, 2, 3, 4, 5]
[1, 2, 3, 5]
1 2 3 5
Stack class models and implements the Stack data structure. The class is based on the basic principle of last-in-first-out. In addition to the basic push and pop operations, the class provides three more functions empty, search, and peek. The class can also be referred to as the subclass of Vector.
Let’s understand the stack with an example:
Java
import java.util.*;
public class GFG {
public static void main(String args[])
{
Stack<String> stack = new Stack<String>();
stack.push("Geeks");
stack.push("For");
stack.push("Geeks");
stack.push("Geeks");
Iterator<String> itr = stack.iterator();
while (itr.hasNext()) {
System.out.print(itr.next() + " ");
}
System.out.println();
stack.pop();
itr = stack.iterator();
while (itr.hasNext()) {
System.out.print(itr.next() + " ");
}
}
}
|
Output
Geeks For Geeks Geeks
Geeks For Geeks
Note: Stack is a subclass of Vector and a legacy class. It is thread-safe which might be overhead in an environment where thread safety is not needed. An alternate to Stack is to use ArrayDequeue which is not thread-safe and has faster array implementation.
As the name suggests, a queue interface maintains the FIFO(First In First Out) order similar to a real-world queue line. This interface is dedicated to storing all the elements where the order of the elements matter. For example, whenever we try to book a ticket, the tickets are sold on a first come first serve basis. Therefore, the person whose request arrives first into the queue gets the ticket. There are various classes like PriorityQueue, ArrayDeque, etc. Since all these subclasses implement the queue, we can instantiate a queue object with any of these classes.
For example:
Queue <T> pq = new PriorityQueue<> ();
Queue <T> ad = new ArrayDeque<> ();
Where T is the type of the object.
The most frequently used implementation of the queue interface is the PriorityQueue.
A PriorityQueue is used when the objects are supposed to be processed based on priority. It is known that a queue follows the First-In-First-Out algorithm, but sometimes the elements of the queue are needed to be processed according to the priority and this class is used in these cases. The PriorityQueue is based on the priority heap. The elements of the priority queue are ordered according to the natural ordering, or by a Comparator provided at queue construction time, depending on which constructor is used.
Let’s understand the priority queue with an example:
Java
import java.util.*;
class GfG {
public static void main(String args[])
{
PriorityQueue<Integer> pQueue
= new PriorityQueue<Integer>();
pQueue.add(10);
pQueue.add(20);
pQueue.add(15);
System.out.println(pQueue.peek());
System.out.println(pQueue.poll());
System.out.println(pQueue.peek());
}
}
|
This is a very slight variation of the queue data structure. Deque, also known as a double-ended queue, is a data structure where we can add and remove elements from both ends of the queue. This interface extends the queue interface. The class which implements this interface is ArrayDeque. Since ArrayDeque class implements the Deque interface, we can instantiate a deque object with this class.
For example:
Deque<T> ad = new ArrayDeque<> ();
Where T is the type of the object.
The class which implements the deque interface is ArrayDeque.
ArrayDeque
ArrayDeque class which is implemented in the collection framework provides us with a way to apply resizable array. This is a special kind of array that grows and allows users to add or remove an element from both sides of the queue. Array deques have no capacity restrictions and they grow as necessary to support usage.
Let’s understand ArrayDeque with an example:
Java
import java.util.*;
public class ArrayDequeDemo {
public static void main(String[] args)
{
ArrayDeque<Integer> de_que
= new ArrayDeque<Integer>(10);
de_que.add(10);
de_que.add(20);
de_que.add(30);
de_que.add(40);
de_que.add(50);
System.out.println(de_que);
de_que.clear();
de_que.addFirst(564);
de_que.addFirst(291);
de_que.addLast(24);
de_que.addLast(14);
System.out.println(de_que);
}
}
|
Output
[10, 20, 30, 40, 50]
[291, 564, 24, 14]
A set is an unordered collection of objects in which duplicate values cannot be stored. This collection is used when we wish to avoid the duplication of the objects and wish to store only the unique objects. This set interface is implemented by various classes like HashSet, TreeSet, LinkedHashSet, etc. Since all the subclasses implement the set, we can instantiate a set object with any of these classes.
For example:
Set<T> hs = new HashSet<> ();
Set<T> lhs = new LinkedHashSet<> ();
Set<T> ts = new TreeSet<> ();
Where T is the type of the object.
The following are the classes that implement the Set interface:
The HashSet class is an inherent implementation of the hash table data structure. The objects that we insert into the HashSet do not guarantee to be inserted in the same order. The objects are inserted based on their hashcode. This class also allows the insertion of NULL elements. Let’s understand HashSet with an example:
Java
import java.util.*;
public class HashSetDemo {
public static void main(String args[])
{
HashSet<String> hs = new HashSet<String>();
hs.add("Geeks");
hs.add("For");
hs.add("Geeks");
hs.add("Is");
hs.add("Very helpful");
Iterator<String> itr = hs.iterator();
while (itr.hasNext()) {
System.out.println(itr.next());
}
}
}
|
Output
Very helpful
Geeks
For
Is
A LinkedHashSet is very similar to a HashSet. The difference is that this uses a doubly linked list to store the data and retains the ordering of the elements.
Let’s understand the LinkedHashSet with an example:
Java
import java.util.*;
public class LinkedHashSetDemo {
public static void main(String args[])
{
LinkedHashSet<String> lhs
= new LinkedHashSet<String>();
lhs.add("Geeks");
lhs.add("For");
lhs.add("Geeks");
lhs.add("Is");
lhs.add("Very helpful");
Iterator<String> itr = lhs.iterator();
while (itr.hasNext()) {
System.out.println(itr.next());
}
}
}
|
Output
Geeks
For
Is
Very helpful
This interface is very similar to the set interface. The only difference is that this interface has extra methods that maintain the ordering of the elements. The sorted set interface extends the set interface and is used to handle the data which needs to be sorted. The class which implements this interface is TreeSet. Since this class implements the SortedSet, we can instantiate a SortedSet object with this class.
For example:
SortedSet<T> ts = new TreeSet<> ();
Where T is the type of the object.
The class which implements the sorted set interface is TreeSet.
TreeSet
The TreeSet class uses a Tree for storage. The ordering of the elements is maintained by a set using their natural ordering whether or not an explicit comparator is provided. This must be consistent with equals if it is to correctly implement the Set interface. It can also be ordered by a Comparator provided at a set creation time, depending on which constructor is used.
Let’s understand TreeSet with an example:
Java
import java.util.*;
public class TreeSetDemo {
public static void main(String args[])
{
TreeSet<String> ts = new TreeSet<String>();
ts.add("Geeks");
ts.add("For");
ts.add("Geeks");
ts.add("Is");
ts.add("Very helpful");
Iterator<String> itr = ts.iterator();
while (itr.hasNext()) {
System.out.println(itr.next());
}
}
}
|
Output
For
Geeks
Is
Very helpful
A map is a data structure that supports the key-value pair for mapping the data. This interface doesn’t support duplicate keys because the same key cannot have multiple mappings, however, it allows duplicate values in different keys. A map is useful if there is data and we wish to perform operations on the basis of the key. This map interface is implemented by various classes like HashMap, TreeMap, etc. Since all the subclasses implement the map, we can instantiate a map object with any of these classes.
For example:
Map<T> hm = new HashMap<> ();
Map<T> tm = new TreeMap<> ();

Where T is the type of the object.
The frequently used implementation of a Map interface is a HashMap.
HashMap provides the basic implementation of the Map interface of Java. It stores the data in (Key, Value) pairs. To access a value in a HashMap, we must know its key. HashMap uses a technique called Hashing. Hashing is a technique of converting a large String to a small String that represents the same String so that the indexing and search operations are faster. HashSet also uses HashMap internally.
Let’s understand the HashMap with an example:
Java
import java.util.*;
public class HashMapDemo {
public static void main(String args[])
{
HashMap<Integer, String> hm
= new HashMap<Integer, String>();
hm.put(1, "Geeks");
hm.put(2, "For");
hm.put(3, "Geeks");
System.out.println("Value for 1 is " + hm.get(1));
for (Map.Entry<Integer, String> e : hm.entrySet())
System.out.println(e.getKey() + " "
+ e.getValue());
}
}
|
Output
Value for 1 is Geeks
1 Geeks
2 For
3 Geeks
Share your thoughts in the comments
Please Login to comment...