Reading an image in OpenCV using Python
Last Updated :
29 Mar, 2023
Prerequisite: Basics of OpenCV
In this article, we’ll try to open an image by using OpenCV (Open Source Computer Vision) library. Following types of files are supported in OpenCV library:
- Windows bitmaps – *.bmp, *.dib
- JPEG files – *.jpeg, *.jpg
- Portable Network Graphics – *.png
- WebP – *.webp
- Sun rasters – *.sr, *.ras
- TIFF files – *.tiff, *.tif
- Raster and Vector geospatial data supported by GDAL
To use the OpenCV library in python, we need to install these libraries as a prerequisite:
- Numpy Library : The computer processes images in the form of a matrix for which NumPy is used and OpenCV uses it in the background.
- OpenCV python : OpenCV library previously it was cv but the updated version is cv2. It is used to manipulate images and videos.
To install these libraries, we need to run these pip commands in cmd:
pip install opencv-python
pip install numpy
pip install matplotlib
The steps to read and display an image in OpenCV are:
1. Read an image using imread() function.
2. Create a GUI window and display image using imshow() function.
3. Use function waitkey(0) to hold the image window on the screen by the specified number of seconds, o means till the user closes it, it will hold GUI window on the screen.
4. Delete image window from the memory after displaying using destroyAllWindows() function.
Let’s start reading an image. using cv2.
To read the images cv2.imread() method is used. This method loads an image from the specified file. If the image cannot be read (because of missing file, improper permissions, unsupported or invalid format) then this method returns an empty matrix.
Syntax: cv2.imread(path, flag)
Parameters:
path: A string representing the path of the image to be read.
flag: It specifies the way in which image should be read. It’s default value is cv2.IMREAD_COLOR
Return Value: This method returns an image that is loaded from the specified file.
Note:
- The image should be in the working directory or a full path of image should be given.
- By default, OpenCV stores colored images in BGR(Blue Green and Red) format.
All three types of flags are described below:
cv2.IMREAD_COLOR: It specifies to load a color image. Any transparency of image will be neglected. It is the default flag. Alternatively, we can pass integer value 1 for this flag.
cv2.IMREAD_GRAYSCALE: It specifies to load an image in grayscale mode. Alternatively, we can pass integer value 0 for this flag.
cv2.IMREAD_UNCHANGED: It specifies to load an image as such including alpha channel. Alternatively, we can pass integer value -1 for this flag.
Below codes are implementations to read images and display images on the screen using OpenCV and matplotlib libraries functions.
Example #1 (Using OpenCV) :
Image used is:
Python3
import cv2
img = cv2.imread("geeksforgeeks.png", cv2.IMREAD_COLOR)
cv2.imshow("image", img)
cv2.waitKey(0)
cv2.destroyAllWindows()
|
Output:
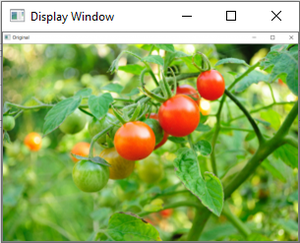
Reading an image using cv2 in BGR format
We can see the shape , i.e., width and height and channels of the image using shape attribute.
img.shape
Output:
(225, 225, 3)
Matplotlib library uses RGB color format to read a colored image. Here we are demonstrating an example of reading an image using this library.
Example#2
Python3
import cv2
import numpy as np
import matplotlib.pyplot as plt
img=cv2.imread("geeks.png")
plt.imshow(img)
plt.waitforbuttonpress()
plt.close('all')
|
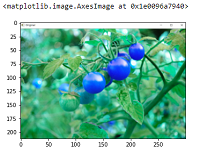
Image read using cv2 and displaying using matplotlib will display picture in BGR format.
Note: See the difference in colors of images read by cv2 and matplotlib library. Because cv2 uses BGR color format and matplotlib uses RGB color format. To convert BGR to RGB, we us a function:
Example#3:
Python3
import cv2
import numpy as np
import matplotlib.pyplot as plt
img=cv2.imread("geeks.png")
RGB_img = cv2.cvtColor(img, cv2.COLOR_BGR2RGB)
plt.imshow(RGB_img)
plt.waitforbuttonpress()
plt.close('all')
|
Output:
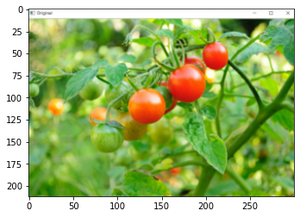
BGR color format changes to RGB color format
Example #4: Opening in grayscale mode
Python
import cv2
path = r'geeksforgeeks.png'
img = cv2.imread(path, cv2.IMREAD_GRAYSCALE)
cv2.imshow('image', img)
cv2.waitKey(0)
cv2.destroyAllWindows()
|
Output :

The shape of the grayscale image can be displayed using shape attribute.
img.shape
Output:
(225, 225)
Share your thoughts in the comments
Please Login to comment...