Python | Intensity Transformation Operations on Images
Last Updated :
04 Jan, 2023
Intensity transformations are applied on images for contrast manipulation or image thresholding. These are in the spatial domain, i.e. they are performed directly on the pixels of the image at hand, as opposed to being performed on the Fourier transform of the image.
The following are commonly used intensity transformations:
- Image Negatives (Linear)
- Log Transformations
- Power-Law (Gamma) Transformations
- Piecewise-Linear Transformation Functions
 Spatial Domain Processes –
Spatial domain processes can be described using the equation:
![g(x, y) = T[f(x, y)]](https://www.geeksforgeeks.org/wp-content/ql-cache/quicklatex.com-02ae9f735d7fde31dafa2460b4c2da6d_l3.png "Rendered by QuickLaTeX.com")
where

is the input image,
T is an operator on
f defined over a neighbourhood of the point
(x, y), and

is the output.
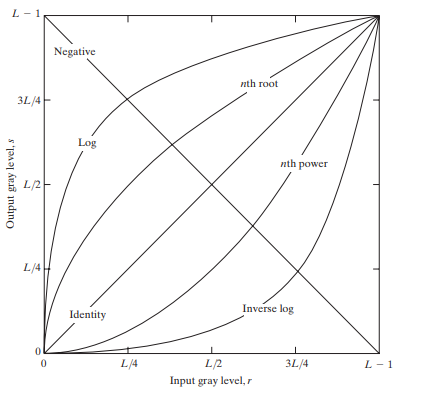
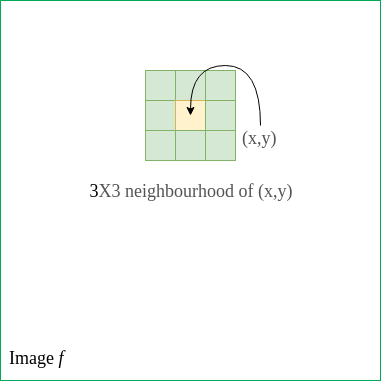 Image Negatives –
Image negatives are discussed in this
article. Mathematically, assume that an image goes from intensity levels 0 to (L-1). Generally, L = 256. Then, the negative transformation can be described by the expression
s = L-1-r where r is the initial intensity level and s is the final intensity level of a pixel. This produces a photographic negative.
Log Transformations –
Mathematically, log transformations can be expressed as
s = clog(1+r). Here, s is the output intensity, r>=0 is the input intensity of the pixel, and c is a scaling constant. c is given by
255/(log (1 + m)), where m is the maximum pixel value in the image. It is done to ensure that the final pixel value does not exceed (L-1), or 255. Practically, log transformation maps a narrow range of low-intensity input values to a wide range of output values.
Consider the following input image.

Below is the code to apply log transformation to the image.
import cv2
import numpy as np
img = cv2.imread('sample.jpg')
c = 255/(np.log(1 + np.max(img)))
log_transformed = c * np.log(1 + img)
log_transformed = np.array(log_transformed, dtype = np.uint8)
cv2.imwrite('log_transformed.jpg', log_transformed)
|
Below is the log-transformed output.

Power-Law (Gamma) Transformation –
Power-law (gamma) transformations can be mathematically expressed as

. Gamma correction is important for displaying images on a screen correctly, to prevent bleaching or darkening of images when viewed from different types of monitors with different display settings. This is done because our eyes perceive images in a gamma-shaped curve, whereas cameras capture images in a linear fashion. Below is the Python code to apply gamma correction.
import cv2
import numpy as np
img = cv2.imread('sample.jpg')
for gamma in [0.1, 0.5, 1.2, 2.2]:
gamma_corrected = np.array(255*(img / 255) ** gamma, dtype = 'uint8')
cv2.imwrite('gamma_transformed'+str(gamma)+'.jpg', gamma_corrected)
|
Below are the gamma-corrected outputs for different values of gamma.
Gamma = 0.1:
 Gamma = 0.5:
 Gamma = 1.2:
 Gamma = 2.2:

As can be observed from the outputs as well as the graph, gamma>1 (indicated by the curve corresponding to ‘nth power’ label on the graph), the intensity of pixels decreases i.e. the image becomes darker. On the other hand, gamma<1 (indicated by the curve corresponding to 'nth root' label on the graph), the intensity increases i.e. the image becomes lighter.
Piecewise-Linear Transformation Functions –
These functions, as the name suggests, are not entirely linear in nature. However, they are linear between certain x-intervals. One of the most commonly used piecewise-linear transformation functions is contrast stretching.
Contrast can be defined as:
Contrast = (I_max - I_min)/(I_max + I_min)
This process expands the range of intensity levels in an image so that it spans the full intensity of the camera/display. The figure below shows the graph corresponding to the contrast stretching.
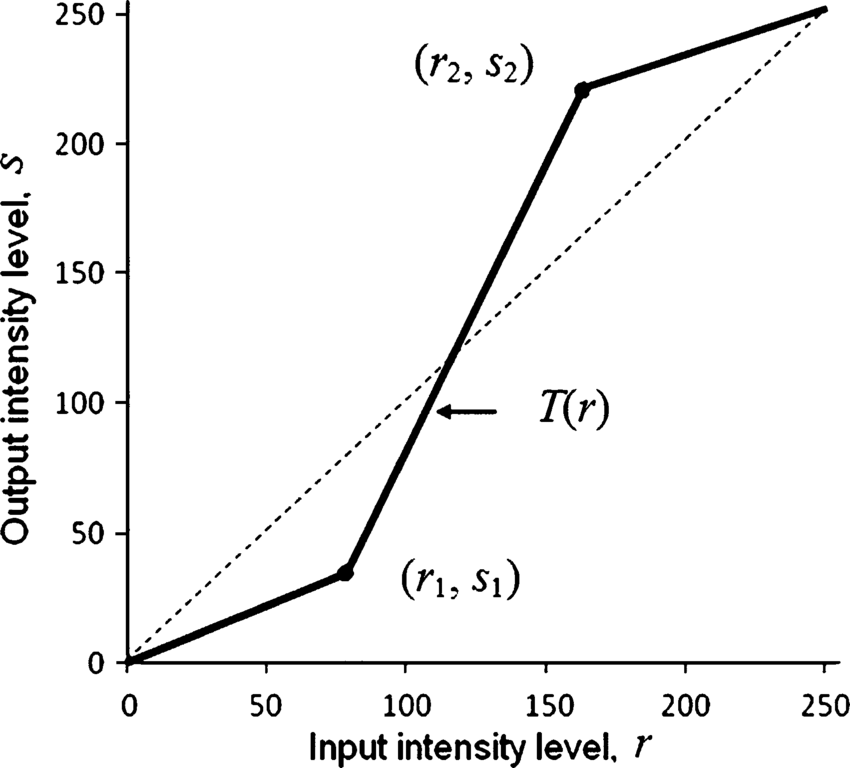
With (r1, s1), (r2, s2) as parameters, the function stretches the intensity levels by essentially decreasing the intensity of the dark pixels and increasing the intensity of the light pixels. If
r1 = s1 = 0 and
r2 = s2 = L-1, the function becomes a straight dotted line in the graph (which gives no effect). The function is monotonically increasing so that the order of intensity levels between pixels is preserved.
Below is the Python code to perform contrast stretching.
import cv2
import numpy as np
def pixelVal(pix, r1, s1, r2, s2):
if (0 <= pix and pix <= r1):
return (s1 / r1)*pix
elif (r1 < pix and pix <= r2):
return ((s2 - s1)/(r2 - r1)) * (pix - r1) + s1
else:
return ((255 - s2)/(255 - r2)) * (pix - r2) + s2
img = cv2.imread('sample.jpg')
r1 = 70
s1 = 0
r2 = 140
s2 = 255
pixelVal_vec = np.vectorize(pixelVal)
contrast_stretched = pixelVal_vec(img, r1, s1, r2, s2)
cv2.imwrite('contrast_stretch.jpg', contrast_stretched)
|
Output:

Share your thoughts in the comments
Please Login to comment...