Python Tkinter – Label
Last Updated :
01 May, 2024
Tkinter Label is a widget that is used to implement display boxes where you can place text or images. The text displayed by this widget can be changed by the developer at any time you want. It is also used to perform tasks such as underlining the part of the text and spanning the text across multiple lines. It is important to note that a label can use only one font at a time to display text. To use a label, you just have to specify what to display in it (this can be text, a bitmap, or an image).
Note: For more reference, you can read our article,
- What is Widgets
- Python Tkinter Overview
- Python Tkinter Tutorial
Tkinter Label Widget Syntax
Syntax: Label ( master, option )
Parameters:
- master: This represents the parent window
- options: Below is the list of most commonly used options for this widget. These options can be used as key-value pairs separated by commas.
Tkinter Label Options
- anchor: This option is used to control the positioning of the text if the widget has more space than required for the text. The default is anchor=CENTER, which centers the text in the available space.
- bg: This option is used to set the normal background color displayed behind the label and indicator.
- height:This option is used to set the vertical dimension of the new frame.
- width:Width of the label in characters (not pixels!). If this option is not set, the label will be sized to fit its contents.
- bd:This option is used to set the size of the border around the indicator. Default bd value is set on 2 pixels.
- font:If you are displaying text in the label (with the text or textvariable option), the font option is used to specify in what font that text in the label will be displayed.
- cursor:It is used to specify what cursor to show when the mouse is moved over the label. The default is to use the standard cursor.
- textvariable: As the name suggests it is associated with a Tkinter variable (usually a StringVar) with the label. If the variable is changed, the label text is updated.
- bitmap:It is used to set the bitmap to the graphical object specified so that, the label can represent the graphics instead of text.
- fg:The label clior, used for text and bitmap labels. The default is system specific. If you are displaying a bitmap, this is the clior that will appear at the position of the 1-bits in the bitmap.
- image: This option is used to display a static image in the label widget.
- padx:This option is used to add extra spaces between left and right of the text within the label.The default value for this option is 1.
- pady:This option is used to add extra spaces between top and bottom of the text within the label.The default value for this option is 1.
- justify:This option is used to define how to align multiple lines of text. Use LEFT, RIGHT, or CENTER as its values. Note that to position the text inside the widget, use the anchor option. Default value for justify is CENTER.
- relief: This option is used to specify appearance of a decorative border around the label. The default value for this option is FLAT.
- underline:This
- wraplength:Instead of having only one line as the label text it can be broken into to the number of lines where each line has the number of characters specified to this option.
Label Widget in Tkinter Example
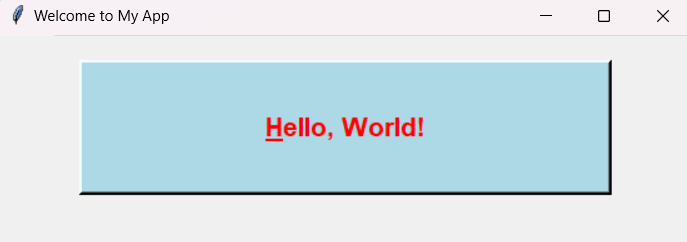
In this example, below Python code creates a Tkinter GUI window with a labeled text “Hello, World!”. The label is styled with specific attributes such as font, color, and dimensions, and it’s positioned at the center with a raised border. Finally, the main event loop is started to display the GUI window until the user interacts with it.
Python3
import tkinter as tk

# Create the main window
root = tk.Tk()
root.geometry("400x250")  # Set window size
root.title("Welcome to My App")  # Set window title

# Create a StringVar to associate with the label
text_var = tk.StringVar()
text_var.set("Hello, World!")

# Create the label widget with all options
label = tk.Label(root,
                 textvariable=text_var,
                 anchor=tk.CENTER,
                 bg="lightblue",
                 height=3,
                 width=30,
                 bd=3,
                 font=("Arial", 16, "bold"),
                 cursor="hand2",
                 fg="red",
                 padx=15,
                 pady=15,
                 justify=tk.CENTER,
                 relief=tk.RAISED,
                 underline=0,
                 wraplength=250
                )

# Pack the label into the window
label.pack(pady=20)  # Add some padding to the top


# Run the main event loop
root.mainloop()
Output
Python Tkiner – Label
Share your thoughts in the comments
Please Login to comment...