How To Use Jupyter Notebook – An Ultimate Guide
Last Updated :
08 Mar, 2024
The Jupyter Notebook is an open-source web application that allows you to create and share documents that contain live code, equations, visualizations, and narrative text. Uses include data cleaning and transformation, numerical simulation, statistical modeling, data visualization, machine learning, and much more. Jupyter has support for over 40 different programming languages and Python is one of them. Python is a requirement (Python 3.3 or greater, or Python 2.7) for installing the Jupyter Notebook itself.
Table Of Content
Installation
Install Python and Jupyter using the Anaconda Distribution, which includes Python, the Jupyter Notebook, and other commonly used packages for scientific computing and data science. You can download Anaconda’s latest Python3 version. Now, install the downloaded version of Anaconda. Installing Jupyter Notebook using pip:
python3 -m pip install --upgrade pip
python3 -m pip install jupyter
Starting Jupyter Notebook
To start the jupyter notebook, type the below command in the terminal.
jupyter notebook
This will print some information about the notebook server in your terminal, including the URL of the web application (by default, http://localhost:8888) and then open your default web browser to this URL.  After the notebook is opened, you’ll see the Notebook Dashboard, which will show a list of the notebooks, files, and subdirectories in the directory where the notebook server was started. Most of the time, you will wish to start a notebook server in the highest level directory containing notebooks. Often this will be your home directory.
Creating a Notebook
To create a new notebook, click on the new button at the top right corner. Click it to open a drop-down list and then if you’ll click on Python3, it will open a new notebook.  The web page should look like this:
Hello World in Jupyter Notebook
After successfully installing and creating a notebook in Jupyter Notebook, let’s see how to write code in it. Jupyter notebook provides a cell for writing code in it. The type of code depends on the type of notebook you created. For example, if you created a Python3 notebook then you can write Python3 code in the cell. Now, let’s add the following code –
To run a cell either click the run button or press shift ⇧ + enter ⏎ after selecting the cell you want to execute. After writing the above code in the jupyter notebook, the output was:  Note: When a cell has executed the label on the left i.e. ln[] changes to ln[1]. If the cell is still under execution the label remains ln[*].
Cells in Jupyter Notebook
Cells can be considered as the body of the Jupyter. In the above screenshot, the box with the green outline is a cell. There are 3 types of cell:
- Code
- Markup
- Raw NBConverter
Code
This is where the code is typed and when executed the code will display the output below the cell. The type of code depends on the type of the notebook you have created. For example, if the notebook of Python3 is created then the code of Python3 can be added. Consider the below example, where a simple code of the Fibonacci series is created and this code also takes input from the user. Example:  The tex bar in the above code is prompted for taking input from the user. The output of the above code is as follows: Output:
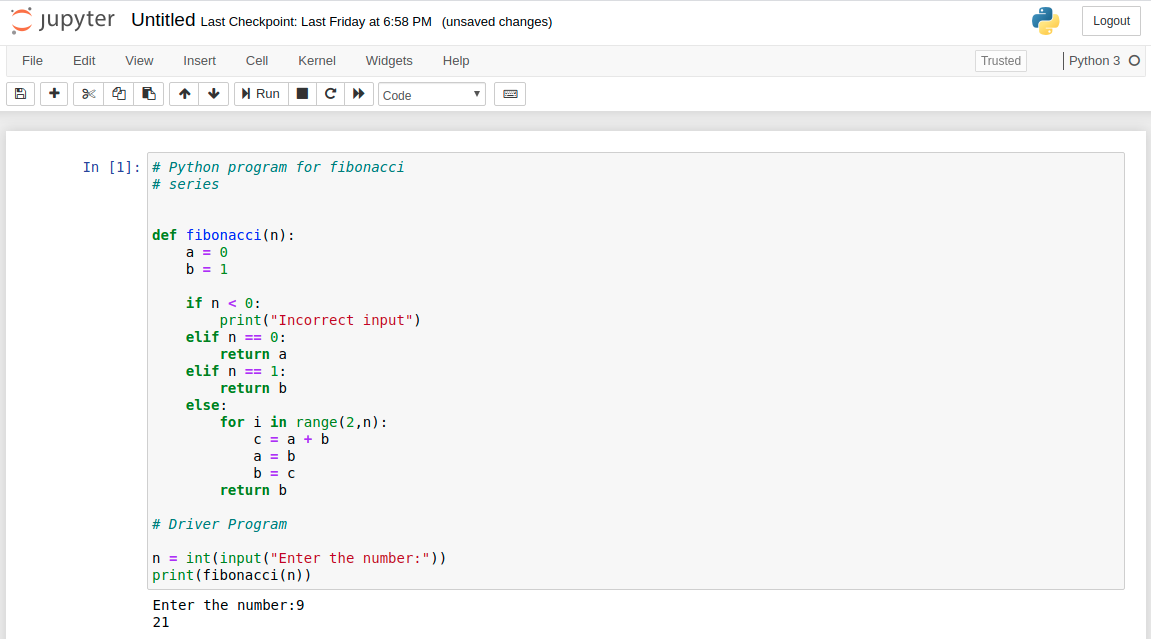
Markdown
Markdown is a popular markup language that is the superset of the HTML. Jupyter Notebook also supports markdown. The cell type can be changed to markdown using the cell menu.  Adding Headers: Heading can be added by prefixing any line by single or multiple ‘#’ followed by space. Example:
  Output:
  Adding List: Adding List is really simple in Jupyter Notebook. The list can be added by using ‘*’ sign. And the Nested list can be created by using indentation. Example:
 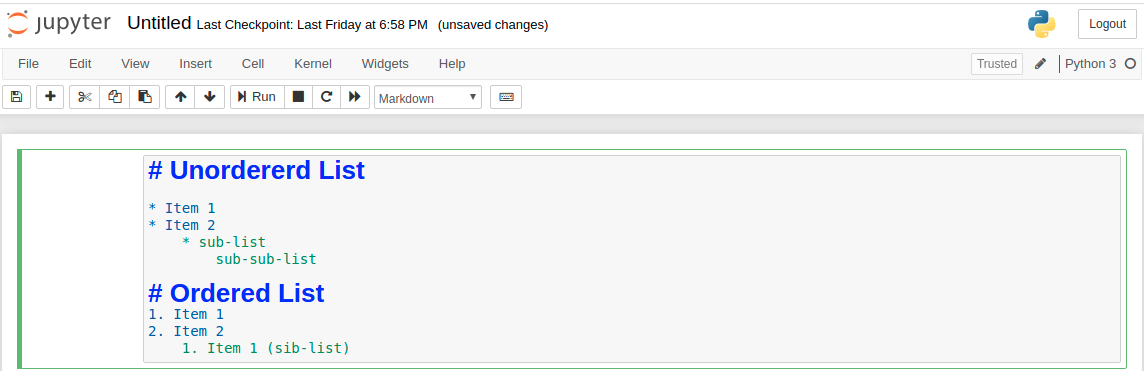 Output:
  Adding Latex Equations: Latex expressions can be added by surrounding the latex code by ‘$’ and for writing the expressions in the middle, surrounds the latex code by ‘$$’. Example:
 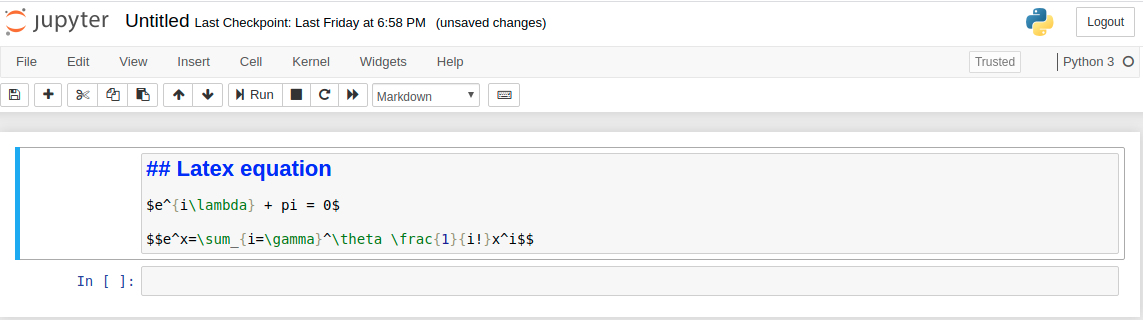 Output:
  Adding Table: A table can be added by writing the content in the following format.
  Output:
  Note: The text can be made bold or italic by enclosing the text in ‘**’ and ‘*’ respectively.
Raw NBConverter
Raw cells are provided to write the output directly. This cell is not evaluated by Jupyter notebook. After passing through nbconvert the raw cells arrives in the destination folder without any modification. For example, one can write full Python into a raw cell that can only be rendered by Python only after conversion by nbconvert.
Kernel
A kernel runs behind every notebook. Whenever a cell is executed, the code inside the cell is executed within the kernel and the output is returned back to the cell to be displayed. The kernel continues to exist to the document as a whole and not for individual cells. For example, if a module is imported in one cell then, that module will be available for the whole document. See the below example for better understanding. Example: 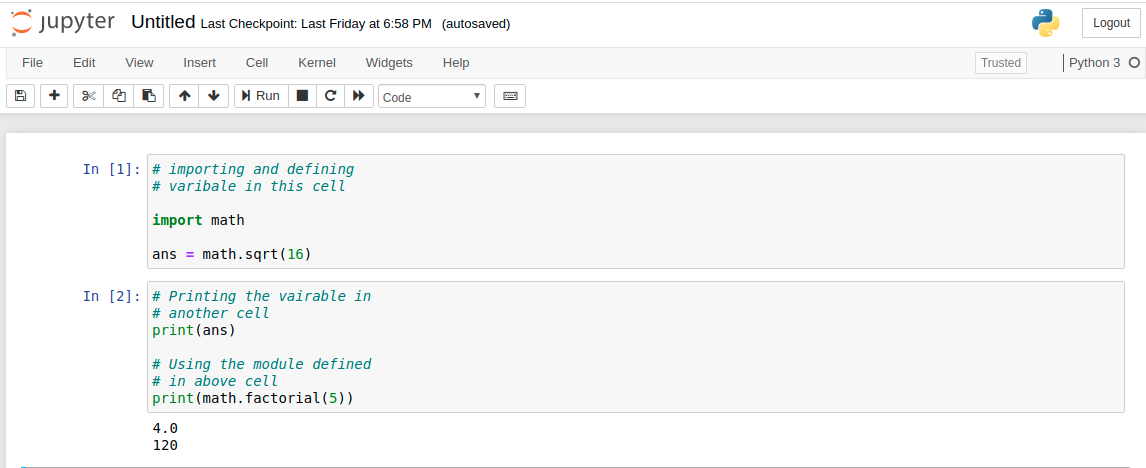 Note: The order of execution of each cell is stated to the left of the cell. In the above example, the cell with In[1] is executed first then the cell with In[2] is executed. Options for kernels: Jupyter Notebook provides various options for kernels. This can be useful if you want to reset things. The options are:
- Restart: This will restart the kernels i.e. clearing all the variables that were defined, clearing the modules that were imported, etc.
- Restart and Clear Output: This will do the same as above but will also clear all the output that was displayed below the cell.
- Restart and Run All: This is also the same as above but will also run all the cells in the top-down order.
- Interrupt: This option will interrupt the kernel execution. It can be useful in the case where the programs continue for execution or the kernel is stuck over some computation.
Naming the notebook
When the notebook is created, Jupyter Notebook names the notebook as Untitled as default. However, the notebook can be renamed. To rename the notebook just click on the word Untitled. This will prompt a dialogue box titled Rename Notebook. Enter the valid name for your notebook in the text bar, then click ok. 
Notebook Extensions
New functionality can be added to Jupyter through extensions. Extensions are javascript module. You can even write your own extension that can access the page’s DOM and the Jupyter Javascript API. Jupyter supports four types of extensions.
- Kernel
- IPyhton Kernel
- Notebook
- Notebook server
Installing Extensions
Most of the extensions can be installed using Python’s pip tool. If an extension can not be installed using pip, then install the extension using the below command.
jupyter nbextension install extension_name
The above only installs the extension but does not enables it. To enable it type the below command in the terminal.
jupyter nbextension enable extension_name
Share your thoughts in the comments
Please Login to comment...