Windows 10 comes with an inbuilt feature that detects any potential problem in the device that might cause an issue while normally booting up the device. So, the Automatic Repair feature gets activated & while restarting the device, the problem gets fixed. But what happens if the solution provider becomes the solution maker?
If Windows Automatic Repair can’t able to fix any problem it continuously tries to resolve it. Hence, the process goes on in an infinite loop and the device never gets started. You should not take the Automatic Repair Loop issue seriously as to resolve the issue, there are a set of effective methods present.
In this article, we will discuss a few handful of methods to fix the Automatic Repair Windows problem without any issue in no time.
Methods to Fix Automatic Repair Loop Problem on Windows
For erasing the Automatic Repair Loop of Windows, the following methods should be used one by one. We will start with the simple Hard Resetting of the device.
Method 1: Fixing Automatic Repair Loop on Windows by Checking Disk Utility
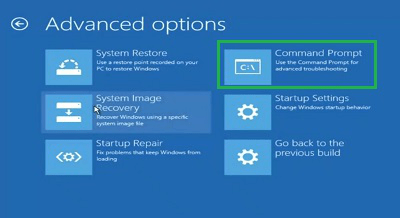
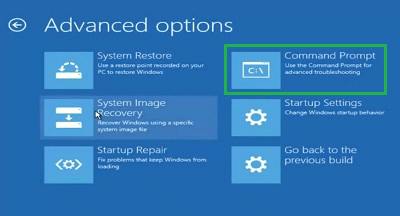
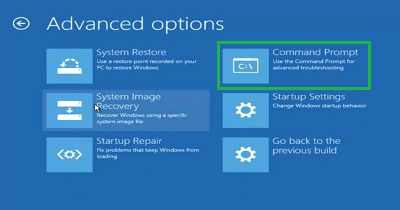
Step 1: Enter into the Boot Menu by pressing the F8 Key while resetting the device. Now, select the Troubleshoot & Advanced option. Under the Advanced option, select the Command Prompt.
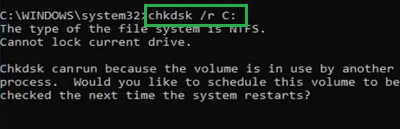
Step 2: Execute the following command, it will check the Disk Issue on the device and fix it.
Command: chkdsk /r c:
Step 3: After executing the above command, the following command should be performed. It will save the changes on the device.
Command: fixboot

Hence, we have successfully fixed the Automatic Repair Loop on Windows by checking Disk Utility.
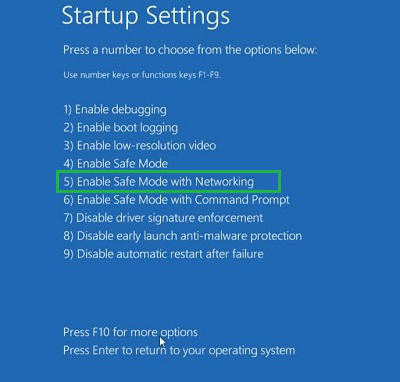
Method 2: Fixing Automatic Repair Loop on Windows by Running System Scan in Safe Mode
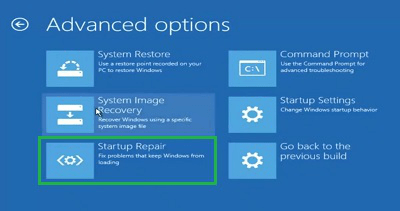
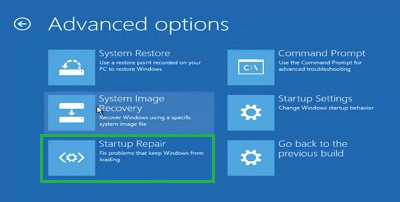
Step 1: In the Advanced Boot Option, select the Startup Repair option.
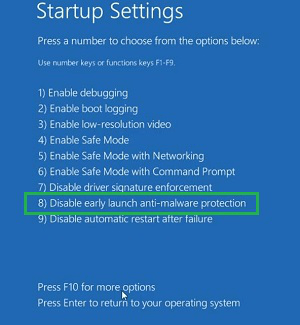
Step 2: Press the Key 5 on your keyboard to go with the Option 5.
Step 3: Execute the following command in the Command Prompt in the Administrator format. Wait until the process gets completed.
Command: DISM /Online /Cleanup-Image /RestoreHealth

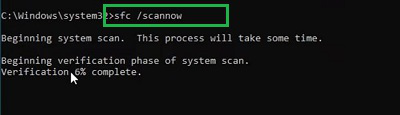
Step 4: After the above command, execute the following one to check & fix all the disk & drive issues on the device.
Command: sfc /scannow
Hence, we have successfully fixed the Automatic Repair Loop on Windows by Running System Scan in Safe Mode.
Method 3: Fixing Automatic Repair Loop on Windows by Restoring Windows Registry
Step 1: In the Advanced Menu option, select the Command Prompt.
Step 2: Execute the following command. Wait until the process gets completed. It will restore the Windows Registry & reopen it.
Command: config\RegBack

Hence, we have successfully fixed the Automatic Repair Loop on Windows by Restoring the Windows Registry.
Method 4: Fixing Automatic Repair Loop on Windows by Disabling Automatic Repair Tool
Step 1: Again in the Advanced Menu, click on the Command Prompt.
Step 2: In the Command Prompt, execute the following command. It will take some time. And when you get the successful message. reboot the device.
Command: bcdedit /set {default} advancedoption no
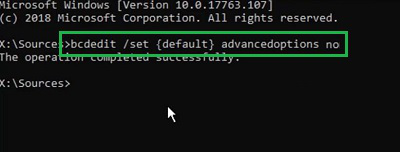
Hence, we have successfully fixed the Automatic Repair Loop on Windows by Disabling the Automatic Repair Tool.
Method 5: Fixing Automatic Repair Loop on Windows by Disabling Anti-Malware Protection
Step 1: In the Advanced Menu, click on the Startup Repair option.
Step 2: Under the Startup Repair option, press the Key 8. The system will reboot automatically and the Anti-Malware Protection will not launch promptly.
Hence, we have successfully fixed the Automatic Repair Loop on Windows by Disabling Anti-Malware Protection.
Method 6: Fixing Automatic Repair Loop on Windows by Restoring System Files
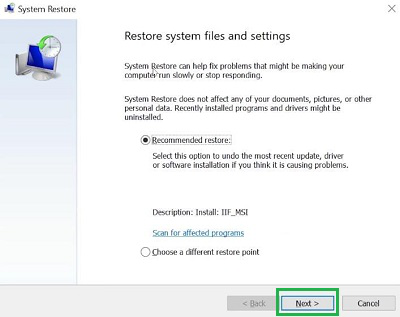
Step 1: In the Advanced Boot Menu, click on the System Restore option.
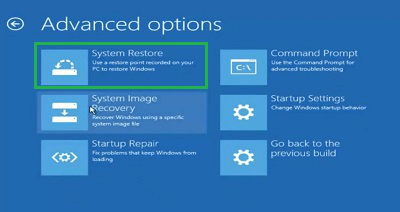
Step 2: Click on the Next button on the Window & select a System Restore Point.
Step 3: Select the Finish option to complete settings & start the Windows Restoring process.
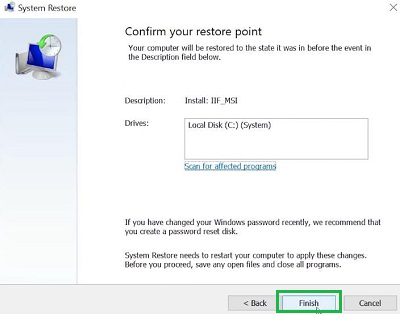
Hence, we have successfully fixed the Automatic Repair Loop on Windows by Restoring Windows System Files.
Method 7: Fixing Automatic Repair Loop on Windows by Reinstalling Window
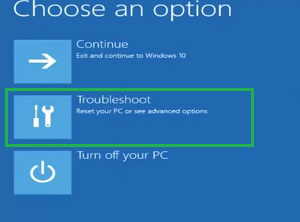
Step 1: Enter Into the Boot Option & select the Troubleshoot option. Under the Troubleshoot, select the Reset The PC option.
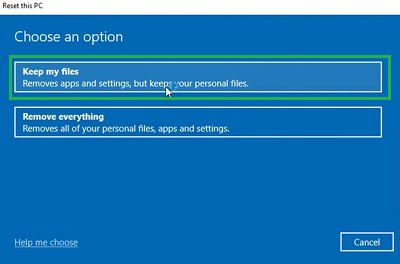
Step 2: In the new window, click on the Keep My Files option.
Step 3: Now, click on the Cloud Download option & start the reinstallation process on the device.
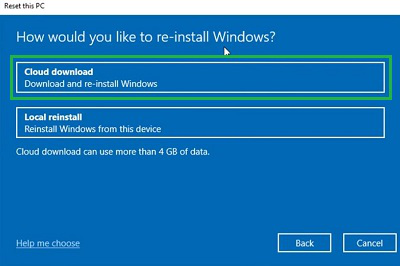
Hence, we have successfully fixed the Automatic Repair Loop on Windows by Reinstalling Windows OS.
So, these are the simple steps you should perform to get back your working laptop or computer without having any issues. Without skipping any method, execute all of the methods to get a complete recovery. If still, the problem still exists, then the hardware or hard disk is damaged in that case.
Also Read
FAQs to Fix Automatic Repair Loop Problem on Windows
1. How can I launch My Windows in Safe Mode to fix Automatic Loop Repair?
To launch Windows in Safe Mode to fix Automatic Loop Repair, the following steps should be executed.
- While Restarting the device, press the F8 key to enter the boot menu.
- Follow the Path Troubleshoot > Advanced Troubleshoot.
- Select the option Startup Repair.
- Go for the option 5 by pressing key 5 on the keyboard.
2. How can I disable the Early Launch of Anti-Malware protection on Windows?
For disabling the Early Launch of Anti-Malware protection on Windows, the following steps can be utilized.
- Enter the Boot Menu by using the F8 Key.
- Go to Troubleshoot & later to the Advanced option.
- Select the Startup Repair option.
- Press the Key 7 to launch the service.
3. How can I Reinstall Windows and Reset it?
To reinstall & reset the Windows on your Windows device, the following steps should be executed.
- Enter the Boot Menu by pressing the F8 Key.
- Select the Troubleshoot option
- Select Now Reset the PC.
- Click on the Keep All Files option.
- Select the Cloud Download option.
Share your thoughts in the comments
Please Login to comment...