How to Disable Chrome Automatic Update in Windows?
Last Updated :
23 Apr, 2024
Disabling Chrome updates could change everything by ensuring you have absolute control over when and how your browser updates. You will need to use Windows Registry Editor to make some policies or even create a special file completely disabling Chrome from checking for new versions and installing them on its own.
This way, you can update it manually when convenient for you and your system. In this article, we will discuss 4 different methods to Disable Chrome Automatic Update in Windows.
How to Disable Chrome Automatic Update in Windows?
Disabling Chrome automatic updates can reduce Data Consumption on your PC and offer several benefits. It prevents background updates, ensuring your internet bandwidth isn’t consumed. Additionally, you have more control over when to update which reduces disruptions.
In this article, we have explained three methods to help you manage Chrome updates effectively. Let’s check out each method with proper demonstration.
Also check: How To Turn Off Update In Windows 10?
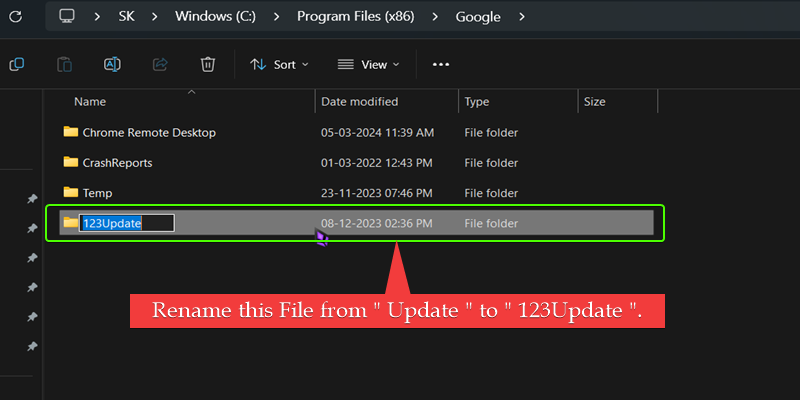
Method 1: Rename the Update Folder in Google Chrome
To rename the Chrome Update folder, go to C:\Program Files (x86)\Google and rename the “Update” folder inside the Google folder to something else like 123Update.
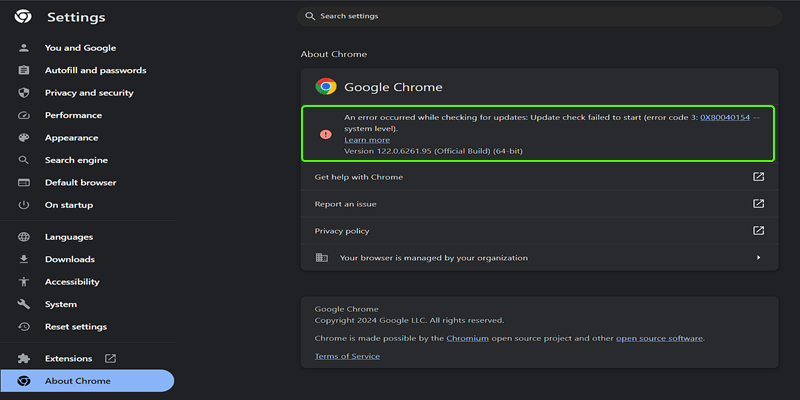
After completing the previous steps Go to the Chrome settings and go to About Chrome or Update Tab there you will see the error as shown in the below image. This error means that your Automatic Updates are now disabled or Stopped.
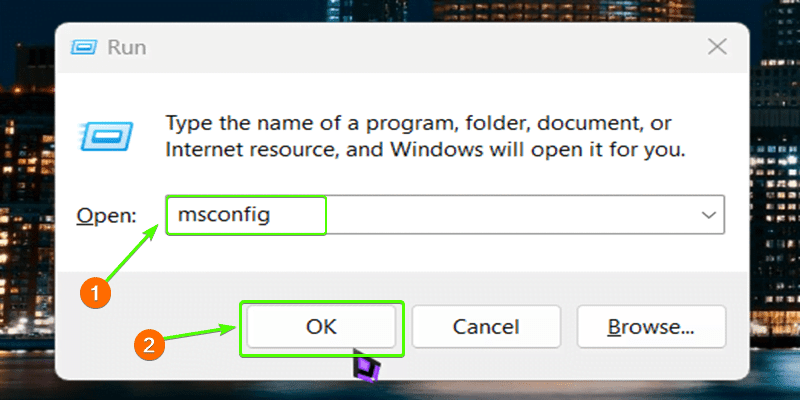
Method 2: Disable Chrome’s Updates via System Configuration Utility
Step 1: Press Windows Key + R, type “msconfig”, and hit Enter. In the System Configuration Utility, find and disable the setting for Google Chrome’s automatic updates.
Step 2: After, clicking OK you need to switch to the Services tab there you will find two Google Update Service Options Untick to Disable them.
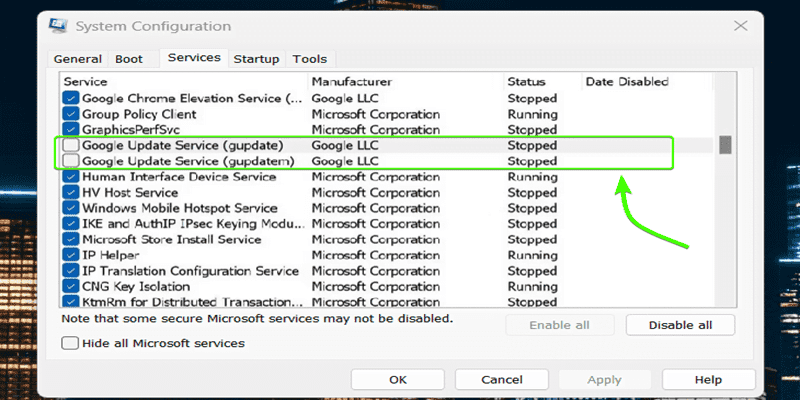
By disabling these Google Update services through the System Configuration Utility, you can effectively prevent Chrome from automatically checking and installing updates on your Windows system.
Also Check: Windows 10 Settings You Should Change Right Now!
Method 3: Disable Chrome’s Updates via the Registry Editor
If none of the previous methods successfully stopped automatic updates on Google Chrome for your Windows system, you can try using the Registry Editor.
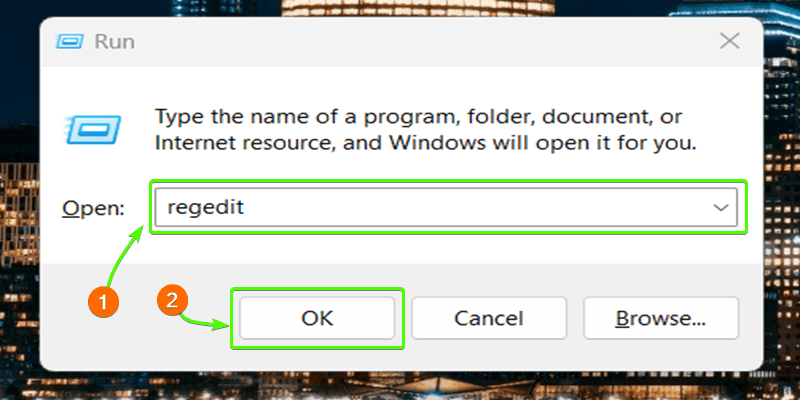
Step 1: Open the Registry Editor by pressing Windows Key + R, typing “regedit”, and hitting Enter.
Note: Registry Editor is used to stop Google Chrome from updating automatically. However, It is advised to exercise extreme caution while making these changes to prevent potential issues with your computer. First back up your system because manipulating this part of the computer is very dangerous if done inaccurately.
Step 2: Go to this Directory Computer\HKEY_LOCAL_MACHINE\SOFTWARE\Policies
Step 3: Once there, right-click on the “Chrome” folder in the left pane. From the context menu that appears, select “New” followed by “Key”. This will create a new subfolder or key under the Chrome folder. You need to name this new key “Update”.
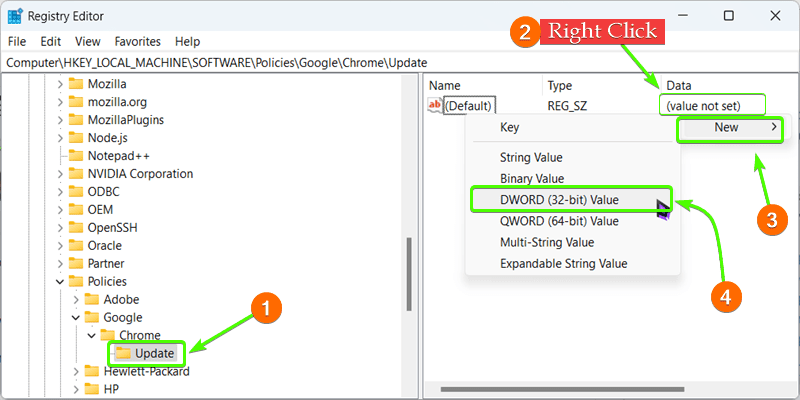
Step 4: Inside the “Update” folder you created, right-click the empty right pane and select New > DWORD (32-bit) Value.

Step 5: Double-click the “New Value #1” file and set the Value data to “0” Finally, click “OK” and close the Registry Editor and after that, you just need to restart your computer to Reflect the Changes that’s it.

Method 4: Disable Chrome Update via Services Manager
Users can use this method to disable Chrome updates easily via Services Manager by following some easy steps –
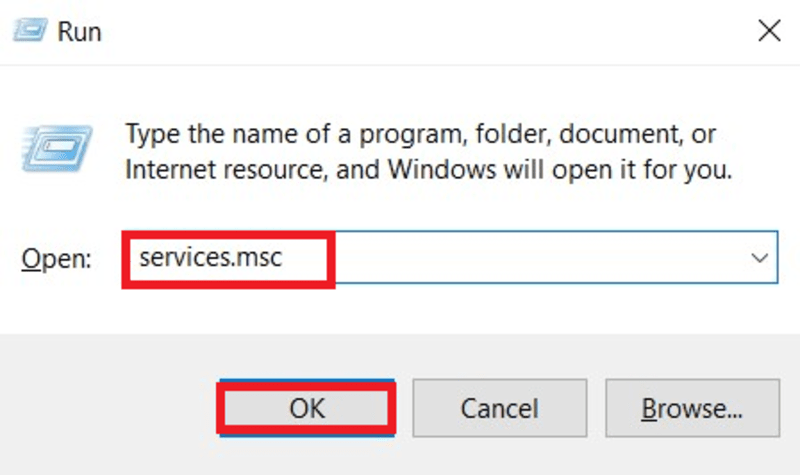
Step 1: Open Windows Services Manager > Open Windows Run utility (Windows + R)
Step 2: Type “services.msc” > hit Enter
Step 3: Scroll down to Google Update Services > Double-click on each item or elements
Step 4: Go to the General tab under Startup type > Select Disable > Click on OKChrome
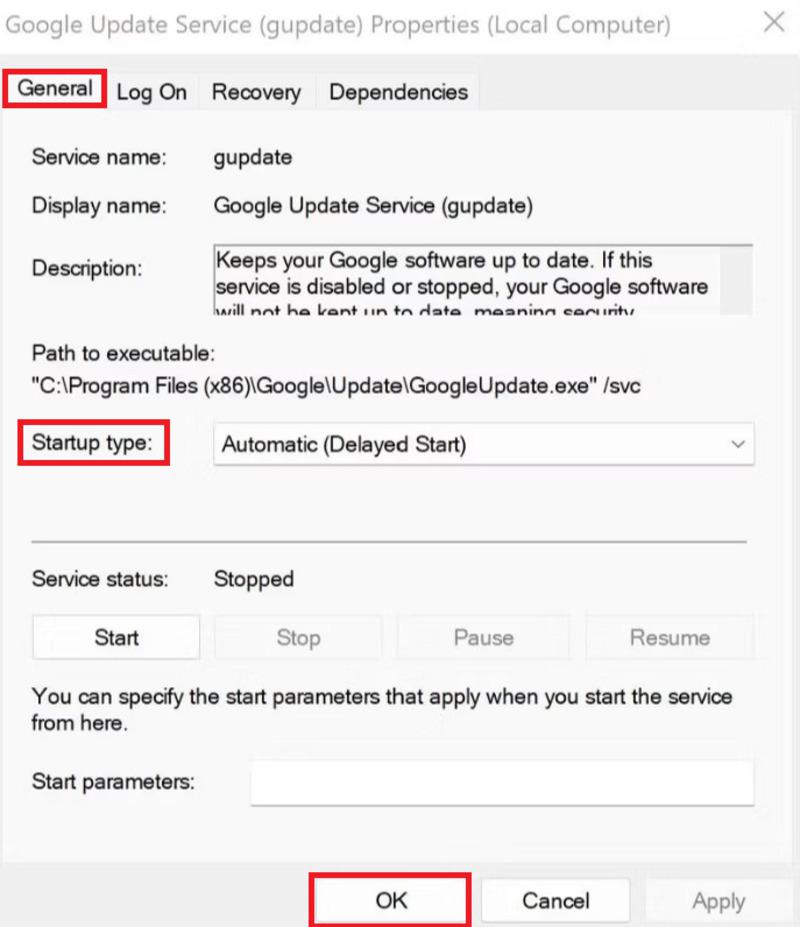
Step 5: Repeat those steps for Google Update Services (update updates in)
Conclusion
If you want to stop Google Chrome from refreshing itself automatically on your Windows PC, You must change automatic Google update settings. These methods have been discussed in detail. The simplest approach is renaming the directory that contains the Update folder and installer file. Instead, you may also disable particular Google Update services with the help of MSConfig (Microsoft Configuration Utility). In a worst-case scenario, however, you can modify the Windows Registry so that Chrome does not auto-update.
Also Read
How to Disable Chrome Automatic Update in Windows – FAQs
How do I turn on auto-update in Chrome?
You can turn Chrome auto-update from the main menu bar, for the perform the following few steps:
- Click on three dots
- Select help > About Google Chrome
The About Chrome page will load and check for the updates showing your current browser version. If any update is available, you find ‘Update Google Chorme’ button. At last, Relauch the Chrome to apply the changes.
What will happen if I turn off updates in Chrome?
Turning off updates in Chrome means you won’t receive the latest features, bug fixes, and important security updates. It’s risky because outdated software is vulnerable to security threats and can’t detect malicious activities, so it’s not recommended to turn off updates in Chrome due to safety concerns.
How to auto-update Chrome on Android?
Applications in Android are automatically updated using playstore settings. Open playstore and follow these steps
Steps: click on the profile icon > Manage apps & device > Updates available
There you will find all the apps which are available to update. You can either update all apps or the particular apps as well. To update Chrome, find Chrome and click Update button
How do I turn off the Chrome extension auto-update?
Inspite of disabling entire chrome updates. You can turn off specific updates in Chrome such as turn off Chome extensions auto-update. To turn off Chrome extensions auto-updates,
- Click on three dots > Extensions > Manage Extensions
- There you will see all the dowloaded extensions, Click on extensions details and turn on Allow automatic update.
Does Chrome auto-update by default?
Yes, Chrome auto update by default keeping you up to date to its lastest feature. Chrome never recommend to turn off this auto update feature due to security vulnerabilities.
Share your thoughts in the comments
Please Login to comment...