Accepting Payments on Google Forms- Quick Steps
- Pick a Payment Tool > Install the Tool
- Set Up Payments > Put Payment Links in Your Form
- Test Your Form > Share Your Form
Google Forms are one of the most convenient ways of collecting information. Whether collecting information from students or inviting people to a party you can use Google Forms.
This article will be a step-by-step guide on, how to collect payments using Google Forms. As for now, there is no template available for payment purposes, so we will continue by customizing a blank form.
How to easily collect payments on Google Forms
Unlock the power of simplicity! Ever wondered how to seamlessly collect payments through your Google Forms? In just a few steps, we’ll guide you through the process of creating a user-friendly form that not only gathers information but also integrates hassle-free payment options. Let’s dive into the world of Google Forms with Payment – where convenience meets efficiency
Using Peer-to-Peer Payment
Step 1: Create a new form
Open your web browser and launch Google Forms. This will open Google Forms’ website and you can see templates to choose from. Just go with a blank form. After you click on ‘Blank’, a blank form should open.
-1024.webp)
Step 2: Fill out your questions
Now go ahead and add basic details in your form. You can get help from this article on how to create Google forms. Add fields to collect the user’s details (I’m taking the name and email ID only). Use text type input for name and email.
-1024.webp)
Step 3: Include a question about payment
Add a field to check whether the payee will pay through bank transfer or UPI. For payment method, choose input type as ‘option’. Mark all the fields as ‘required’.
.webp)
Step 4: Link to a payment service
a) Add Bank Account section
Add a new section to the form and write the following details.
Title the section as Bank Details, and in the description, part add the recipient’s name, bank name, A/C number, and IFSC code. Add a field to collect the Bank Reference number and choose the input type as short text. Add another input field for payment receipt make type as file upload and allow PDF and Image types only. Make both the fields as required.
.webp)
b) Add UPI payment section
Add another section to the form and name it UPI and in the description, fill in the recipient name and UPI ID. You can add a QR code also for payment. Add input field for Bank Ref Number of short-text type. Add another input field for payment receipt make type as file upload and allow PDF and Image types only. Make both the fields required (same as the previous section).
.webp)
Step 5: Configure the payment sections
a) Configure the sections based on the option selected
For payment, the user will choose only one method, which can be either UPI or Bank transfer, so we have to configure forms’ sections according to the user’s input. Go to Section 1 and in the payment method, click on the three dots. Select ‘Go to section based on answer’.
.webp)
Now configure the sections according to the answers as shown in the image below.
.webp)
b) Configure submission
There is no need to go for a bank transfer if one is selecting UPI as a payment method and the reverse is also true. So, there needs to be a submit option once the user completes the payment using any of the methods. To do that, head over to the end of section 2 and change ‘Continue to next section’ to ‘Submit form’ using the dropdown.
.jpg)
Step 6: Finish your form and send it out
Now you can preview your form and send the link of your form to others and they can fill payment details in the form.
.png)
How to Use Google Workspace Add-Ons
There is no built-in feature in Google Forms that lets you complete your payment, but you can use add-ons on your form to include payment methods.
Step 1: Design Your Form
Create a blank form and fill in the questions you need people to fill out for payment. Design your form as per your need to make your payment-enabled Google Form.
Ask for basic information like name and phone number and display your prices for users to select and pay.
.webp)
Step 2: Explore add-ons
a) Add an add-on:
Create a new form in workspace.google.com and look for suitable add-ons of your preference to add to Google Forms to enable payments in your form. Here, we will be using this add-on named “Payable Forms” to integrate the payment gateway into our form.
.webp)
b) Enable your add-one in Forms:
Now head over to your Google form and you will be able to see an icon for add-ons on the top right corner of your form. Click on that and select the Payable form.
.webp)
Once done, you should be able to see the payable menu on the right side of your screen.
.jpg)
Step 3: Integrate Payment Gateway
a) Select the preferred payment Provider
On the menu click on “Auto-Configure Form and Sheet” for automatic configuration, and then click on “Connect a Payment Provider” to add any payment gateway of your choice from the available ones.
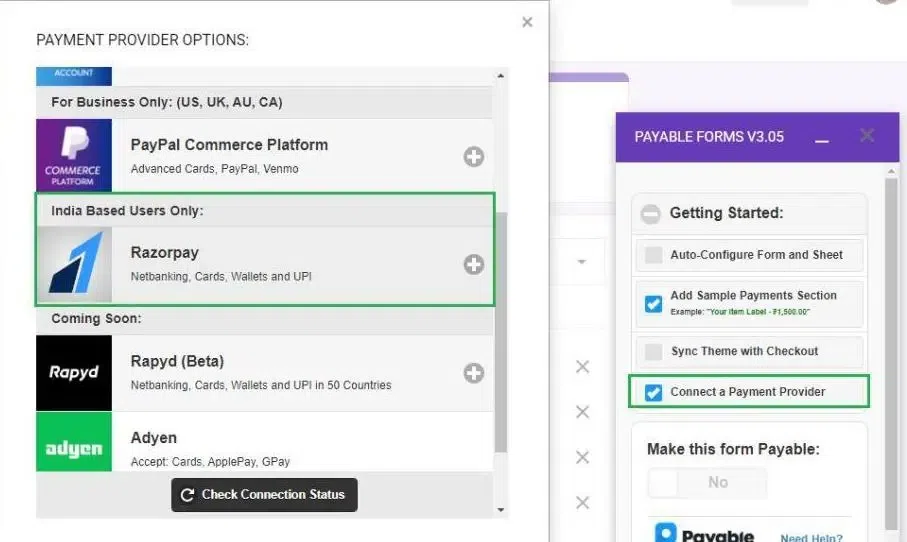
For Indian users, select Razorpay and connect your account, you can select any other payment providers as well.
b) Log into the payment services account
Once you click on your provider a new Chrome pop-up will open asking you for login credentials. Log in to your existing account or create a new one.
.webp)
c) Connect using API key
In your payment providers profile section, you will find your merchant ID and the option to generate API keys.
Generate the API key and fill in other details asked in the payable form dialog. For this time, we are using TEST API keys, you can use your live ones if you want.
.webp)
d) Make the form payable
Now you should be able to see your account connected with payable forms and a Toggle is there to enable payment, click on that to enable payment in your form.
.webp)
Step 5: Customize Form Settings
In the payable forms menu, there is an option to configure your payment settings, explore the given settings, and configure them as per your requirements. Leave Testing Mode on for test purposes otherwise, turn this off.

Step 6: Test the Payment Process
Before making this form live for real users to make payment test this on your own to check if everything is running smoothly. To check that,
a)Fill out the form:
Click on the preview form button on the top right corner of your form fill out the details asked and then press submit.
.webp)
b) Checkout to the payment page
Use the link given after submission to open the payment gateway, now as it is in test mode you will be provided with test cards to complete payment. Use the given cards only don’t use your real money during testing.
.webp)
Click on Pay with RazorPay to continue.
c) Fill card details
In razorpay’s payment page fill in the test card details provided and click on pay, use any upcoming mm/yy for expiry, and any 3digit number for CVV. If the page asks for any OTP, enter a random 4-digit number.
.webp)
d) Check your receipt
Once payment is completed, wait for a while on the page your receipt for the payment will be generated.
.webp)
e) Check your response sheet
Go back to your form and click on responses then click on view on sheet.
.webp)
After the response sheet opens check all your payment details for cross-verification.
.webp)
Conclusion
Taking payment through Google form is a convenient way as you get your required details and payment both collected using the same link. You can use peer-to-peer payments based on UPI and bank transfer otherwise use workspace add-ons to get payment through popular payment gateways. In payment gateways, based on the provider you choose, the user can use the card, UPI, and other payment methods. Check the response sheet of Google form and you are provided with all details.
FAQ’s
1. Can I add a payment to Google Forms?
Yes, you can add payment methods to Google Forms. Use peer-to-peer payments using upi or bank transfer , else use workspace add-ons on your google form to include payment method.
2. Can we add GPay on Google Forms?
No, There is no direct way to add GPay in your Google Forms. However you can add your GPay QR code in form to collect payment. If you are using add-ons like “Payable Forms” in your form, select Razorpay as payment gateway where you can pay using GPay.
3. How do I create a payment link?
Once you are done with creating your form. click on the send option available on the top right corner to share your form, using which others can make payments.
Share your thoughts in the comments
Please Login to comment...