How to Create and Customize Google Forms?
Last Updated :
02 Jul, 2020
No doubt google forms tend to be one of the most versatile tools when it comes to the collection, analysis, and storing of information. Here is a complete step by step guide to the secret of making customized Google forms.
Step 1: Visit forms.google.com.
You can open Forms from your Google Drive or Excel sheets too.
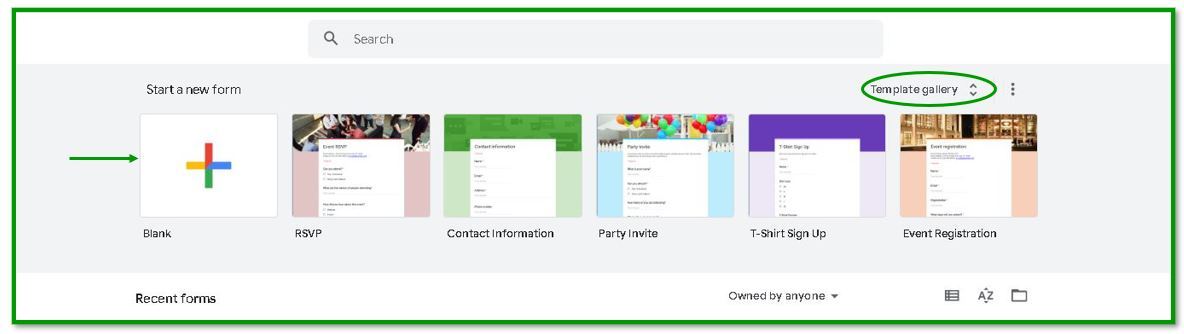
Step 2: Choose a template
The page so opened, offers you the following options.
Either you can create your own customized form using the blank template or use any of the already available templates from the encircled Template Gallery.
For the sake of this tutorial, we will choose a blank form.
Step 3: Create a customized form
Introduction to the provided functionalities:
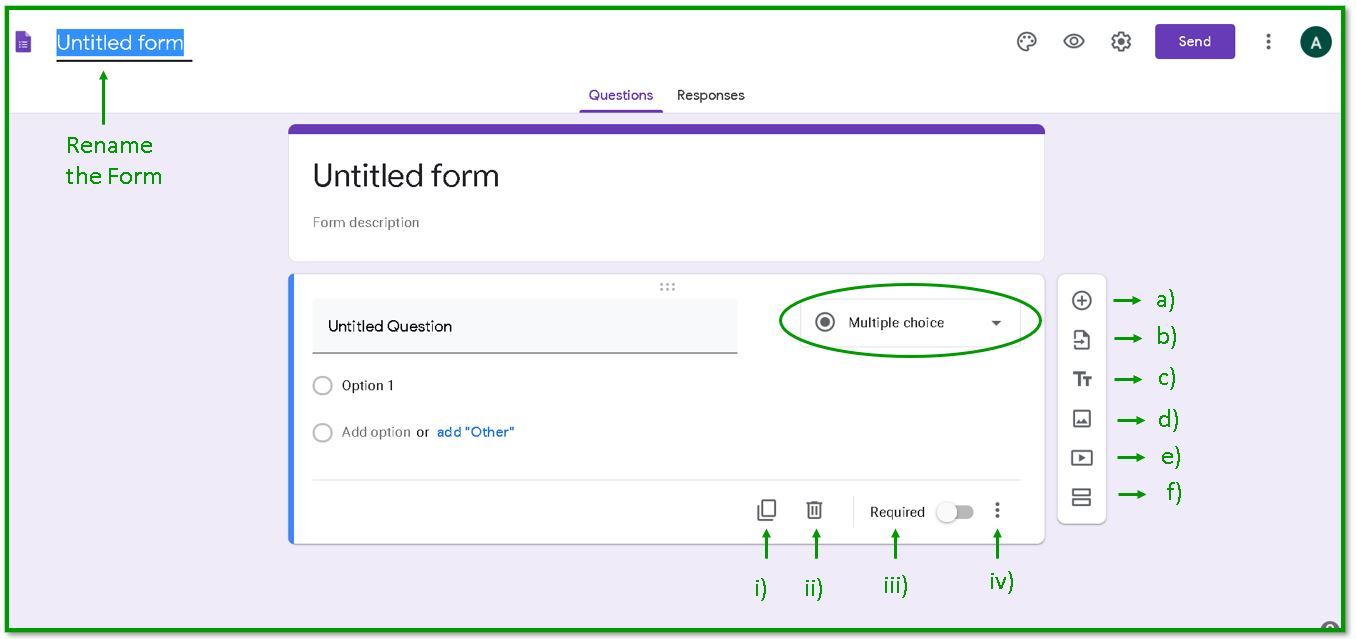
a) Add a question.
b) Import a Question.
You can import questions from the previously created forms as follows:
- Select the form of your choice.
- Tick the checkboxes of the questions you want to import.
- Click ‘import questions’.
Using this feature you may import questions from multiple forms too. This may save a lot of effort.
c) Add a Title and Description.
You may add a separate information segment in the forms where you just put a Title and if required a description too.

d) Add an image segment.
You can add a separate image segment which also allows you to embed hover text.
(Hover text is the text that is displaced as the mouse moves over the image.)
You may resize the image by double-clicking onto it.
The overflow menu over the image offers the following functionalities:
- align the image,
- change the image,
- remove the image.

d) Add a video.
You can add a youtube video to the form. Either search for a particular topic or add the URL of a specific video.
Note: Only youtube videos can be added to google forms.

You are allowed to add a caption to the video. The functionalities in the other overflow menu are the same as they were in the image segment.

e) Add a separate section to the forms.
It is always a good idea to organize questions related to different topics into different sections. Each section appears on a different page while the respondents fill the form.
The overflow menu offers you the option to duplicate, move, or delete the particular section.
Step 4: Customize the appearance. (Optional)
The color pallet icon at the top of the form unfolds the following :
- add a header image: you can either choose an image from a variety of options that Forms offer or browse files from your own desktop. Images can be selected from the ‘Google Photos’ app too.
- change the theme and the background color.
- change the font style from the four options provided.
Tip: You can choose from the provided theme colors or select a color using its hexadecimal code.
The eye icon allows you to preview the form designed.
Note: You can re-order the templates by clicking and moving the six-dot icon at the top of each question/description template.
Step 5: Altering the Settings
In settings, you can set the rules for the respondent to use the forms.
General:
Decide whether or not
- to collect respondent’s email addresses: enabling it would set Email as a required field. Then a copy of their responses can also be sent to them.
- limit the number of their responses: enabling it limits the response from a particular signed in account to 1. This is a key feature when you set a quiz using google forms.
- let them edit the form after submission.
- show them the other responses received: this reveals the responses recorded by all the other respondents, it may be shown using some kind infographics or text itself as per the format of the form.
Presentation:
Here you can choose:
- To show the progress bar: i.e how many sections have been answered so far.

- To shuffle the order of the questions: especially useful when the form is circulated as a quiz.
- Show the link to submit another response
- Change the default confirmation message.
Quizzes:
You can choose to present the form as a quiz.
Step 6: Send and Share
By clicking on the send option at the top right, the following box pops up:

You can either mail the link to the desired participants directly, share using Facebook and Twitter, or copy-paste the link on other social networking sites. You can also share embedded HTML.
You have the added functionality to add collaborators, i.e. the people who other than you can edit and share the forms.
The collaborators can be restricted to the people you have added or you can change the settings to make anyone with the link an editor.
Step 7: Checking Responses.
Google Forms provides features to precisely and accurately visualize the information so gathered. This is also why they are preferred to create survey forms.

Like Article
Suggest improvement
Share your thoughts in the comments
Please Login to comment...