Google Forms is a versatile tool that can be used to create surveys, quizzes, and other data collection forms. One of its useful features is the ability to limit the number of responses that a form can receive. This can be useful for a variety of reasons, such as preventing a form from being overloaded with responses, ensuring that everyone has an equal chance to respond to a form, or collecting data from a specific number of people. To limit responses in Google Forms, open the form that you want to limit responses for, click on the Settings tab, scroll down to the Responses section, and under Limit Responses, select the option that you want to use. If you are setting a maximum number of responses, enter the number of responses that you want to allow. Then, click Save. Once you have limited responses in your form, users will not be able to submit additional responses once the limit has been reached. You will receive a notification when the limit is reached, and you can also view the number of responses that have been submitted in the Responses tab of the form.
Limiting responses in Google Forms can be a useful way to control the amount of data that you collect and to ensure that everyone has an equal chance to respond to your form.
How to Limit Google Form Responses
Google Forms offers a built-in feature that allows you to restrict responses by Google account. This is particularly useful when you want to ensure that each respondent can only submit one response. Here’s how to do it:
Step 1: Create a Google Form
Start by creating your Google Form or opening an existing one.
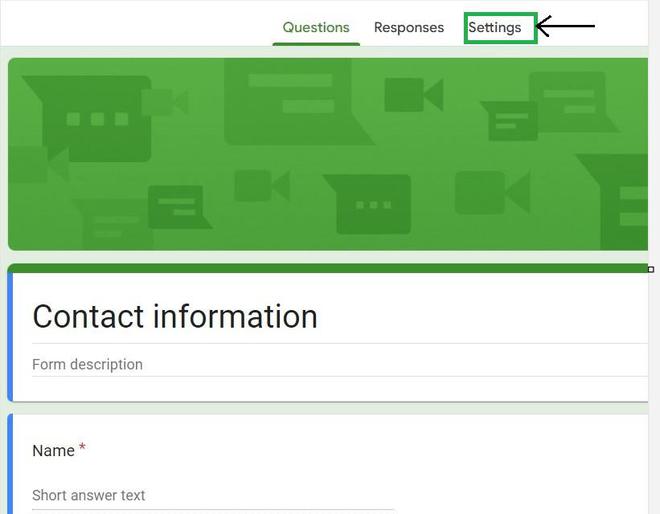
Step 2: Go to Google Form’s Settings Tab
Click on the gear icon located at the top-right corner of the Google Form.
Step 3: Choose “General” Settings
In the settings menu, select the “General” tab.
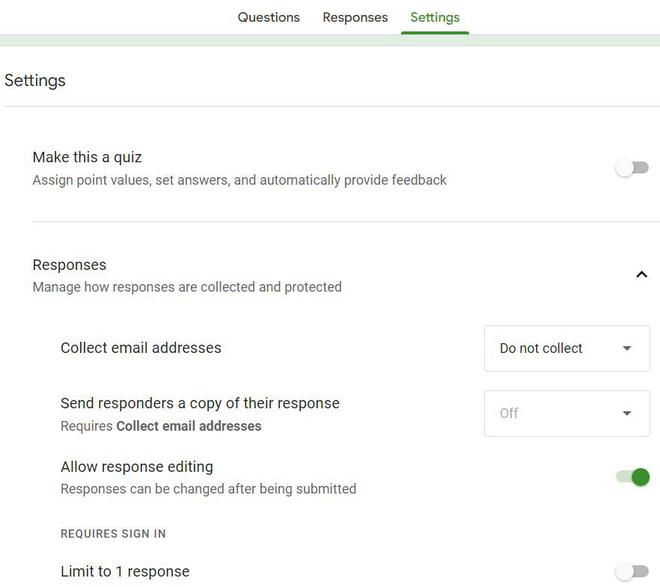
Step 4: Enable “Limit to 1 Response” Option
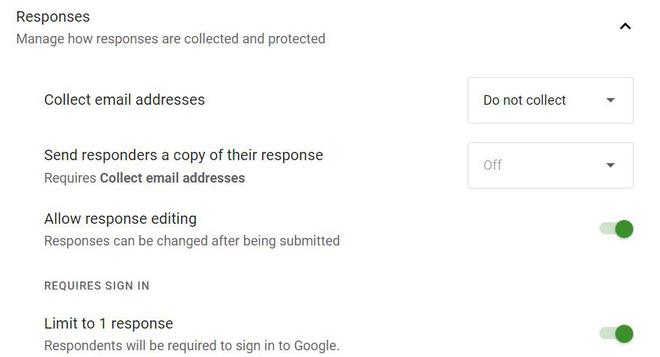
Under the “General” tab, you will see an option labeled “Limit to 1 response.” Click on this option to restrict each respondent to one response.
Step 5: Save Changes
After selecting the “Limit to 1 response” option, remember to click “Save” to apply the changes. Now, your Google Form is set up to limit responses to one per Google account. If someone tries to submit multiple responses using the same account, the form will automatically prevent them from doing so.
How to Limit Google Form Responses with an Add-On
Sometimes, you may require more advanced restrictions or specific conditions for limiting responses. Google Forms allows you to achieve this using add-ons. One such add-on is “Google Forms add-on – Form Limiter,” which provides additional flexibility. Here’s how to use it:
Step 1: Install the Form Limiter Add-On
Open your Google Form, then click on the “Add-ons” menu and select “Get add-ons.”
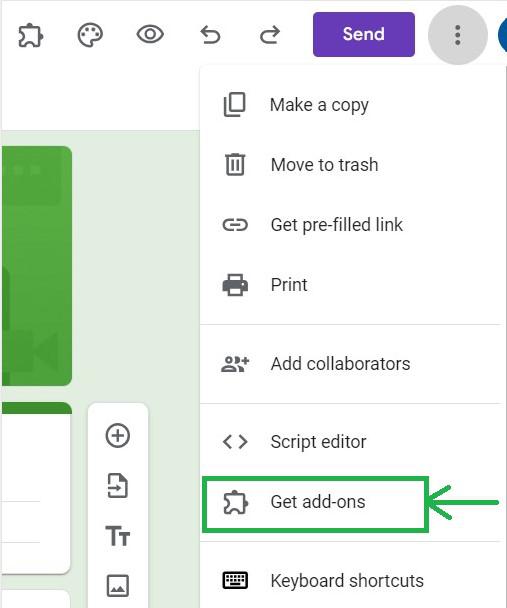
Step 2: Search for “Form Limiter”
In the add-ons marketplace, search for “Form Limiter.”
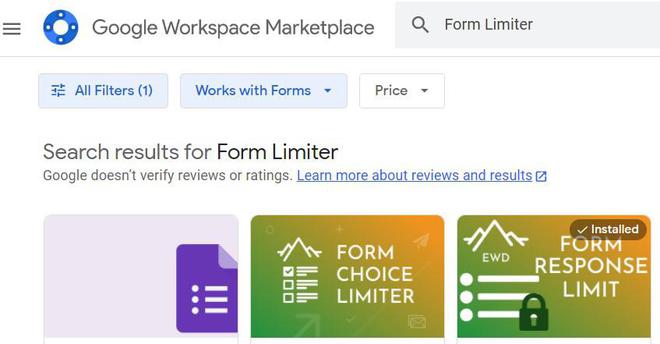
Step 3: Install Form Limiter
Click the “Install” button next to “Form Limiter.” You may need to grant certain permissions for the add-on to function.

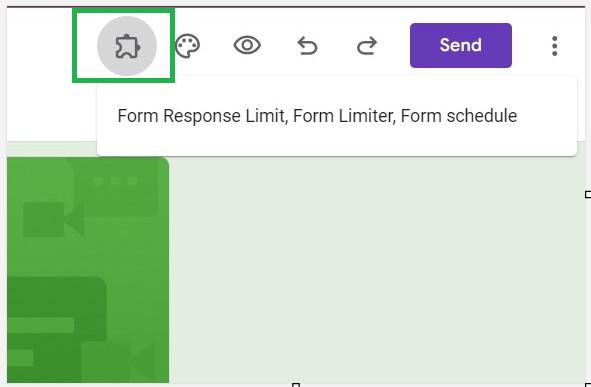
Step 4: Click on the Form Limiter Iocn at the located at the top right corner
Once installed, go back to your Google Form. In the top-right corner, you will now see the “Form Limiter” icon. Click on it to access the add-on.
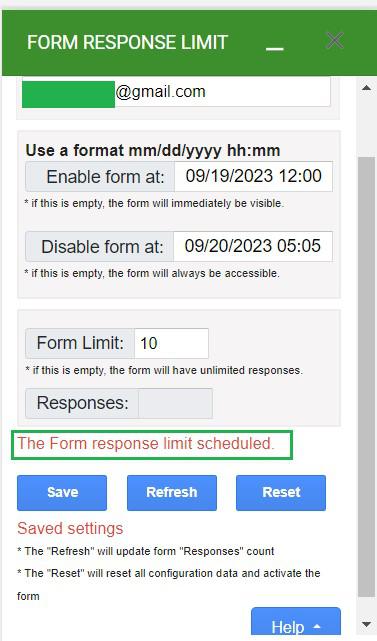
Step 5: Configure Limitations
Within the Form Limiter add-on, you can set specific limitations such as a fixed number of responses, a date and time range for accepting responses, or a combination of both.
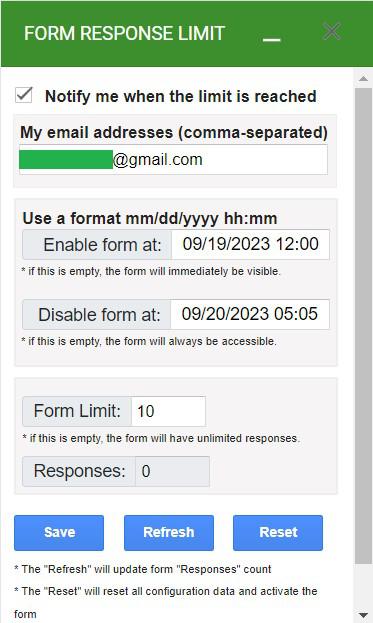
Step 6: Apply and Save
After configuring your limitations, click the “Apply” or “Save” button within the Form Limiter add-on.
Step 7: Confirm and Save
You will receive a confirmation message indicating that your form limitations have been set successfully.
How to Stop Accepting Responses in a Google Form
If you prefer a manual approach without using add-ons or account restrictions, you can simply monitor your Google Form and close it manually once you’ve received the desired number of responses.
Step 1: Open Google Form
Step 2: Go to the Responses Tab
Step 3: Enable Stop Accepting Responses in Google Form
When you have reached the desired number of responses, manually close the form by following these steps:
- Open your Google Form.
- Click the “Responses” tab.
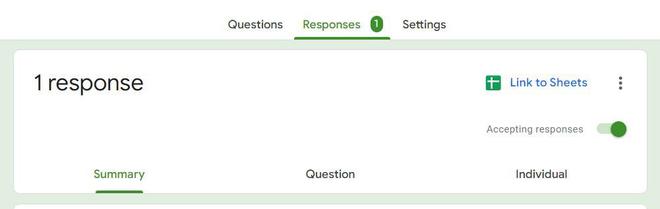
- Toggle the “Accepting responses” switch to the off position.
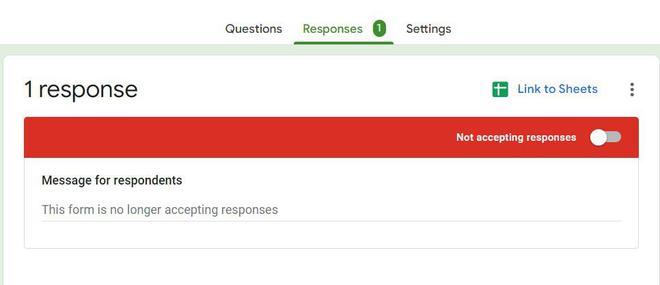
- This method gives you complete control over when to stop accepting responses.
How to stop accepting responses Google Form Automatically
- If you need more automated control over response limitations, Google Forms add-ons like Form Limiter can be invaluable. However, if you want to avoid using add-ons, the manual method mentioned earlier can still be effective.
- By using Form Limiter, you gain a powerful tool for managing and automating response limitations in Google Forms. It’s a solution that not only streamlines your data collection process but also enhances the overall user experience by ensuring that your forms operate precisely as you intend them to. Whether you’re managing surveys, quizzes, registrations, or any other data collection endeavor, Form Limiter simplifies the process, allowing you to focus on extracting valuable insights from your collected data.
Benefits of Automating Response Limitations with Form Limiter
- Precision and Accuracy: Form Limiter allows you to set precise response limitations. You can specify the exact number of responses you want to accept or define a specific date and time range for accepting submissions. This precision ensures that your Google Form closes automatically when the predetermined criteria are met, eliminating the possibility of overflows.
- Effortless Automation: Once you’ve configured your response restrictions using Form Limiter, the add-on takes over the responsibility of managing your form’s responses. There’s no need for manual monitoring or intervention, which can save you valuable time and effort.
- Minimized Errors: Automation reduces the risk of human errors. With Form Limiter, you won’t have to rely on manual closing or constant vigilance, reducing the chances of accidentally exceeding your response limits.
- Enhanced User Experience: For respondents, Form Limiter ensures a seamless experience. When your response limits or deadlines are reached, the form automatically closes, providing a clear and user-friendly interface that eliminates the possibility of late or excess submissions.
Conclusion
Effectively limiting responses in Google Forms is essential for managing data collection and ensuring data accuracy. By following the steps outlined in this guide, you can easily restrict responses based on your Google account, use add-ons for more advanced limitations, or manually control when your form stops accepting responses. Choose the method that best suits your needs and enjoy more efficient data collection with Google Forms.
FAQs
How to Limit Responses in Google Forms easily on Mobile ?
Google Forms provides a convenient way to collect and manage data on mobile devices. If you want to limit responses on Google Forms through your mobile device, you can do so using the Google Forms mobile app or a mobile web browser. Here’s a step-by-step guide:
Using the Google Forms Mobile App:
- Download the Google Forms App: If you haven’t already, download and install the Google Forms app from your device’s app store.
- Open Your Form: Launch the Google Forms app and open the form for which you want to limit responses.
- Access Form Settings: Tap on the form you want to edit, and then tap the gear or settings icon located in the top-right corner of the screen.
- Enable Response Limit:If you want to limit responses, toggle on the “Collect email addresses” option. This will require respondents to sign in with their Google account, and it will automatically limit responses to one per account.
- Additionally, you can set a specific date and time to close the form automatically.
- Save Changes: After configuring your response limitations, tap the “Save” or “Done” button to apply the changes.
- Share Your Form: Share the form with your intended respondents by tapping the share icon. They will be prompted to sign in with their Google account to submit a response, and multiple responses from the same account will be restricted.
How do I stop multiple responses in Google Forms?
Create or Open Your Google Form:
Start by creating a new Google Form or opening an existing one.
Click on the Settings Gear Icon:
Click on Settings
Go to “General” Settings:
In the settings menu, navigate to the “General” tab.
Find “Limit to 1 Response” Option:
Locate the “Limit to 1 response” option. This option restricts respondents to submit only one response.
Toggle the Option On:
Click the switch next to “Limit to 1 response” to turn it on.
Save Your Settings:
Be sure to save your settings by clicking the “Save” button at the bottom-right of the Settings window.
How to Limit Google Form Responses and Close Form Automatically?
To limit Google Form responses and close the form automatically after reaching a specific number of responses, you can use a Google Forms add-on called “Google Forms add-on – Form Limiter.” Here’s how:
1.Open Your Google Form: Access the Google Form for which you want to limit responses.
2.Install the Form Limiter Add-On:
- Click on the three vertical dots (menu) in the upper right-hand corner of your Google Form.
- Select “Add-ons” and then choose “Get add-ons.”
- Search for “Form Limiter” in the add-ons marketplace and install it.
3.Access Form Limiter:
- After installing Form Limiter, go back to your Google Form.
- Click on the three vertical dots (menu) again, select “Add-ons,” and choose “Form Limiter.”
- Configure Limitations:In Form Limiter, you can set specific limitations, such as the number of responses allowed and the date and time range for accepting responses.
4.Apply and Save:
- Once you’ve configured your limitations, click “Apply” or “Save” within the Form Limiter add-on.
5.Confirmation:
- You will receive a confirmation message indicating that your form limitations have been set successfully.
With Form Limiter, your Google Form will automatically close and stop accepting responses once the specified limitations are met.
How Do I Avoid Multiple Responses in Google Forms?
To avoid multiple responses in Google Forms, you can implement one or more of the following methods:
1. Require Sign-In with Google Account:
- In your Google Form, go to “Settings” (the gear icon) and enable the “Collect email addresses” option. This will require respondents to sign in with their Google account before submitting a response, limiting them to one response per account.
2. Use Form Limiter Add-On:
- Install the “Google Forms add-on – Form Limiter” add-on, as explained in the previous section. This add-on allows you to set limitations, including restricting responses to one per person.
3. Enable IP Restriction :
- This method involves using Google Apps Script to restrict responses based on the respondent’s IP address. It’s a more advanced approach and may require some scripting knowledge.
4. Share Individualized Links (Advanced):
- If you have a list of respondents, you can create individualized Google Form links for each person using a mail merge tool or a script. Each respondent will receive a unique link, ensuring one response per person.
How Do I Limit Google Forms to 10 Responses?
To limit Google Forms to a specific number of responses, you can use the “Google Forms add-on – Form Limiter” add-on as follows:
1.Install the Form Limiter Add-On:
- Open your Google Form.
- Click on the three vertical dots (menu) in the upper right-hand corner of your Google Form.
- Select “Add-ons” and then choose “Get add-ons.”
- Search for “Form Limiter” in the add-ons marketplace and install it.
2.Access Form Limiter:
- After installing Form Limiter, go back to your Google Form.
- Click on the three vertical dots (menu) again, select “Add-ons,” and choose “Form Limiter.”
3.Configure Limitations:
- In Form Limiter, set the limitation for the number of responses to 10 (or your desired limit).
4.Apply and Save:
- Once you’ve configured the limitation, click “Apply” or “Save” within the Form Limiter add-on.
- The Google Form will automatically close and stop accepting responses once it reaches the specified limit of 10 responses.
These methods allow you to easily limit responses in Google Forms, whether you want to restrict by account, set a specific response limit, or employ add-ons for more advanced restrictions.
Share your thoughts in the comments
Please Login to comment...