How To Create VPC Network In GCP?
Last Updated :
30 Jan, 2024
A VPC or Virtual Private Cloud allows you to secure your virtual networking environment including IP addresses, subnets, and network gateways. VPC allows users to create a virtually protected environment for their virtual instances on the Cloud platform and have complete access to the environment. VPC provides users the facility to place and manage necessary resources in a virtual protected environment of the cloud provider like Google Cloud Platform(GCP). We as a user can create, customize, and delete VPC networks in GCP. In this article, we will be exploring how we can create a VPC network in the Google Cloud Platform.
What Is Virtual Private Cloud (VPC) Network In GCP?
A Virtual Private Cloud (VPC): A VPC network is a virtual version of a physical network that is implemented inside Google’s production network.
Google Cloud platform‘s Virtual Private Cloud Network is a networking service that allows users to create their private network infrastructure virtually. It provides networking functionalities to Google Cloud’s VMs, Kubernetes Engines, and serverless workloads. Google Cloud’s VPC network is globally available and has flexibility and scalability. It provides facilities for internal application load balancers. It can be also connected to on-premises networks using Cloud VPN tunnel.
We can create multiple Virtual Private Cloud networks in Google Cloud Platform. However, when we create an account in Google Cloud Platform it provides a default VPC Network having one subnetwork or subnet in each region. Each subnet has IP address range associated with them.
Steps To Create VPC Network In GCP
Step 1: Open Google Cloud Console
- On your web browser, visit console.cloud.google.com and Login with your valid credentials.
- You must have a valid Google Cloud’s subscription to continue with the further steps.
- Once you are on the homepage of Google Cloud Console, create a project with some valid name.

Step 2: Enable Compute Engine API
- In order to be able for creating VPC networks, we need to enable Compute Engine API which provides functionalities for managing VPC Networks, subnets and other related resources.
- Use the search-bar available to search for Compute Engine API and click on the search result.

- Click on ENABLE and wait for sometime for it to be enabled, then go back to the Google Cloud Console’s homepage.
Step 3: Open VPC Network
Use the left sidebar available, scroll down there and look for “VPC Networks” and click on it.

- This will open the VPC Network’s page. Here you can see the default VPC Network has already been created for you.

- You can use this VPC Network for learning purposes but it is not recommended to be used for production purpose.
- In you have on-premises server or have multiple VPC then there is a chance that this default- VPC may overlap.
- It is always better to create a new VPC Network for your projects and production.
Step 4: Create VPC Network
- Click “Create VPC Network” button available there which will open a new page to fill basic details about your VPC Network and options to configure and customize.

Step 5: Fill Out VPC Network Details
- Give a name to your VPC Network and write a description for it. Description is not mandatory, so if you want you can skip it.

- Leave the MTU or Maximum transmission unit as it is. MTU simply defines the largest packet size of the network.
- It can be set to any value between 1300 and 8896. The Default value is 1460. Disable the VPC network ULA internal IPv6 range.
Step 6: Configure Subnets
We will be choosing custom in subnet section, so we can define our subnet ranges. If you select automatic it will be the same as the default VPC network as it will create one subnet in each region with default values.

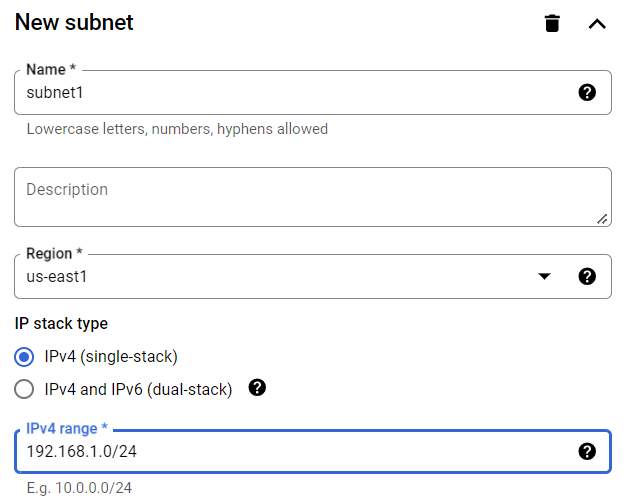
- Let’s Create two different subnets in different regions. You can choose the IP Stack type while creating subnets, here we will be selecting IPv4 for each subnet.
For the first one,
- Name: subnet1
- Region: us-west1
- IPv4 : 192.168.1.0/24
You can write a description if you want, we will here leave other options as it is.
Let’s create another subnet as
- Name: subnet1
- Region: us-east1
- IPv4 : 10.1.0.0/24

Step 7: Configure Firewall Rules
- If the firewall rules section you can see rules are already created for you with the IP addresses you have selected.

- The first rule defines that all the VMs in your VPC network can have incoming connection request on all ports inside the VPC Network.
- The second rule will allow anyone on the internet to ping your instance created in the VPC Network.
- The next one allows anyone over the internet to use remote desktop connection with the instances on your VPC and the next one allows will allow to use the SSH over the internet with valid keys.
- These four rules will be evaluated first then the next two rules will be evaluated. The next two rules defines deny all access and allow all access to the instances in the VPC Network.
- Choose the firewall rule which suits the best for you. You can edit the rules later or can create new rules once your VPC Network is created.
Step 8: Review And Create
- In the next section of Dynamic routing mode select the default mode which is Regional.
- You can also create DNS Policy if you want but these things are optional.
- Check all the configurations you have done to the VPC Network and once checked by yourself, click on the Create button to create the VPC Network. It will take few minutes to create.

The other way
- You can also select Equivalent Command line to generate command line code for the VPC Network with the configurations you have done, run it on Cloud Shell to create the VPC Network.
Step 9: Check Your VPC Network
- Once you see the message “Created” search for VPC Networks on the search bar and select it to navigate in the VPC Networks’ Homepage to verify the creation of your VPC Network.

- Now you can see the VPC Network “geeksvpc” in the VPC networks section with the default one means our VPC Network has been created successfully.
- You click on geeksvpc to get a overview of it with customization and configuration options and the priviledge to delete the VPC Network.

- You can explore all the other options available to check and change the configurations made as per your requirement.
- For example let’s check the subnets section and see what we get.

- As you see, we get the option to add new subnets and it’s showing us the subnet we have created with it’s IP ranges.
Implementing VPC Network Security Best Practices
- To make the VPC Network the major focus must be on to minimize attack surface and maximize resource protection.
Least privilege access
Configure least privilege by assigning security groups the minimum inbound and outbound traffic permissions necessary for their specific function. Avoid using “0.0.0.0/0” as a destination address range. use IAM roles to manage access to your VPC resources. Give only the necessary permissions to users and services, following the principle of least privilege. Regularly audit and update IAM roles as personnel and project requirements changes.
Network Segmentation
Use private subnets for resources which does not require internet access. Use NAT gateways for controlled outbound traffic. This technique isolates critical resources. Assign specific IP address ranges to each subnet based on the intended purpose of the resources within, which will help to minimize the attack surface.
Firewall Rules
Create your own firewall rules to control incoming and outgoing traffic to and from your VPC. Use the principle of least privilege, only allowing necessary traffic. Regularly check and update firewall rules as your network grows. Setup monitoring and logging features in the network for better management.
Monitoring And Logging For VPC Networks In GCP
VPC Flow Logs
VPC flow logs records the network flows sent by or received from VM instances. The logs can be used for network monitoring and security analysis.
In Google Cloud Platform select the VPC network you have created and in the subnet section you will see Flow logs button.

- If it is off, click on turn on. Then click on view logs and a new page will open and you will be able to see network traffic logs for the VPC Network.

Here you can check logs, run custom query , create alert and many other things for better monitoring and logging of the VPC Network.
Stackdriver Logging
You can also choose to send all application and system logs, including VPC-related events, to Stackdriver Logging for centralized analysis. This will give you insights to check security failures and discover root cause. You can set up custom alerts based on metrics such as network latency, throughput, and error rates to efficiently identify and address issues.
IAM Audit Logs
Enable Cloud Audit Logs to monitor IAM activity logs and keep a track of user access and resource modifications within your VPC networks. This helps detect unauthorized access attempts and potential threats. Cloud Audit Logs will maintain an audit of all administrative activities within your VPC. This will help check failures, identify and solve network issues.
Scaling And Modifying VPCs: Tips and Considerations
Subnet Resizing
To scale your VPC network you can try resizing the subnets. Calculate the IP ranges and consider the availability zones to resize subnets. While resizing subnet can lead to changes in firewall rules and resource allocation. Reconfigure the rules for firewall protection and monitor resource allocated for better networking experience.
If you are planning to scale the VPC network, go ahead with Global load balancers rather using regional. Using Global load balancers can help routing efficiently in different zones. This will let you route in all regions using a single VPN or interconnected or cloud router.
Troubleshooting VPC Network Issues In Google Cloud Platform
In case of any issue happens during the creation or using the VPC Network, the best way to solve the issue by taking a look in the official documentation. Consider the best practices while using VPC networks to avoid issues in the first place. However in case you need to troubleshoot Use,
- VPC Network troubleshooter. This interactive tool helps diagnose common VPC connectivity issues and suggests potential solutions.
- You can access the logs in VPC flow logs for network insights and identify the problem.
- Check for route tables if they are configured properly or not.
Conclusion
VPC network is a useful networking feature provided in Google Cloud Platform. You can create your own VPC Network, define subnets, configure firewall rules and configure routings. Create VMs or Kubernetes engine instances in a protect environment and manage the resources. Connect our VPC with on-premises network and there are many more amazing things you can use with Cloud VPC. Now used your own VPC network to host and manage your resources with a secure and protected environment for your application and resources.
Creating VPC Network In GCP – FAQs
What Is The Full Form Of VPC?
VPC stands for virtual private cloud which provides virtual version of physical network with access to configure network components. Major cloud providers like AWS, GCP have features of VPC Network.
How Do I Create My Own VPC Network In GCP?
Follow the simple steps to create a VPC Network in GCP
1. Open Cloud Console
2. Choose VPC network and click create
3. Configure you VPC network with subnets, firewall rules, routes
4. Click Create
Do I Have To Enable Compute Engine API To Create VPC Network In GCP?
Yes, you need to enable Compute Engine API to create and manage Virtual Machine and networking features in Google Cloud Platform.
Is It Necessary To Define Subnet IP Ranges?
You can opt for automatic subnet IP , which will create a subnet in each region. But it is recommended to define your subnet IP ranges manually as per your requirements.
Share your thoughts in the comments
Please Login to comment...