How to Create a Load Balancer on GCP?
Last Updated :
24 Apr, 2023
A load balancer in GCP (Google Cloud Platform) is a service that distributes incoming network traffic across multiple backend resources such as virtual machines (VMs), container instances, and managed instance groups.
The main purpose of a load balancer is to improve the availability and scalability of the backend resources by distributing the incoming traffic evenly among them. This helps to avoid overloading any single resource and provides better performance, reliability, and fault tolerance for the applications.
Pre-requisites: GCP
Types of GCP Load Balancers
- HTTP(S) Load Balancer
- Network Load Balancer
- Internal Load Balancer
- Global Load Balancer
To create a load balancer in Google Cloud Platform (GCP), you can follow these general steps:
- Choose a load balancing option: GCP offers several types of load balancers, such as HTTP(S) Load Balancing, Network Load Balancing, Internal Load Balancing, and Global Load Balancing. Choose the one that best fits your needs.
- Configure your backend service: A backend service defines the set of instances that will receive traffic from the load balancer. You need to create and configure a backend service, including the instance group, instance template, and health check settings.
- Create a load balancer: After you configure your backend service, you can create a load balancer. The steps to create a load balancer depend on the type of load balancer you are using.
For example, to create an HTTP(S) Load Balancer, you can follow these steps:
- Go to the GCP Console and select your project.

Selecting the Project
You can check the status of your load balancer in the GCP Console by navigating to Navigation Menu > Networking Services > Load Balancing.
- In the left sidebar, click “Networking” and then click “Load balancing.”
- Click “Create load balancer.”
- Choose “HTTP(S) Load Balancing.

Creating and Choosing HTTP(S) Load balancer
- Follow the prompts to configure your load balancer, including the frontend configuration, backend configuration, health check settings, and SSL certificate (if applicable).
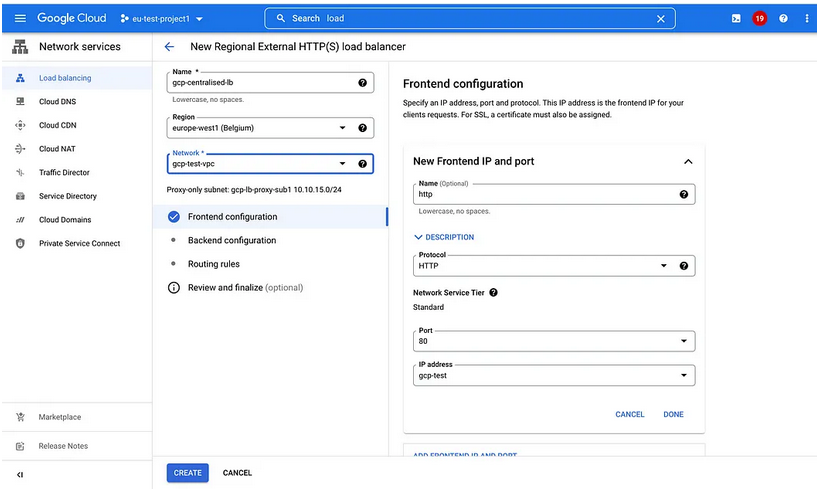
Setup frontend Configuration

Setup Backend Configuration – here I will go for Cross-project backend option
After entering Project ID and Backend Service name click on “Add backend Service” button to add cross service backend.
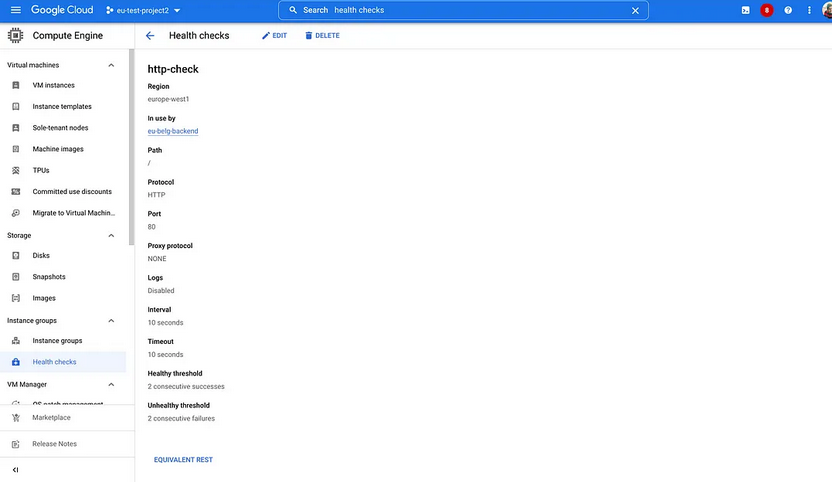
Setup Healthcheck
Healthcheck helps us to ensure backend is ready to accept traffic on specified port
- Review and finalize your load balancer configuration, then click “Create.”
Then,
- Test the Load-balancer setup by accessing IP address with port 80. We can access the backend instance from another project.
- We can add this IP address to DNS zone and map with domain name to access our Load-balancer via that domain address.
Test Load Balancer
After you create your load balancer, you can test it by sending traffic to its IP address or DNS name. You can also monitor your load balancer’s traffic and health using the GCP Console or command-line tools.
Note that these are general steps, and the exact steps to create a load balancer in GCP may vary depending on the load balancer type and your specific requirements.

GCP HTTPS Load Balancer – Pipeline
If you got any error like: ModuleNotFoundError, then Check if the necessary modules are installed: In this case, make sure that you have installed the google-cloud-compute library. You can check this by running the following command in your terminal or command prompt:
Python3
pip freeze | grep google-cloud-compute
|
If you see no output, it means the library is not installed. In that case, install it using the following command:
Python3
pip install google-cloud-compute
|
Python3
from google.cloud import compute_v1
compute_client = compute_v1.LoadBalancerClient()
backend_service = {
"name": "my-backend-service",
"health_checks": ["https-health-check"],
"backend": {
"group": "https-instance-group"
},
"protocol": "HTTP",
"port": 80,
}
target_pool = {
"name": "my-target-pool",
"health_checks": ["https-health-check"],
"instances": [
{"instance": "instance-1"},
{"instance": "instance-2"},
{"instance": "instance-3"},
]
}
forwarding_rule = {
"name": "my-forwarding-rule",
"ip_address": "1.2.3.4",
"port_range": "80-80",
"target": "my-target-pool"
}
backend_service_response = compute_client.
insert_backend_service(project="my-project",
backend_service_resource=backend_service)
target_pool_response = compute_client.
insert_target_pool(project="my-project",
target_pool_resource=target_pool)
forwarding_rule_response = compute_client.
insert_forwarding_rule(project="my-project",
forwarding_rule_resource=forwarding_rule)
print("Backend service created:", backend_service_response.self_link)
print("Target pool created:", target_pool_response.self_link)
print("Forwarding rule created:", forwarding_rule_response.self_link)
|
This code defines a backend service, target pool, and forwarding rule, then uses the insert_backend_service, insert_target_pool, and insert_forwarding_rule methods to create them in GCP.
Note: This code is just an example, and you may need to modify it to fit your specific requirements.
Output:
The output of the code depends on the success or failure of the API requests to create the backend service, target pool, and forwarding rule. If the requests are successful, the code should print the self-links of the created resources, similar to the following:
Output
Backend service created:
https://www.googleapis.com/compute/v1/projects/my-project
/global/backendServices/my-backend-service
Target pool created:
https://www.googleapis.com/compute/v1/projects/my-project
/regions/us-central1/targetPools/my-target-pool
Forwarding rule created:
https://www.googleapis.com/compute/v1/projects/my-project
/regions/us-central1/forwardingRules/my-forwarding-rule
If the requests fail, the code may raise an exception with an error message explaining the reason for the failure. In that case, you may need to debug the issue by checking the error message and the API documentation to identify the problem and possible solutions.
Share your thoughts in the comments
Please Login to comment...