When we are building an application to be hosted on a Cloud Platform we must configure networks and take security measures. If you are building an application that is open to users over the internet, you might want to control who gets access or not, and how users interact with each other. This is essentially where you will need a VPC Network. A VPC network is like your own private or isolated internet within the Cloud Platform. Google Cloud Platform being one of the leading cloud providers offers various Network services and VPC is one of them. Using a VPC network in GCP you can isolate various resources and infrastructure to confirm better security and performance. Now, Terraform acts as a Infrastructure tool that allows to create and manage Cloud infrastructure with simple code. In this article, we will be learning about how we can create a VPC using Terraform in Google Cloud Platform (GCP).
What is VPC in Google Cloud Platform (GCP)?
In Google Cloud Platform (GCP), a Virtual Private Cloud (VPC) is just a regular Network infrastructure but on the cloud where you as a user don’t need to think about the management. It is a virtual network that provides a secure and isolated environment for cloud resources. Using VPC, developers can define and control various networking components such as IP addresses, Subnets, Routing, and Firewall rules. For example, you can think of VPC as your own room where your house is on the Internet. In your room, you can change the furniture layouts, allow others to come inside or ask one to leave. The room number given to your room is the IP address and other rooms will be services or computing resources with some number (IP address) associated with them.
What is Terraform?
Terraform is an Infrastructure as Code (IaC) tool developed by HashiCorp to create and manage different cloud resources using simple code. Terraform is compatible with major Cloud providers like, Google Cloud Platform, Amazon AWS, Microsoft Azure. Using Terraform we can manage services like, Virtual machines, Storage buckets, Databases, Network components using simple Code. Terraform also helps in versioning, and automation of Cloud tasks.
Steps to create VPC in GCP using Terraform
Step 1: Configure Terraform
To use Terraform, either you have to install terraform in your local PC and then connect it with Google Cloud Platform using Cloud SDK. Otherwise you can use Google Cloud Shell to execute Terraform codes as the Cloud Shell already has Terraform installed in it.
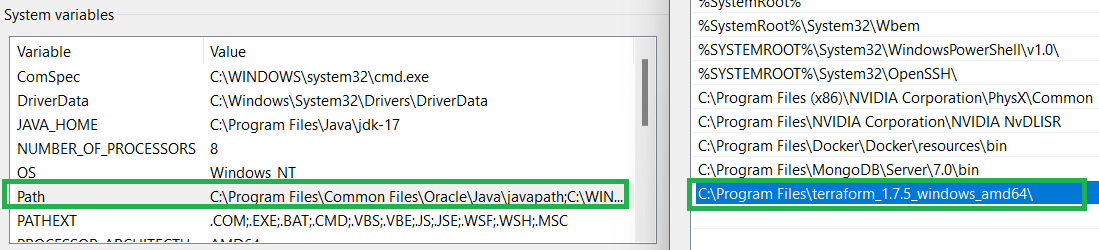
- Now, To install Terraform, download Terraform from the official website and choose the AMD64 version.
- Unzip the file and copy the directory path and paste in the Environment variable under Path.
To check, if Terraform is properly installed on not, run the following command on Terminal.
terraform --version
Output:
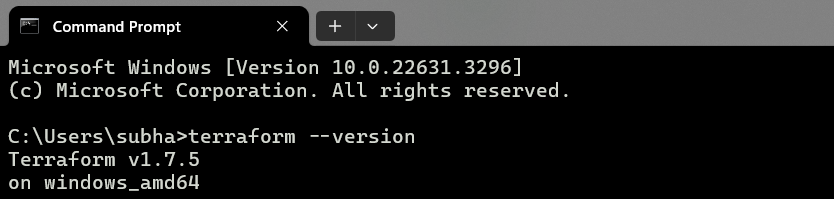
If you get a output similar to the above then Terraform is properly installed in your system.
Step 2: Configure GCP using Cloud SDK
Google Cloud SDK allows users to interact with Google Cloud Platform and use GCP services from terminal. Tasks such as deploying application, managing services all can be done directly form local PC without accessing Cloud Console. To use Terraform also, we need to setup Cloud SDK.
- Download the executable installer of Cloud SDK from official website and execute it. You can also use the following command in Terminal for installation.
(New-Object Net.WebClient).DownloadFile("https://dl.google.com/dl/cloudsdk/channels/rapid/GoogleCloudSDKInstaller.exe", "$env:Temp\GoogleCloudSDKInstaller.exe")

& $env:Temp\GoogleCloudSDKInstaller.exe
- After successful installation it will ask your permission to login. Enter Y to continue.
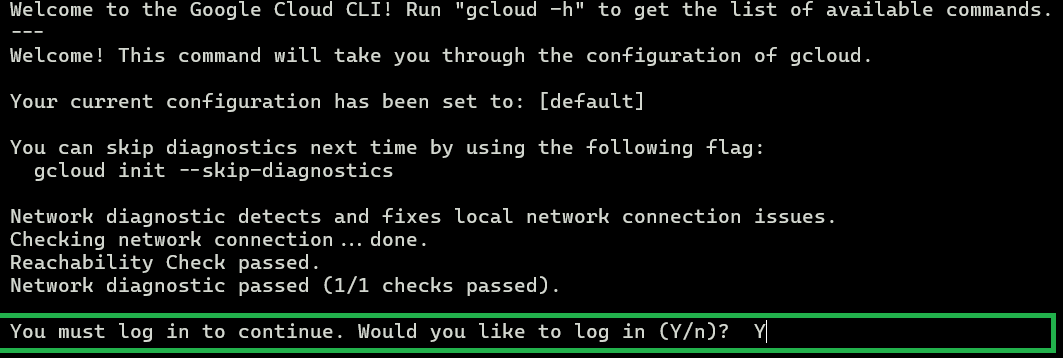
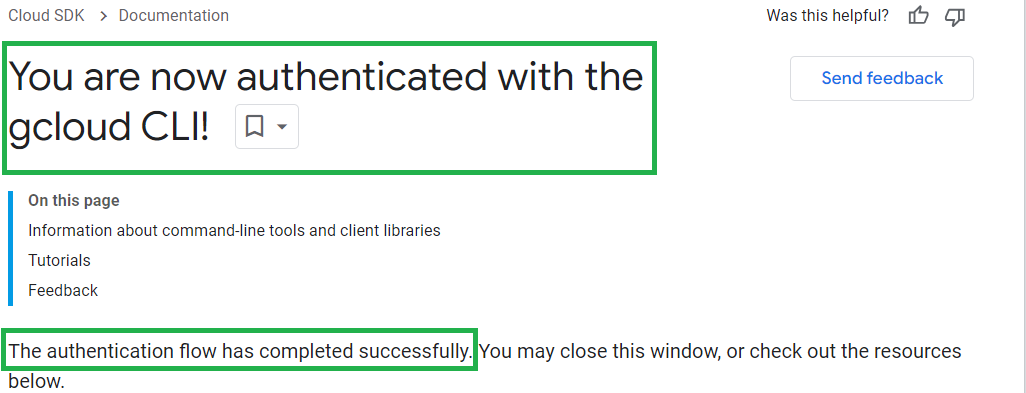
- Select the Google account with valid Cloud subscription to login and allow the permissions asked and you will get connected with Google Cloud Platform using CLI.
Step 3: Enable Compute Engine API
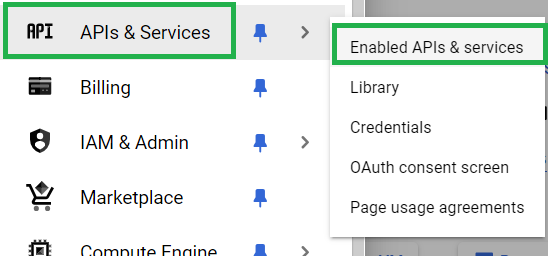
If the GCP project you are going to use is being used for the first time then this step is mandatory for you. Open Google Cloud Console and Click on API & Services and select Enabled API and Services.
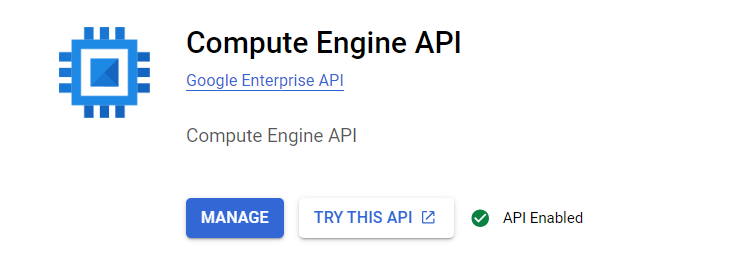
If you see Google Compute Engine API is enable then it’s well and good. Otherwise, search for Compute Engine API and select the following one.

On Compute Engine API’s page click on enable. This API is very crucial to use Google Cloud services using API calls.
Step 4: Generate Service account Key
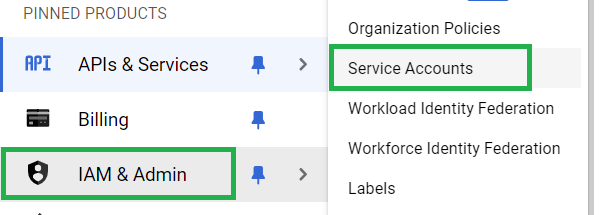
To authenticate service requests from a local machine using API we need some valid credentials. A service account key will do the task for use. On Cloud console, Click on IAM & Admin and select Service Accounts.
If have an existing Service Account then fine, else create one by clicking on Create Service Account and fill out the necessary details.
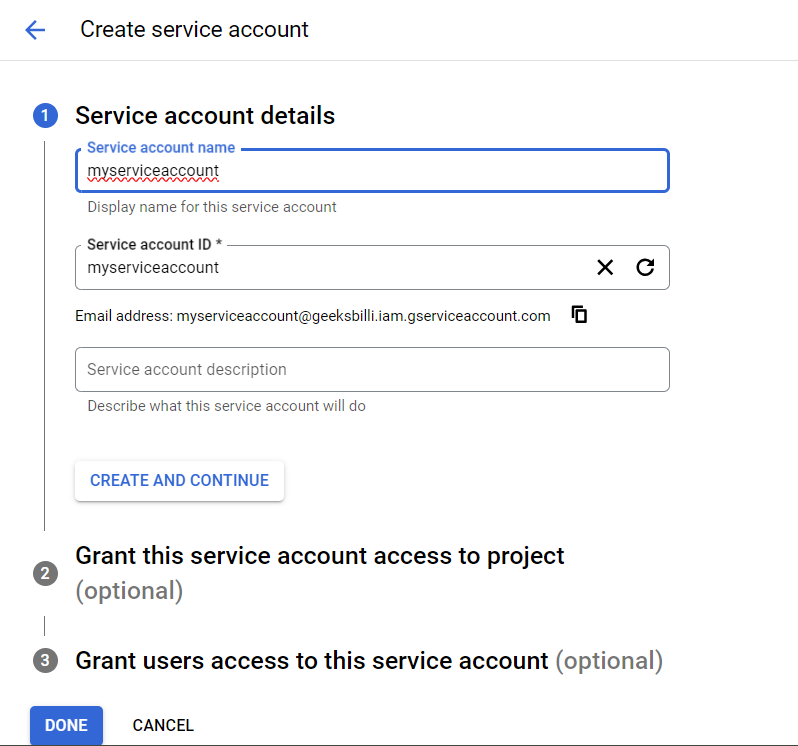
You need to fill only the Account Name and the same will be used for Service Account ID. Leave other fields as it is and click on Create. Once created you can see the account name similar to the following.

Click on the Account Name and go to the Keys section and click on Add Key and select Create New keys. For Key type select JSON and click on Create.
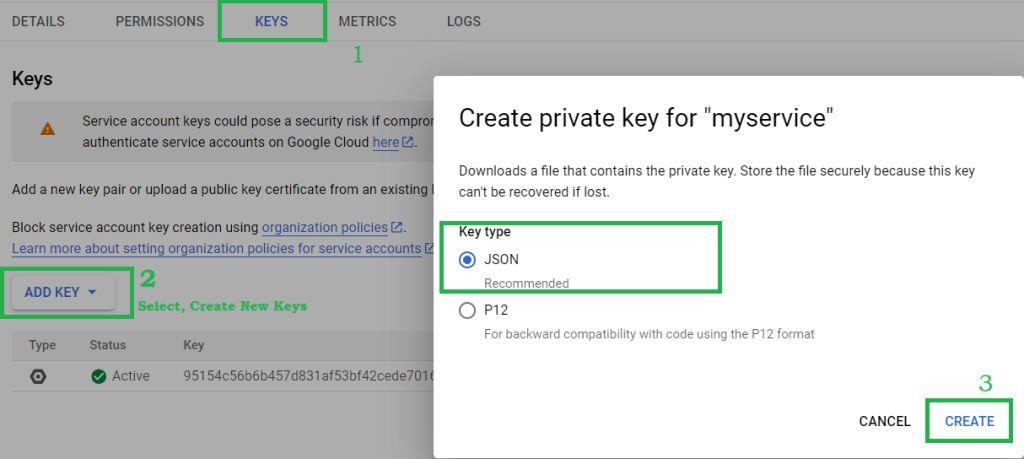
This will download the JSON key file in your computer. Keep this file safe as we will need this on further steps.
Step 5: Write Terraform Configurations
Create a file name main.tf in any IDE. Paste the JSON file containing Key in the same directory. Now write the following Configurations or Code.
a) Provider Block:
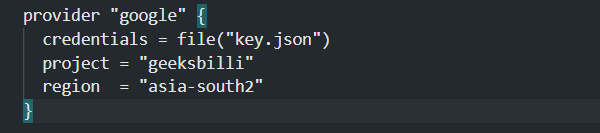
Here we have configured the Google Cloud Platform for Terraform as a provider.
- Credentials: This specifies the path for the service account JSON key for authentication.
- Project: Here we have give the Project ID of the current active project in GCP under which we want to create the VPC.
- Region: This specifies the region where we want to create the resources. It is recommended to choose the nearest region.
b) VPC Network Configuration:
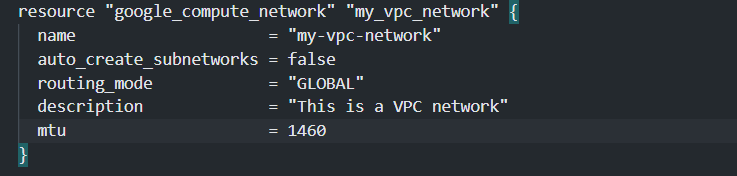
This Block contains the required details for the VPC Network.
- Name: This defines the name of the VPC network.
- auto_create_subnetworks: This is set as false as we don’t want the subnets to created automatically and we will be defining the subnets manually.
- routing_mode: This is set to Global which allows the VPC to route traffic globally.
- description: This is optional. Write a description for the VPC if you want to.
- mtu: This is the Maximum transmission unit which defines the size of data packet that can be accepted by inter-connected device.
c) Subnet Configuration:
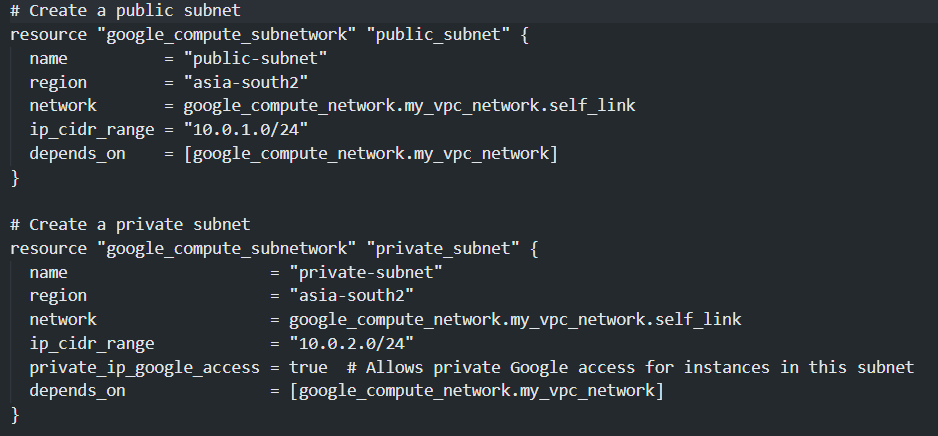
Here we have define two subnets where one is public subnet and another one is a private subnet. We have defined the name and region for both the subnets and linked with the VPC network using self-link. the ip_cidr_range defines the IP ranges for the subnet written using CIDR notation. for the private subnet the private IP access is turned on. Using the depends_on attribute, it is defined that the creation of subnets are dependent on the creation of VPC Network.
Here is complete code for your reference.
main.tf
provider "google" {
  credentials = file("key.json")
  project = "geeksbilli"
  region  = "asia-south2"
}

# Create a VPC network
resource "google_compute_network" "my_vpc_network" {
  name                    = "my-vpc-network"
  auto_create_subnetworks = false
  routing_mode            = "GLOBAL"
  description             = "This is a VPC network"
  mtu                     = 1460
}

# Create a public subnet
resource "google_compute_subnetwork" "public_subnet" {
  name          = "public-subnet"
  region        = "asia-south2"
  network       = google_compute_network.my_vpc_network.self_link
  ip_cidr_range = "10.0.1.0/24"
  depends_on    = [google_compute_network.my_vpc_network]
}

# Create a private subnet
resource "google_compute_subnetwork" "private_subnet" {
  name                     = "private-subnet"
  region                   = "asia-south2"
  network                  = google_compute_network.my_vpc_network.self_link
  ip_cidr_range            = "10.0.2.0/24"
  private_ip_google_access = true  # Allows private Google access for instances in this subnet
  depends_on               = [google_compute_network.my_vpc_network]
}
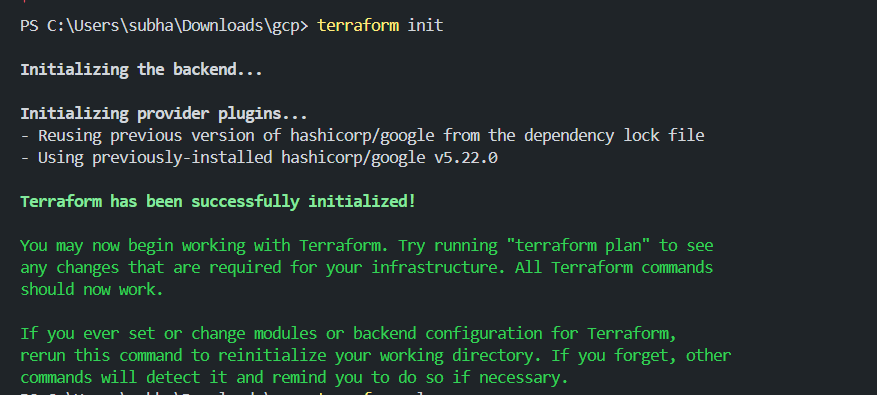
Step 6: Execute the Configurations
Open Terminal in the working directory and execute the following commands.
terraform init
This will initiate Terraform in the current working directory and download the necessary plugins.
Output:
Now execute the following command to the changes that are going to happen if we execute the terraform code written.
terraform plan
output:
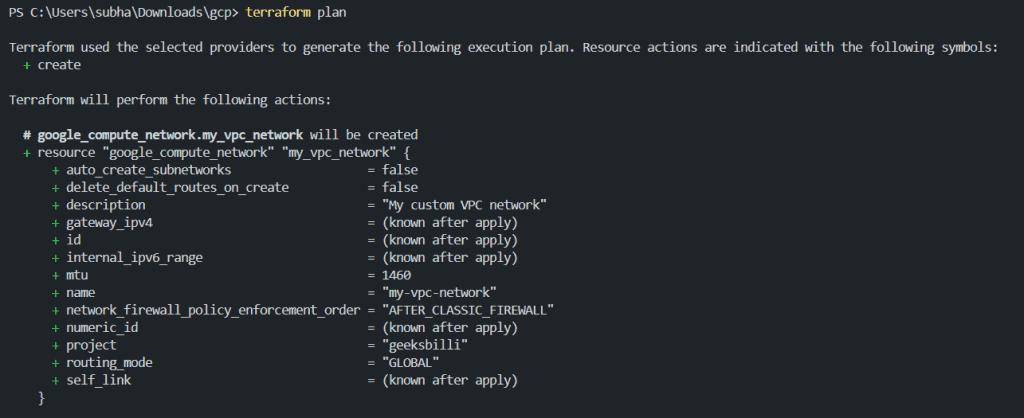
Review the plan given as per your configurations made. If you don’t found any issues then move ahead and execute the following command to implement the changes.
terraform apply
output:
This will again show the same plan same as previous and ask for your permission to continue. Type yes in word to confirm.

After you confirm the changes then you will be able to see the changes implementing similar to the following.
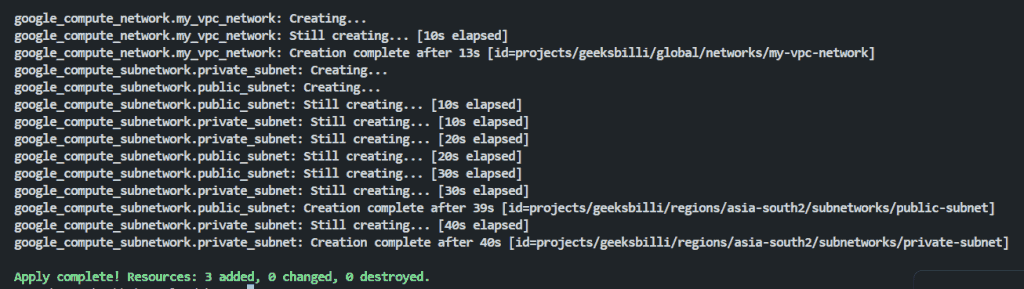
As you can see the there are 3 resources have been added which are a VPC Network, and two subnets.
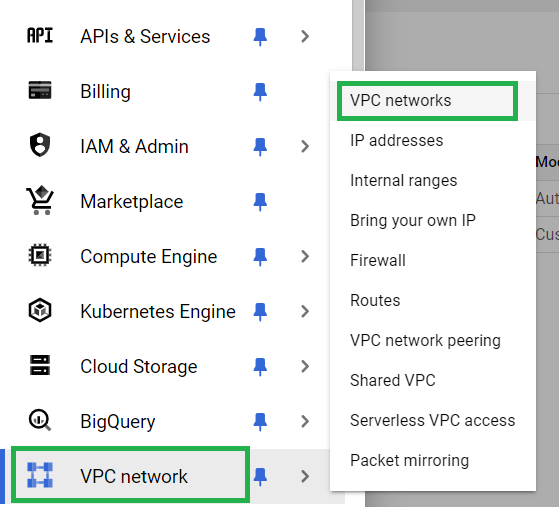
Step 7: Verify the Changes
After we have successfully implemented the resource configurations using Terraform, it’s time to check if changes have been made by accessing Google Cloud Console. Open Cloud Console and click on VPC Network and select VPC networks.
Here you should be able to see the name of your VPC network.

As you can see there are two VPC networks are there, where one is the default one and the other one is what we have created. You can see the configurations also that we have defined are same. To further check the subnets, Click on the VPC network’s name and go to subnets.
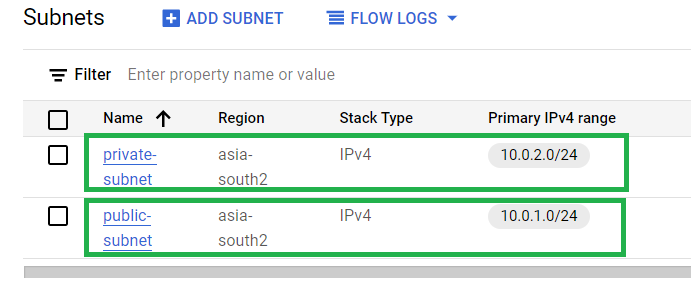
As you can see both the subnets (Public and private) are present here under the VPC Network. Thus, we have successfully created a VPC Network with user defined subnets.
Conclusion
By using Terraform we have created a Virtual Private Cloud in Google Cloud Platform with both private and public access. Remember to get your system ready with Terraform and Cloud SDK if you want to try this on your own or any other similar tasks. Now, you can build and manage your own VPC using Terraform in GCP.
How to create VPC in GCP using terraform – FAQ’s
Is it possible to create multiple VPC using Terraform ?
Yes, you can create multiple VPCs using Terraform. You have to define the configurations for each VPC in different resource block.
How to get existing resources in Terraform ?
Use terraform import command to get existing resources to your Terraform configuration. You can manage the resources along with other resources like VPC networks.
Can I modify the VPC after creation using Terraform ?
Yes, you can modify VPC after creating it using Terraform. Make the required changes in main.tf file and run terraform apply to register the changes.
Do I have to enable Billing for VPC ?
Yes, you should enable billing for your GCP account before creating VPC. Otherwise, you won’t be able to use any service or resource in GCP including VPC network.
Share your thoughts in the comments
Please Login to comment...