How to Customize the Taskbar in Windows 11?
Last Updated :
28 Mar, 2024
The taskbar is the command centre of your Windows 11, providing quick access to your most frequently used applications and tools. Customizing this vital component can transform your desktop into a personalized hub that affects your workflow and enhances your work productivity. Whether you’re a power user or a Normal computer user, mastering the art of taskbar customization is a skill that will enhance your overall computing experience.
What is a Taskbar?

Windows Taskbar is a narrow bar that displays at the bottom of your computer screen. It acts as a central unit where you can access your favorite programs and manage open windows easily.
- Program icons: The taskbar exhibits small images (frequently referred to as shortcuts) for the software that is either pinned or not, which you may choose to click on and alternate between multiple programs quickly.
- Start Menu: The Start button is situated on the left area of the taskbar (this has the Windows logo). Accessing this will reveal the start menu with which you can search and start applications, get into settings, etc.
- System Tray: Located on the right side of the taskbar is a system tray or notification area that contains small icons representing various background running programs such as antivirus, volume control, and clock among others.
- Opened windows: If many windows are open at once, this section will have each of them displayed in the form of tabs. You can swap from window to window by clicking on these tabs.
- Taskbar preview: A preview of an opened item can be seen by floating above it with the cursor. This makes it easy to know which window one wants to shift to through the mouse’s pointer hovering over its tab in the taskbar.
How to Customize the Taskbar in Windows 11?
Customizing taskbar can transform the system into a personalized hub that affects user’s workflow and enhances overall work productivity. Here, we’ll discuss 7 methods to customize the taskbar in Windows 11.
Method 1: Remove the default icons
Some icons on Taskbars we can’t remove by just simply unipin them. Well, we can hide them using the default taskbar settings Follow the below Steps to Do that.
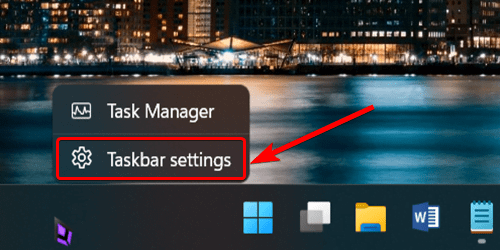
First Right Click on the empty area on the Taskbar and then choose “Taskbar Settings” It will open a new window where we can customize the Taskbar.
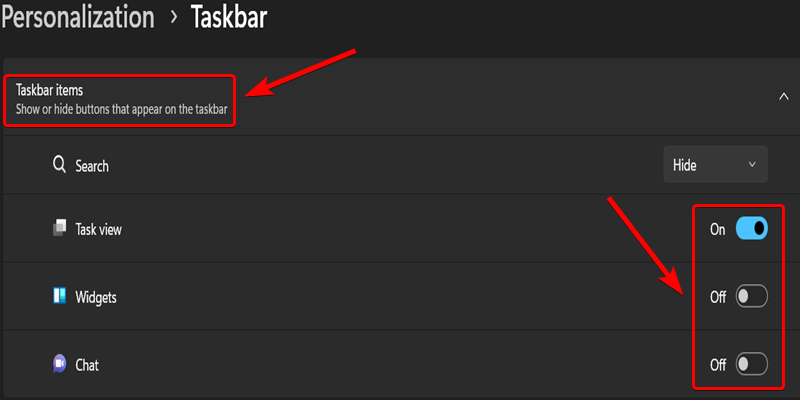
In this window, you can see the list of items that are normally shown on the Taskbar like the Search, Task-View, widgets, and Chat. We can see the switch in front of every option of Enable and Disable. Just Turn off the Toggle for the item you don’t want to see on the Taskbar. When you do this that Specific icon will disappear from the taskbar.
Method 2: Change taskbar Alignment
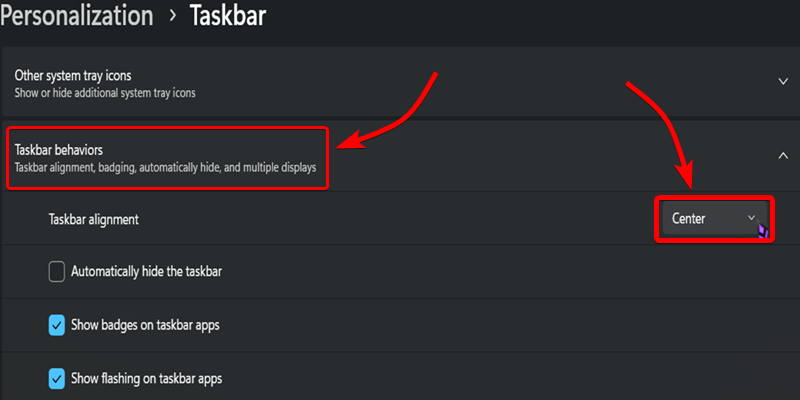
To Move the Taskbar from the Right side to the Left side you need to Click on Empty taskbar and again choose “Taskbar settings“. Then Scroll down and Click on the “Taskbar Behaviour” section and change the alignment option to Left to change the alignment to Left or change it to right or in the Centre if you want it.
Method 3: Pin icons to the taskbar
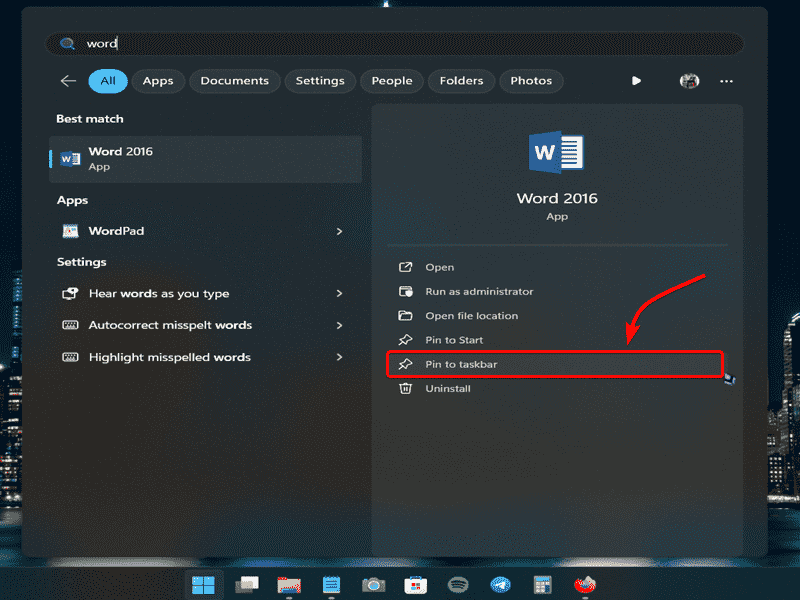
Simply use the Windows Search feature to find the app you want to pin. After searching for the app, right-click on its icon in the search results. From the menu that appears, select the option that says “Pin to taskbar.” That’s it! The app’s icon will now be pinned to your taskbar for quick access.

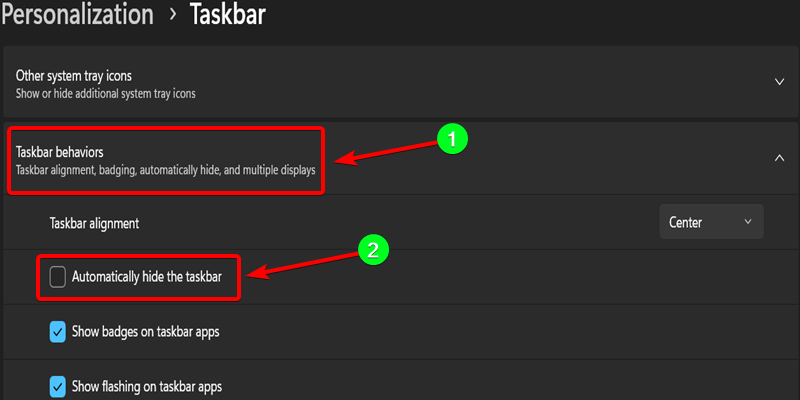
Method 4: Enable taskbar auto-hide
To enable the auto-hide function, right-click on an empty taskbar area and select “Taskbar settings.” Scroll down to the “Taskbar behaviors” section and Tick “Automatically hide the Taskbar“.
Method 5: Make the Windows 11 taskbar transparent
Make the taskbar match your desktop background and give it a transparent look in Windows 11. Follow the Below Steps.
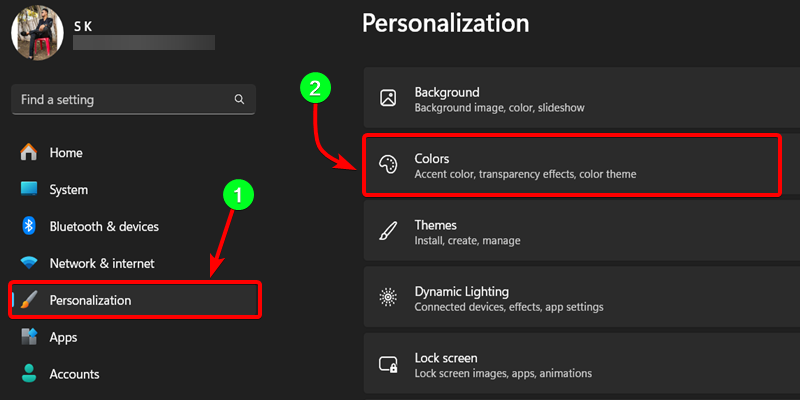
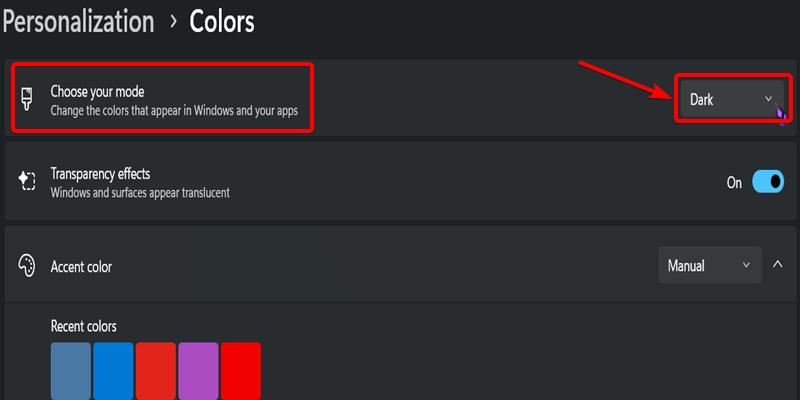
Go to the “Settings” In the Settings window, choose “Personalization” from the left sidebar. After that click on the “Colors” option in the Personalization section.
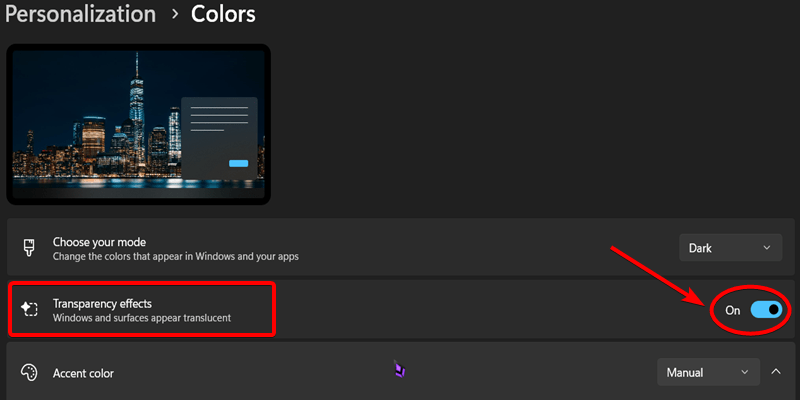
On the Colors Settings Page, you’ll see an option called “Transparency effects.” Turn this option on by clicking the toggle switch.
Method 6: Change the taskbar color
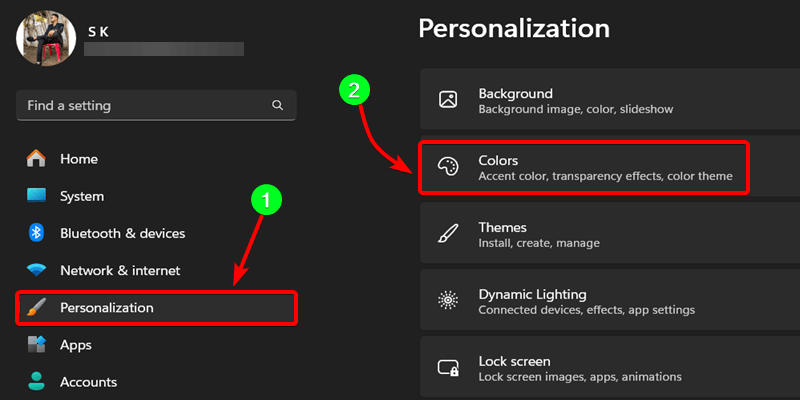
Open the Windows 11 Settings In the Settings window, choose “Personalization” from the left sidebar, and then click on “Colors.”
Enable “Dark” mode from the Choose Your Mode section.
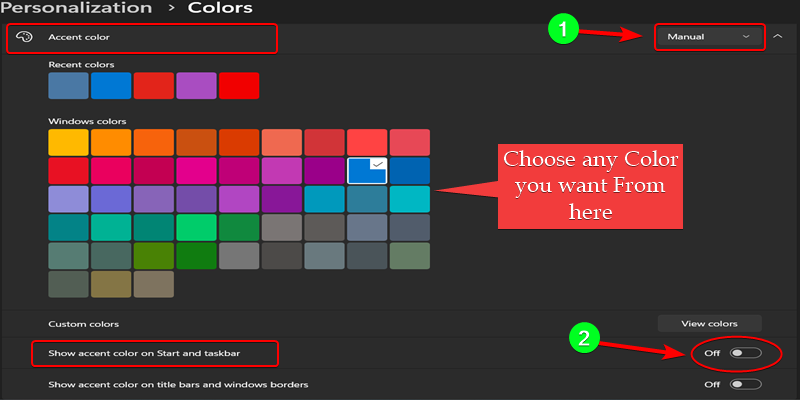
Now, look for the “Accent color” setting and change it from “Windows” to “Manual.” Scroll down and turn on the option that says “Show accent color on Start and taskbar.” This will reveal a color palette below. You can click on any color to set it as your taskbar’s color.
Method 7: Change the taskbar size
Adjusting the size of the taskbar icons in Windows 11 requires modifying the registry settings. Don’t worry, this process is safe as long as you Follow the Below Steps.
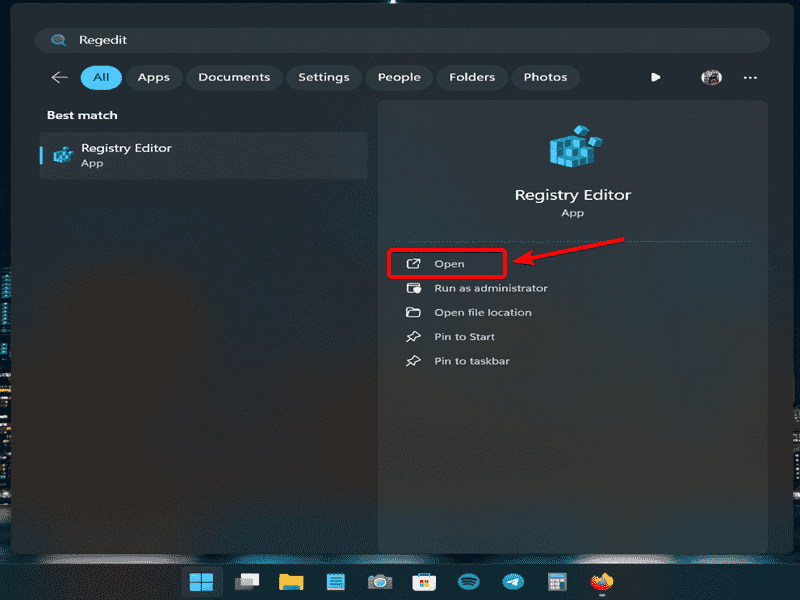
Open the Registry Editor by searching for “regedit” in the Start menu search bar.
In the Registry Editor, navigate to the following location:
HKEY_CURRENT_USER\Software\Microsoft\Windows\CurrentVersion\Explorer\Advanced.
Once you’re in the “Advanced” folder, right-click on it and select “New > DWORD (32-bit) Value.”
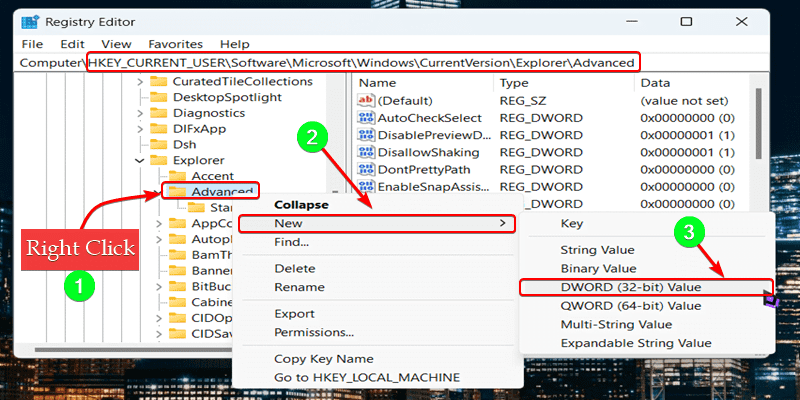
Name this new value “TaskbarSi” (without quotes).

Double-click on the newly created “TaskbarSi” value to open it. In the “Value data” field, enter one of the following numbers to set the taskbar icon size:
- 0 for small icons
- 1 for medium icons (this is the default size in Windows 11)
- 2 for large icons
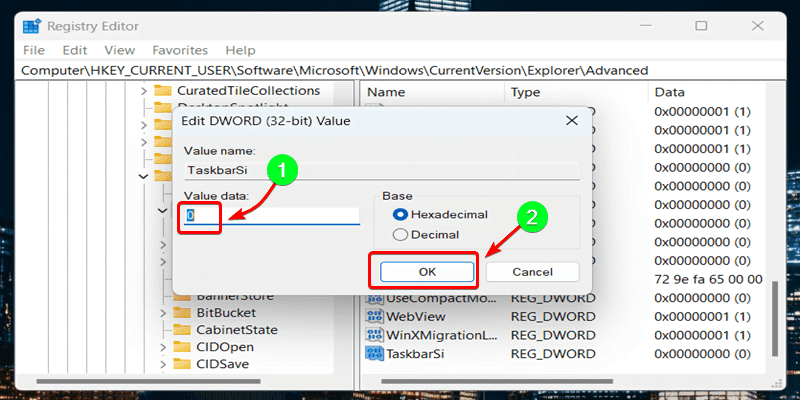
Click “OK” to save the changes.
Restart the Windows Explorer process by opening the Task Manager, find the “Windows Explorer” process, right-click on it, and select “Restart.”
Conclusion
Customizing your taskbar is important for a good Windows 11 experience because it can make it easier to do things in the world of computers. Within a few steps, you can change preferences and thus personalize its location, look, and actions. You will be able to find all these options on the Settings app if you want to move the icons to the left or change their colors or sizes. If you take time to calibrate your taskbar as per your wishes, then you will have a personalized and efficient workspace that will enhance both user satisfaction and productivity levels.
FAQs on How to Customize the Taskbar in Windows 11
What is the taskbar, and why is it important?
The Taskbar is the Bar that was on the Bottom side of your windows screen. This Taskbar is Important Because it Provides the Quick access to you daily used apps and Programs. This Helps you navigate your computer more easily.
Why should I customize the taskbar?
Customizing the taskbar allows you to modify it to your specific needs and preferences. This makes our Computing experience more Personalized, Enhanced, organized and Clean.
How can customizing the taskbar improve my productivity?
It is optimized by changing the position, size and look of your taskbar that you use for your job tasks. For example, pinning apps that are most frequently used can save one’s time since one will not have to go through many menus or messy desktops.
What are the benefits of moving the taskbar to a different location?
On bigger monitors especially, when you move it either to side or top of your screen, will free up some valuable space on your screen hence creating more virtual real estate for other tasks. This feature becomes useful in certain applications and workflows which require more horizontal or vertical space.
Why would I want to change the taskbar’s color or make it transparent?
By doing so, we can ensure our taskbars blend well with our desktop themes or wallpapers hence giving a better view of everything related to us at once.
Share your thoughts in the comments
Please Login to comment...