Windows Snipping Tool Shortcut Key
Last Updated :
25 Feb, 2024
The Windows Snipping Tool is a handy utility that allows users to capture screenshots or snips of their computer screen. Whether you need to capture a specific portion of a webpage, an error message, or an image, the Snipping Tool makes it easy to do so.

In this blog post, we’ll explore how to quickly open the Windows Snipping Tool using shortcut keys, saving you time and effort in capturing screenshots on your Windows computer.
Quick Preview to Open Snipping Tool Shortcut:
- Press the Windows + Shift + S buttons simultaneously.
- Drag the Cursor on the screen for a particular part.
- After dragging, the part will automatically get copied.
- Paste the Copied image in Paint to save it.
Steps to Open the Windows Snipping Tool Using Shortcut Key
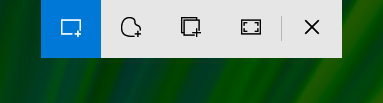
Step 1: Press Windows + Shift + S. You will see a widget at the top of your screen.
This is the Snipping Tool utility. Notice that there are four options available. They include:
- Rectangular Snip
- Freeform Snip
- Window Snip
- Full-Screen Snip
In our case, we will go ahead with Rectangular Snip. Click on it to select the option.
Step 2: To take a rectangular screenshot, you need to select an area of your screen using a to or TouchPad.

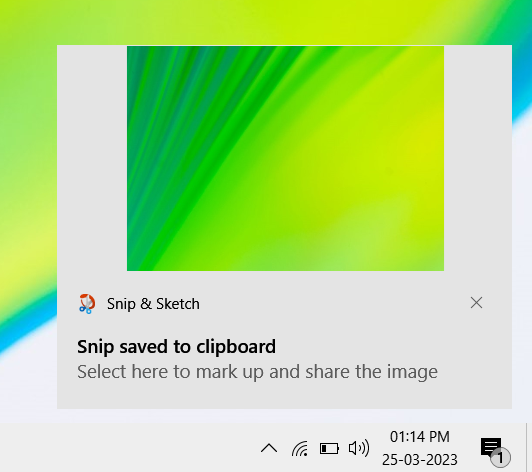
Step 3: You will see a Snip saved to clipboard notification at the bottom-right corner of your screen. Click on it to proceed.
Step 4: A window will pop up. Now, to save the screenshot, press Ctrl + S.

Step 5: The Save As dialog box will pop up. Choose your save location and give the File name to your Screenshot. Then, hit Save to store your screenshot on your PC.
Steps to Create Desktop Shortcut for Snipping Tool in Windows
Note: Apart from the simple shortcut key Windows + R, You can also create a shortcut for snipping tool windows to your desktop despite typing snipping tool repeatedly in the search bar. here are the steps.
Step 1: On your desktop, Press Right-Click > New > Screenshots.
.png)
Step 2: In Create shortcut windows, type the location of the snipping tool i.e. ‘ snipping tool ‘, and Click Next.
.png)
Step 3: Now type the name for this shortcut like ‘ Snipping Tool ‘ or something else of your choice, and click Finish.
.png)
Step 4: A desktop shortcut has been created, you can double-click on that to open the Snipping Tool.
.png)
As we have seen, opening the Snipping Tool Windows 10 using shortcuts is not a big deal at all. We must press the Keyboard Shortcuts for Snipping Tool appropriately & simultaneously to take the screenshot. After taking the Screenshots using Snipping Tool save them, or else they will be replaced by the next copied item.
Conclusion
Capturing screenshots on your Windows computer is made easy with the Snipping Tool, and using shortcut keys can make the process even faster. By remembering the keyboard shortcuts Windows Key + Shift + S or Windows Key + Shift + Q, you can quickly open the Snipping Tool and capture screenshots with ease. Additionally, pinning the Snipping Tool to the taskbar provides convenient access whenever you need it. Incorporate these shortcuts into your workflow to streamline your screenshot-taking process on Windows
Also Read
Open the Windows Snipping Tool Using Shortcuts – FAQs
How do I open the Snipping Tool in Windows?
You can open snipping using two ways:
1. Go to the start menu the type snipping tool, click on snipping tool option.
2. Alternatively, Press windows key + shift + S to open Snipping Tool
What’s the shortcut key to open the Snipping Tool on Windows?
The shortcut key to open the Snipping Tool in Windows is “Windows Key + Shift + S.“
How can I use the Snipping Tool shortcut to capture a specific area of my screen?
After pressing “Windows Key + Shift + S,” click and drag your mouse to select the area you want to capture, and the Snipping Tool will automatically save the screenshot to your clipboard.
Is the Snipping Tool shortcut key available on all Windows versions?
The Snipping Tool shortcut key is available on Windows 10 and the latest versions. If you’re using an earlier version, you may need to use the Snipping Tool through the Start menu or search.
What is the shortcut for Full-Screen Snip?
To open the Full-Screen Snip, there are two shortcuts present in Windows devices. These are the following.
- After pressing the Windows + Shift + S keys, go the the Full-Screen Snip option. Click on it.
- Otherwise, use the keys CTRL + PRT SC simultaneously. It will also capture a screenshot of the whole screen.
Share your thoughts in the comments
Please Login to comment...