How to Take Screenshots in Windows 11?
Last Updated :
12 Feb, 2024
Whatever the device a user is using, they should know the way to Bag Screenshots there. And the Windows 11 operating system is no different from that. Like any other new technology, many users roam to find a way to Take Windows 11 Screenshots. Occasionally, users move to a third-party Screenshot Capture Tool to get the job done.
However, the user forgets that Windows 11 is the latest version launched by Microsoft. There should be some exciting technologies present to reduce the effort to take screenshots. You will be happy to know, there are a few methods present to Capture Screenshots on Windows 11. And these methods are so simple to execute.
This article is going to highlight those methods required to Get Windows 11 Screenshots in literally no time.
Quick Preview to Take Screenshots on Windows 11:
- Press the Windows + Shift + S keys simultaneously to take different shape screenshots.
- Use different keyboard shortcuts with the PRT SC Key to get screenshots.
- Execute the Xbox Game Bar using Windows + G keys at a time.
Methods to Take Screenshots in Windows 11
For capturing screenshots in Windows 11, the following methods should be executed one by one. We will first use the most latest technology Snip & Sketch involved in Windows 11 to do the same.
Method 1: Take Screenshots on Windows 11 using Snip & Sketch (Earlier Snipping Tool)
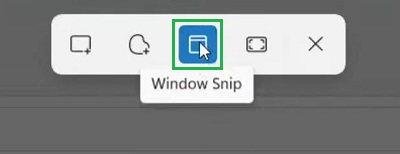
Step 1: Go to the Screen that should be captured & press the keys Windows + Shift + S simultaneously.
Step 2: A new small tab will be present on the upper side of the screen with four types of screen-capturing techniques.
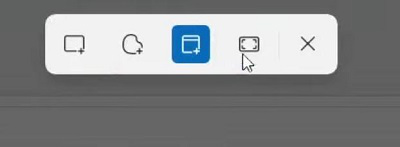
Step 3: Click on the third option, Window Snip to capture the whole screen of the system. And it will be saved automatically.
Hence, we have successfully captured screenshots in Windows 11 using the Latest Snip & Sketch Tool earlier Snipping Tool.
Method 2: Take Screenshots on Windows 11 using Shortcut Key
Using the keyboard of your device, you can take the screenshot on your Windows 11 device. There are a lot of options present to capture screenshots using keyboards. We will discuss all of those sub-methods one by one.
On your keyboard, you have to press the Control (CTRL) and Print Scan (PRTSC) buttons simultaneously. The screenshot will be copied to your clipboard. You can open any application where you want to paste it. You can press the Control (CTRL) + V to paste it on the application. To save the screenshot use the Paint application for that purpose.
- Pressing Windows + PrtScr:
Another method to capture the screenshot is to use the Windows key + Print Scan (PRTSC) key. On your required screen, press these two keys. The screenshot will be automatically captured & saved to its default folder. The default folder is the Pictures under the C Drive. Hence, there is no need to use another app to save it.
This particular operation is to be used for taking a screenshot of any particular application. If a user doesn’t want to take a complete screenshot, this method can be used. you have to first stay on the application which screenshot you are taking. Now press the Alter key (ALT) + Print Scan (PRTSC) key to save the screenshot on your clipboard. Now, paste on any application.
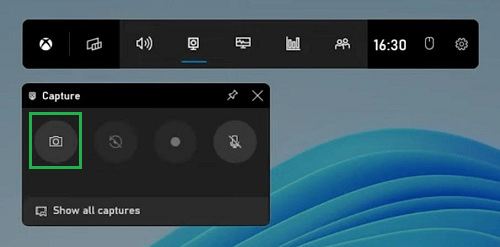
Method 3: Take Screenshots on Windows 11 using Xbox Gamebar
Step 1: On your keyboard press these keys simultaneously to open the Xbox Game Bar. Press Windows + G.
Step 2: The Xbox Game Bar will open on the upper side of the screen. Click on the 4th option, Capture there to get some more options.
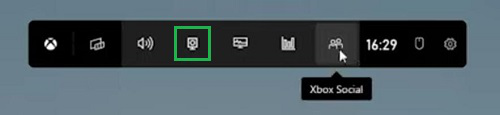
Step 3: Now, under the capture section, you will get a Camera Option, click on that to take a screenshot of the present screen.
So, these are the few methods that one can use to Take Screenshots on Windows 11 OS. But as there are a lot of updates coming to Windows 11, some other latest technologies might arrive in the future for Taking Windows Screenshots. Some old technologies might get replaced with new ones as the Windows Snipping Tool.
Also Read
Frequently Asked Questions to Take Screenshots in Windows 11
How can I take screenshots in Windows 11?
To take screenshots on Windows 11, the following guidelines should be used
- Press the Windows + Shift + S button simultaneously.
- A new tab will arrive on the upper side.
- Click on the Windows Capture to take screenshots.
What is the method to take a screenshot of any particular application in Windows 11?
To take a screenshot of any particular application in Windows 11, use the following steps carefully.
- On the application press Alter (ALT) + Print Scan (PRTSC) keys simultaneously.
- Open Paint or any application to save the copied screenshot.
- Press Control (CTRL) + V to save it.
How can I take instant screenshots while playing any game on a Windows 11 PC?
To take an instant screenshot while playing exciting games on your Windows 11 PC, you have to follow the below guidelines.
- Press the Windows + G button while playing the game.
- The Xbox Game Bar will arrive & click on the Capture option.
- Click on the Camera option to take & save the screenshot on the device.
Share your thoughts in the comments
Please Login to comment...