Java is a general-purpose computer programming language that is concurrent, class-based, object-oriented, etc. Java applications are typically compiled to bytecode that can run on any Java virtual machine (JVM) regardless of computer architecture. The latest version is Java 21. Below are the environment settings for both Linux and Windows. JVM, JRE, and JDK three are all platform-dependent because the configuration of each Operating System is different. But, Java is platform-independent. Few things must be clear before setting up the environment which can better be perceived from the below image provided as follows:
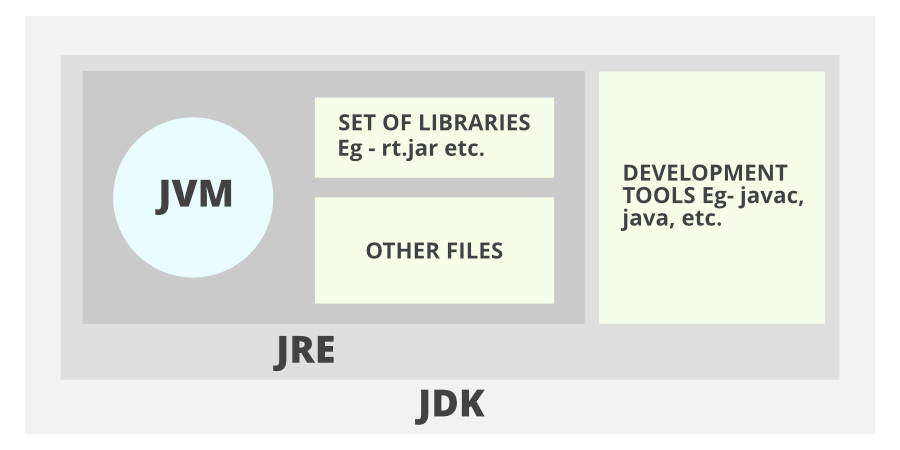
- JDK(Java Development Kit): JDK is intended for software developers and includes development tools such as the Java compiler, Javadoc, Jar, and a debugger.
- JRE(Java Runtime Environment): JRE contains the parts of the Java libraries required to run Java programs and is intended for end-users. JRE can be viewed as a subset of JDK.
- JVM: JVM (Java Virtual Machine) is an abstract machine. It is a specification that provides a runtime environment in which java bytecode can be executed. JVMs are available for many hardware and software platforms.
Now let us discuss the steps for setting up a Java environment with visual aids. Let’s use the Windows operating system to illustrate visual aids.
Steps: Here we will be proposing steps for three different operating systems as listed:
- Windows operating system
- Linux operating system
- macOS operating system
A. Windows operating systems
The steps for setting the environment in the Windows operating system are as follows:
Step 1: Java8 JDK is available at Download Java 8. Click the first link for Windows(32-bit) and the last link for Windows(64-bit) as highlighted below.
Step 2: Now you will see a download prompt just accept the term and conditions and click on the download button
Step 3: If you have an oracle account then sign in or if don’t then create one and sign in
Step 4: Then your download will start automatically after signing in if don’t then click on the previous link again

Step 5: After downloading, run the jdk-8u Application(.exe file) and follow the instructions to install Java on your machine. Once you install Java on your device, you have to set up the environment variable.
Step 6: Go to Control Panel -> System and Security -> System. Under the Advanced System Setting option click on Environment Variables as highlighted below.

Step 7: Now, you have to alter the “Path” variable under System variables so that it also contains the path to the Java environment. Select the “Path” variable and click on the Edit button as highlighted below.

Step 8: You will see a list of different paths, click on the New button, and then add the path where java is installed. By default, java is installed in “C:\Program Files\Java\jdk\bin” folder OR “C:\Program Files(x86)\Java\jdk\bin”. In case, you have installed java at any other location, then add that path.

Step 9: Click on OK, Save the settings, and you are done !! Now to check whether the installation is done correctly, open the command prompt and type javac -version. You will see that java is running on your machine.
Note: To make sure whether the compiler is set up, type javac in the command prompt. You will see a list related to javac.
B. Linux Operating System
In Linux, there are several ways to install java. But we will refer to the simplest and easy way to install java using a terminal. For Linux, we will install OpenJDK. OpenJDK is a free and open-source implementation of the Java programming language. Steps for setting the environment in the Linux operating system are as follows:
Step 1: Go to Application -> Accessories -> Terminal.
Step 2: Type the command as below as follows:
sudo apt-get install openjdk-8-jdk
Step 3: For the “JAVA_HOME” (Environment Variable) type the command as shown below, in “Terminal” using your installation path…(Note: the default path is as shown, but if you have to install OpenJDK at another location then set that path.)
export JAVA_HOME = /usr/lib/jvm/java-8-openjdk
Step 4: For “PATH” (Environment Value) type command as shown below, in “Terminal” using your installation path…Note: the default path is as shown, but if you have to install OpenJDK at another location then set that path.)
export PATH = $PATH:/usr/lib/jvm/java-8-openjdk/bin
Note: We are done setting up the environment in Java for Linux OS.
Note: Now to check whether the installation is done correctly, type java -version in the Terminal. You will see that java is running on your machine.
- Notepad/gedit : They are simple text-editors for writing java programs. Notepad is available on Windows and gedit is available on Linux.
- Eclipse IDE : It is the most widely used IDE(Integrated Development Environment) for developing software in java. You can download Eclipse.
C. MacOS Operating System
Step 1: Open the terminal from the application folder or simply press the “command” and “shift” key together and write initials of the terminal and press enter.
It will be good to have package manager such as homebrew installed in your machine as we can operate to install any software from here itself simply by using terminal commands.
Step 2: Now in order to configure first write the command ‘java –version ‘ where the message below it will pop that there is no
java --version
javac --version
Note: If it was set up then you would have been getting the version displayed on the screen as it is shown below where in that machine it was already set up. So remember to cross-check in your machine once you have successfully set it up in yours.

Step 2: Once we are done with installing JDK now let us move on setting up the java_home environment variable for that you will have to look into something called s ‘bash_profie’ using the below command
ls -al
You will notice that in your terminal there will be no bash_profile set but it is shown below so here in this machine it is already set up. In order to set it up if not there we have to create it which lets us prior seek into java home variables whether it is set up or not.

Step 3: Setting up the home java variable. Use the below command to check or setup if not installed as follows on the terminal:
echo $JAVA_HOME

If it is showing blank then the java home variable is not set up as perceived from the above image.
Step 4: Installing bash_profile
Make sure to go to the root folder in the terminal and write the command ‘touch ./bash_profile ‘

Now you will see that bash-profile s created which is as shown in the step2 in your machine which hone can verify by writing command as follows:
ls -al
Step 5: Edit the .bash_profile created for java, you just have to write the command marked in below media and provided below as follows:
export JAVA_HOME=$(/usr/libexec/java_home)
// No need to remember this command

Save this file and relaunch the terminal by closing it.
Step 5: Verifying whether it is installed by entering the following two commands
source .bash_profile
echo $JAVA_HOME

From the above media, we can see the java variable is all set to go as earlier there was a blank therein the above media.
Like Article
Suggest improvement
Share your thoughts in the comments
Please Login to comment...