loading.js in Next JS
Last Updated :
13 Feb, 2024
Next JS is a React framework that provides a number of features to help you build fast and scalable web applications. One of these features is loading.js which allows you to create a loading UI for your application.
Prerequisites:
Loading UI is important because it helps to improve the user experience as without a loading UI users will think that the application is frozen or unresponsive.
Syntax:
To create loading states, you can create a file named “loading.js” inside the route that you want to handle and can render a react component from it which will act as the loader.
// inside loading.js
export default function Loader() {
  return <>  Your code </>
}
Steps to create the project:
Step 1: To create your app, run the following npx command in your terminal to start the creation process:
npx create-next-app@latest
Step 2: Provide the necessary details to create your app as shown in the image below.
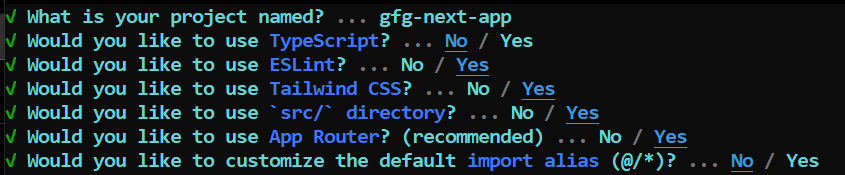
create-next-app
Step 3: Your project would be created by now. Go inside your project directory and start the development server through the following command:
npm run dev
Folder Structure:

folder structure
The updated dependencies in package.json file will look like:
"dependencies": {
    "react": "^18",
    "react-dom": "^18",
    "next": "14.1.0"
  },
"devDependencies": {
    "autoprefixer": "^10.0.1",
    "postcss": "^8",
    "tailwindcss": "^3.3.0",
    "eslint": "^8",
    "eslint-config-next": "14.1.0"
}
Example 1: In this example, let’s create the “loading.js” file inside our app directory and return simple loading text from it inside a component. Then inside our home page (“src/app/page.js”), let’s make it an async function and simulate that it’s consuming time through a Promise which resolve after certain seconds. For that amount of time, we will be displayed the loading text returned by the loading component.
Javascript
export default function Loader() {
return <p className="p-5 text-sm">Loading the page...</p>;
}
|
Javascript
export default async function Home() {
await new Promise((resolve) => {
setTimeout(resolve, 5000);
});
return (
<div className="p-5">
<h1 className="text-green-500 text-3xl font-bold">GeeksforGeeks</h1>
<h4 className="font-bold">loading.js Next.js</h4>
<p>This is the homepage of our app.</p>
</div>
);
}
|
Output:

Output of example 1: loading.js Next.js
Example 2: In this example, let’s create a dynamic page inside “src/app/[user]/page.js“. Now, let’s make a request to the github api inside this page through the fetch api and then show that to the user.
Javascript
export default function Loader() {
return (
<div className="p-5">
<h1 className="text-green-500 text-3xl font-bold">GeeksforGeeks</h1>
<h4 className="font-bold">loading.js Next.js</h4>
<p className="animate-pulse">Loading the user...</p>
</div>
);
}
|
Javascript
export default async function UserPage({ params }) {
const { user } = params;
const response = await fetch(`https:
const responseBody = await response.json();
return (
<div className="p-5">
<h1 className="text-green-500 text-3xl font-bold">GeeksforGeeks</h1>
<h4 className="font-bold">loading.js Next.js</h4>
<div className="mt-4">
<p>
Github user: <span className="font-bold">{user}</span>
</p>
<p>
No. of public repos: <span className="font-bold">{responseBody.public_repos}
</span>
</p>
<p>
Followers: <span className="font-bold">{responseBody.followers}</span>
</p>
<p>
Following: <span className="font-bold">{responseBody.following}</span>
</p>
<img src={responseBody.avatar_url} alt="User image" />
</div>
</div>
);
}
|
Output:
Output of example 2: loading.js Next.js
Share your thoughts in the comments
Please Login to comment...