Next JS Image Optimization: Best Practices for Faster Loading
Last Updated :
22 Feb, 2024
Large and unoptimized images can impact a website’s performance on loading time. Optimizing images is necessary to improve the performance of the website. Next.js provides built-in support for image optimization to automate the process, providing a balance between image quality and loading speed.
Prerequisites:
Next JS provides a built-in next/image component for optimizing images. It provides features such as automatic resizing, lazy loading, support for various image formats, and many more. It converts jpg, and png file format into a WebP format. WebP is a modern image format that provides lossless and lossy compression for web images. It allows websites to display high-quality images with much smaller file sizes than traditional formats like PNG and JPEG.
To use this component, import it from the next/image.
import Image from 'next/image';
Props supported by Image Components:
- src: It will take a path string. It can be either an absolute external URL or an internal path. If you’re using an external URL, you must add it to remotePatterns in next.config.js.
- width: It will take a width in pixels. It will help in rendering a placeholder of the correct size and prevent layout shifts when the actual image loads.
- height: It will take a height in pixels. It will help in rendering a placeholder of the correct size and prevent layout shifts when the actual image loads.
- alt: It will take a text. It will used by search engines and displayed if image not found.
- layout: It is used to provide layout to the image. Ex: intrinsic, responsive, and fixed.
- priority: It will ensures that images are prioritized during page loading. value can be true or false.
- placeholder: It is used to enhance the perceived loading speed and provide a better user experience.
- quality: It is used to define quality of image and it takes value between 1 to 100. default value is 75.
Creating Next.js Application
Step 1: Create a Next.js application using the following command.
npx create-next-app@latest gfg
Step 2: After creating your project folder i.e. gfg, move to it using the following command.
cd gfg
Project Structure:
The updated dependencies in package.json file will look like:
"dependencies": {
    "react": "^18",
    "react-dom": "^18",
    "next": "14.1.0"
},
  "devDependencies": {
    "autoprefixer": "^10.0.1",
    "postcss": "^8",
    "tailwindcss": "^3.3.0",
    "eslint": "^8",
    "eslint-config-next": "14.1.0"
}
Example: The below example demonstrates the use of Image Optimization.
Note: Remove the included css file from layout.js file.
Javascript
import Image from "next/image";
export default function Home() {
return (
<>
<h4>Image component:</h4>
<Image
src=
width={400}
height={100}
alt="GeeksForGeeks Logo"
placeholder="empty"
priority={true}
/>
<br />
<h4>img tag:</h4>
<img
src=
alt="GeeksForGeeks Logo" />
</>
);
}
|
Javascript
const nextConfig = {
images: {
remotePatterns: [
{
protocol: 'https',
hostname: 'media.geeksforgeeks.org',
port: '',
pathname:
'/wp-content/cdn-uploads/20210420155809/gfg-new-logo.png',
},
],
},
};
export default nextConfig;
|
To run the Application open the terminal in the project folder and enter the following command:
npm run dev
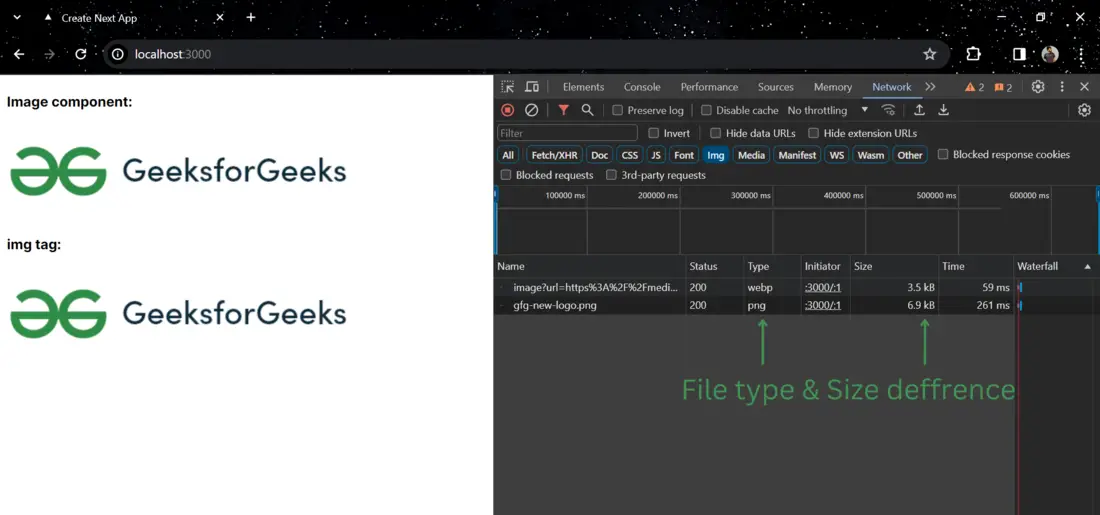
Output:
Here, you can see the actual image size and file type is 6.9kb(png) and the optimized image side and file type is 3.5kb(webp)
Share your thoughts in the comments
Please Login to comment...