How to deploy React app to Heroku?
Last Updated :
07 Mar, 2024
React is a very popular and widely used library for building User Interfaces. So if you are thinking about deploying your React app to the cloud platform, there are various choices for doing that such as AWS EC2 or Heroku. But for testing your React app, Heroku will be the best option as it is free and very easy to get started with.
Prerequisites:
- Installed Node.js and npm.
- Knowledge about GitHub.
- Basic knowledge about Heroku.
- Already created a React app.
Note: Make sure all the commands shown below must run only inside your project folder.
Step 1: Install Heroku CLI in your system by running the following command. It will install the updated version of Heroku CLI into your system.
curl https://cli-assets.heroku.com/install-ubuntu.sh | sh
To check the version you may run the command.
heroku -v
Step 2: Now, get to https://www.heroku.com/ and register. After completing your registration go to the dashboard and create a new app named “myherokuapp” or name of your choice.
Step 3: Run the following command, it will prompt you to enter any key to continue, it will open a new tab in your browser asking you to log in to your Heroku account. After you enter the required credentials and login on to the site, it is going to show in your terminal “Logged in”
heroku login
Step 4: Initialize a Git repository by running the following command. Make sure you be at the top level of your project directory.
git init
Step 5: Now, add the Heroku remote by simply running the command which you will find in your Heroku Dashboard -> myherokuapp or Your App Name -> Deploy Section
Or
Simply run the following command. The deployment method should’ve chosen as GitHub.
heroku git:remote -a myherokuapp
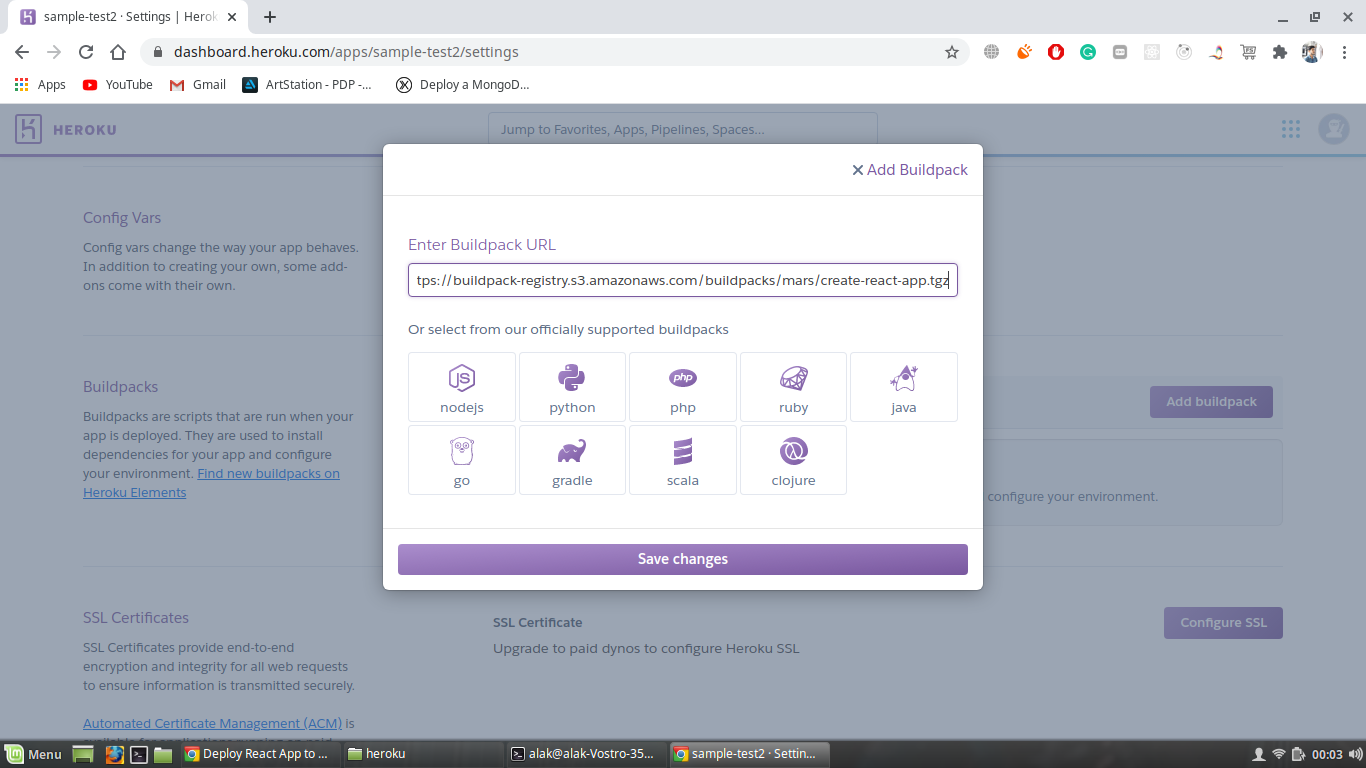
Step 6: Now the most important part and i.e Heroku provides the buildpack for Python, Node.js-based app, but it doesn’t provide buildpack for React apps. So we have to add an extra buildpack in the settings section of your Heroku app.
https://buildpack-registry.s3.amazonaws.com/buildpacks/mars/create-react-app.tgz
Step 7: Now run the following commands to push your project to the repository.
git add.
git commit -m "First Commit"
git push heroku master
Step 8: Successfully pushed your React app to the Heroku repository. Now finally to see your deployed app, run the following command.
Note: It will open your deployed app to your browser. If there is any problem like if your React app is not showing up then you can run the following command to check logs what has gone wrong. Consider one thing that before deployment tries to remove all warnings from your app as heroku considers all warnings as errors.
heroku logs --tail
Share your thoughts in the comments
Please Login to comment...