How To Configure Cloud Spanner In GCP ?
Last Updated :
21 Mar, 2024
In today’s era when data is everywhere, the demand for databases which can seamlessly accumulate massive amount of data is increasing. Databases also have to provide consistency, reliability and high availability. Google Cloud Platform is one of famous cloud providers in the market providing cloud solutions including storage and databases. Cloud Spanner is a fully managed, scalable, distributed database service, offered by Google Cloud Platform. Cloud Spanner combines the benefits of a traditional relational database system with the scale and flexibility of a NoSQL database. In this article we will be learning about, how we can create and configure Cloud Spanner in Google Cloud Platform.
What Is Cloud Spanner?
Cloud Spanner is a fully managed, distributed database service provided by Google Cloud Platform. Cloud spanner provides reliability, high availability and high scalability. Cloud spanner combines the traditional relational databases i.e. Strong consistency, high availability, SQL Queries with the agility and scalability of NoSQL databases. Cloud Spanner also provides fully automatic data replication and server redundancy within all available instances. Google also uses Cloud Spanner for it’s products like Gmail to internally manage workloads. The features provided by Cloud Spanner includes,
- Write and Read scalability with no limits
- Horizontal scalability
- SQL compatibility
- Automatic Management
- Vector Search
Create And Configure Cloud Spanner: A Step-By-Step Guide
Step 1: Login To Google Cloud Console
- First thing we need to do for creating Cloud Spanner is to login to the Google Cloud Platform’s Cloud Console.
- On your web browser, navigate to google cloud console and login with valid credentials and a valid subscription plan to Google Cloud services.
Step 2: Enable Spanner API
Once we are logged into the Cloud Console, we have to enable the Spanner API. Spanner API is an application programming interface (API) provided by Google Cloud Platform that allows developers to interact with Cloud Spanner and create, manage, and query databases withing Cloud Spanner.
- To enable the API, click on the the API & Services button in the left sidebar on the Cloud Console and then select Library.
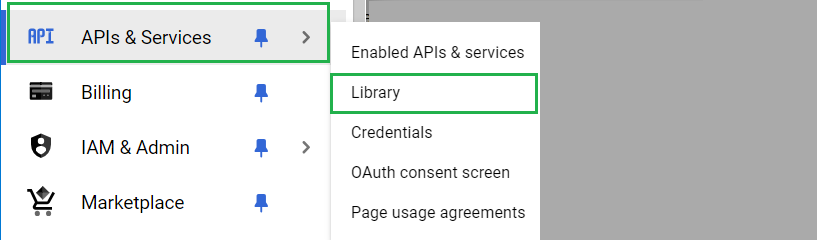
- This will open the API Library where search for Spanner API. Once you got the API in search results, click on it and then click on Enable.
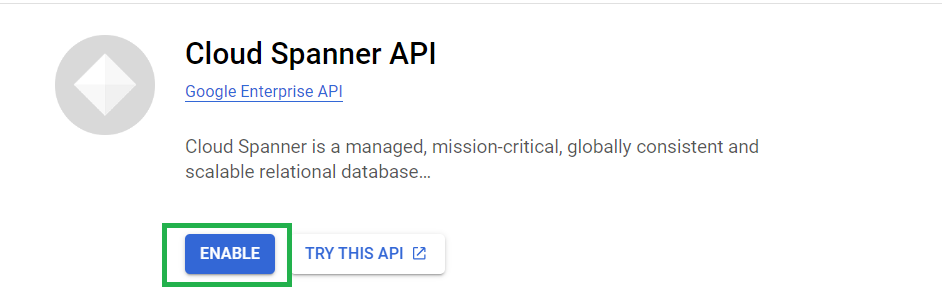
Step 3: Search For Cloud Spanner
- Now, Search for Cloud Spanner in the search-bar given in the Cloud Console and click on the result.

- Then click on Create a provisioned instance.
Step 4: Configure Cloud Spanner Instance
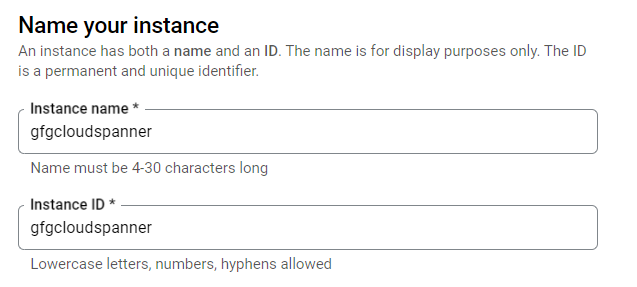
a) Configure Instance details:
- Give a appropriate name to the Spanner instance. Instance name should be 4 to 30 character long. You can choose the same name for instance Id as well. instance Id allows only Lowercase letters, numbers, hyphens. The instance Id is the unique identifier for the instance and name is for display purpose only.
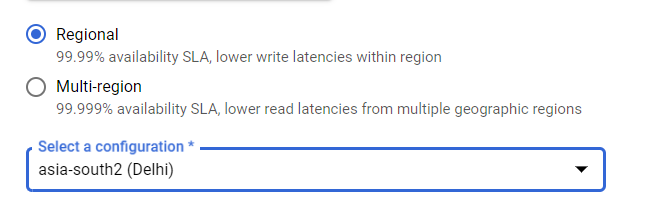
b) Configure Region:
- Now Select the Region configuration for the instance. We have two options given here, one is Regional and another one is Multi-Regional.
- If the users and services are located in one region then it’s better to select regional to save some cost. For database to be triggered by multiple locations then it’s better to use Multi-regional.
- For this example, we are selecting Regional. Now for both the cases we have to choose a region. It is recommended to choose the location which is near to you. Here we will choose asia-south2 (Delhi).
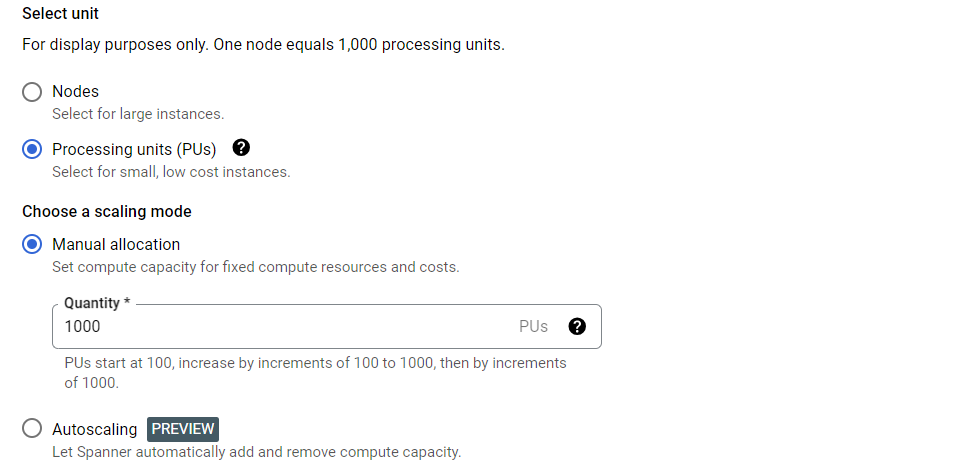
c) Configure Compute Capacity:
- Compute capacity determines the data throughput, Queries per second and storage limits for the Cloud Spanner instance. If you are building a large project, you can choose Node as unit. But here as we are using this for learning purpose we will be choosing Processing Units. Leave other settings as pre-set.
Step 5: Review And Create
- Once you are done with the above configurations, review all the changes you have made and look for the summary available on the right side of your computer screen.
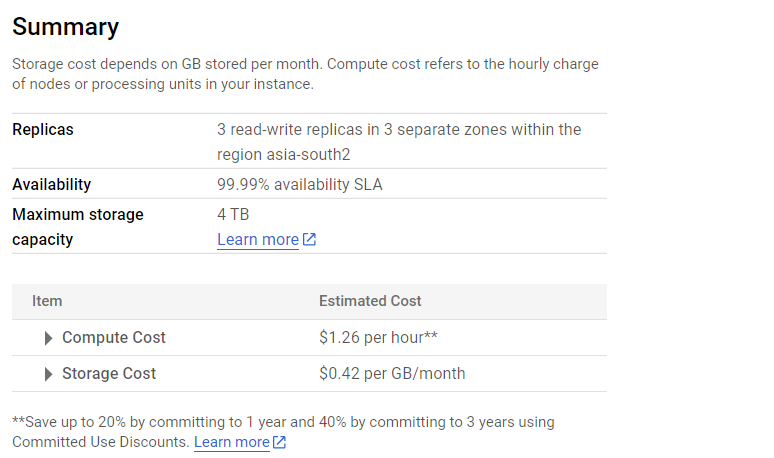
- The summary gives you an insight on the configurations are made. This also provides the estimated cost for computation and Storage for using this cloud service with the selected configurations.
- Once you have verified everything, click on Create. Wait for few seconds and Cloud Spanner instance will be ready for use.

Using Cloud Spanner Database: A Step-By-Step Guide
Spanner Database relies on the concepts of Primary Keys, Table interleaving, and Foreign Keys to maximize database efficiency and performance. In this example we will create a new database and a table then performing some basic database operations.
Step 1: Create Database
- Click on the instance name, we have just created and it will open the details of the instance. Scroll down and look for Database and click on Create Database.

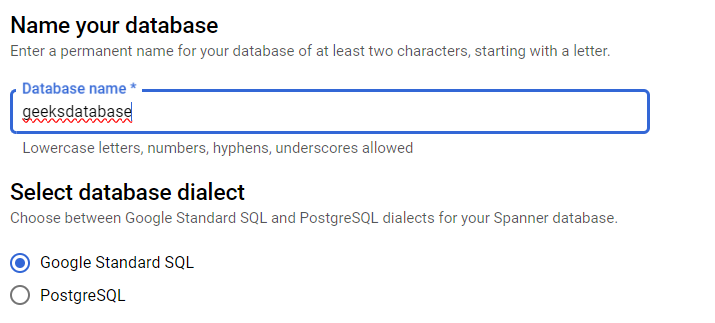
- Now give a name to your database and select the database dialect. Here we are going to choose the Google Standard SQL. If you want you can choose PostgreSQL as database dialect.
- Now, click on create and the Spanner database will be created.

Step 2: Create Table
- Click on the database name to open it’s details and then select Create Table which will open the Spanner Studio on your screen. Now to create a table use the following format,
CREATE TABLE
  <table_name> ( <col_name> <col_type>,
    )
PRIMARY KEY
  (<col_name>);
- Let’s create a Singers table with some attributes, using the following query.
CREATE TABLE Singers (
  SingerId   INT64 NOT NULL,
  FirstName  STRING(1024),
  LastName   STRING(1024),
  SingerInfo BYTES(MAX),
  BirthDate  DATE
) PRIMARY KEY(SingerId);
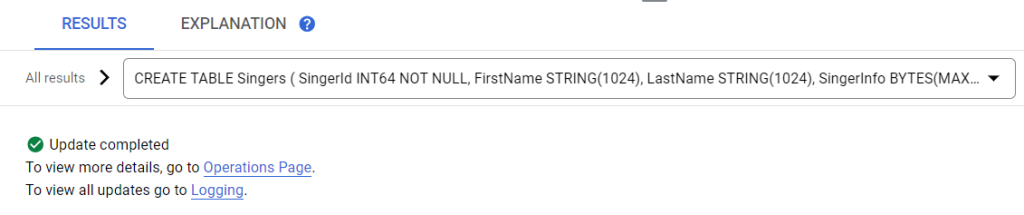
- The following screenshot illustrates on running the SQL Queris In Edior.
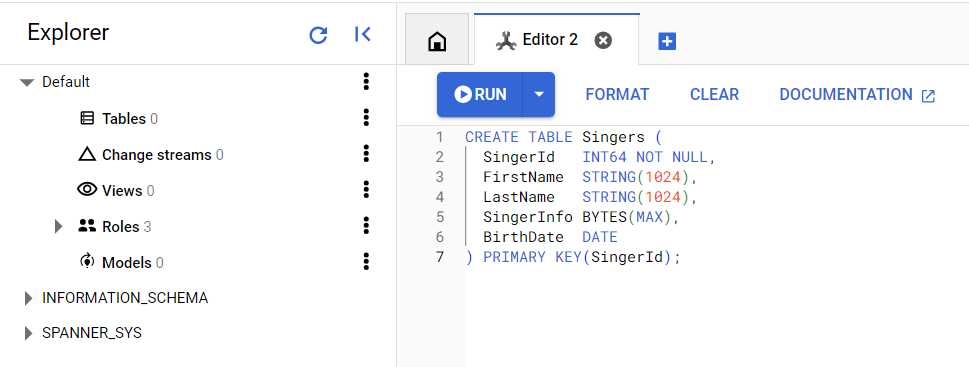
- Click on RUN to execute the query to create Singers table.
Output:
Step 3: Perform Database Operations
- Let’s move forward and perform some database operations on the Spanner Database.
a) Insert Data: We will be using Spanner Studio to perform all database operations. To insert data use the following structure for query.
INSERT INTO
  Singers (SingerId,
    BirthDate,
    FirstName,
    LastName,
    SingerInfo)
VALUES
  (<SingerId>, -- type: INT64
    <BirthDate>, -- type: DATE
    <FirstName>, -- type: STRING(1024)
    <LastName>, -- type: STRING(1024)
    <SingerInfo> -- type: BYTES(MAX)
    );
- Let’s insert few records into the table using the above format.
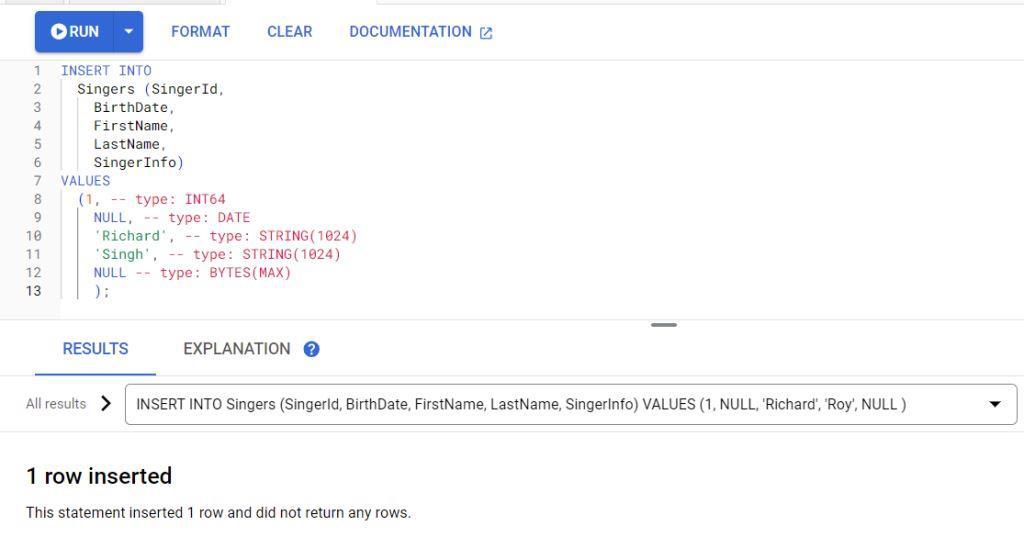
- Click on Run to execute Query.
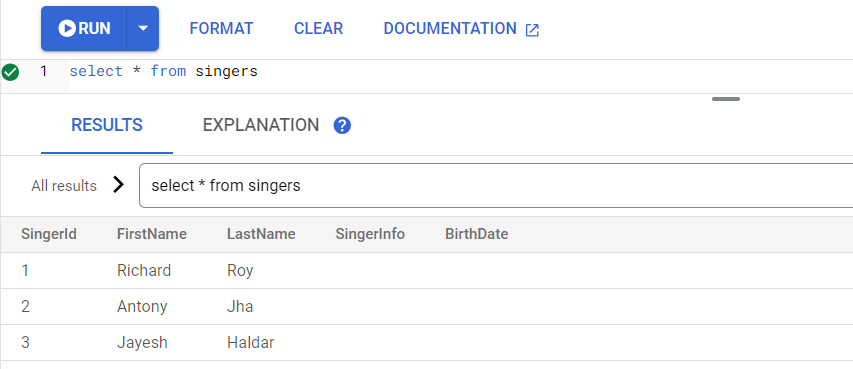
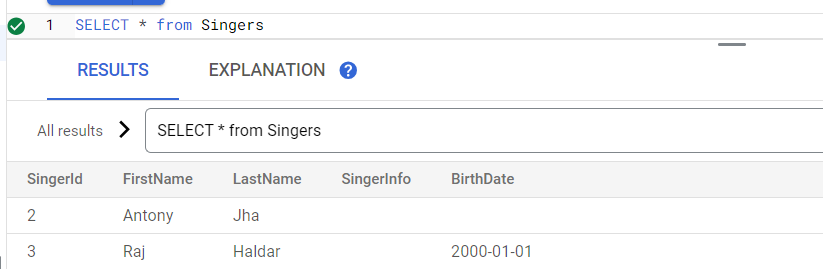
b) Read Operation: We have inserted two more records in the table. Let’s check all the rows in the database. Following is the format to check all the records available in the table.
select * from <table_name>
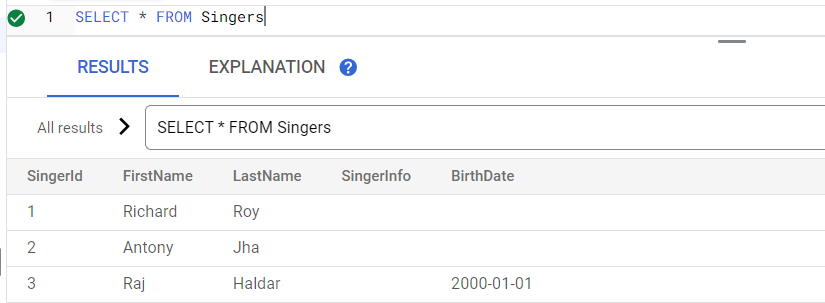
c) Update Operation: Let’s query again to add birthdate to “Jayesh Haldar” using query. We can also change other values in the same update statement. Let’s change the Singer Name and birthday.
UPDATE
  Singers
SET
  BirthDate='2000-01-01',
  FirstName='Raj'
WHERE
  SingerId=3;
Output:

- Let’s again check the rows to see if the changes are made.
d) Delete operation: Let’s try deleting the first singer from the table.
DELETE from Singers WHERE SingerId = 1
Output:
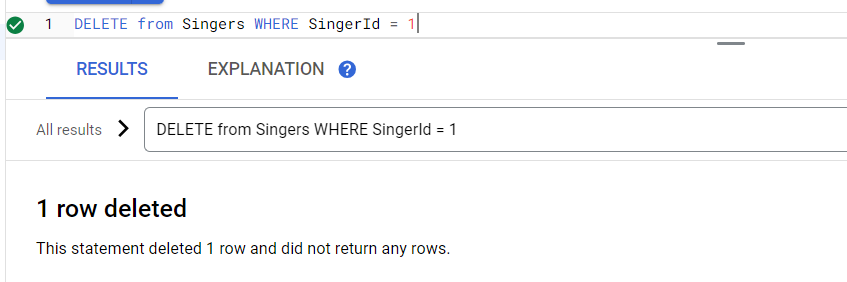
- Singer Table after deleting the first row.
Conclusion
The Google Cloud Spanner offering features of RDBMS with flexibility of NoSQL system stands out from the other database solutions in the market. The spanner API further enhances features of Cloud Spanner by providing seamless programable access to Cloud spanner’s functionalities. This enables developers to integrate the database service in their applications. With Cloud Spanner, developers can build and deploy critical applications with effortless scaling, high availability and high performance.
Configure Cloud spanner in GCP – FAQ’s
How Does Cloud Spanner Ensures High Availability?
Cloud Spanner provides high availability through automatic replication of data across the available regions. This helps providing data is case of any regional outage happens.
What Is The Difference Between Cloud Sql And Cloud Spanner?
Cloud SQL and Cloud Spanner, both are database services provided by Google Cloud Platform. Cloud SQL is a fully managed relational database service that supports popular database engines like MySQL, PostgreSQL, and SQL Server while Cloud Spanner is a globally distributed, horizontally scalable relational database service.
Is Cloud Spanner Serverless ?
No, Cloud Spanner is not serverless. Cloud spanner uses managed instance as used by Cloud SQL . Cloud Spanner runs on a virtual server and it’s not available to the users.
What Is Cost Of Using Cloud Spanner?
Cloud spanner pricing is based on the resource consumption, which includes storage, nodes, etc. As it is a cloud service, it also uses the pay-as-you-go model. For the configurations we have made in our Cloud Spanner, you can check the pricing in the summary screenshot attached for a reference.
Share your thoughts in the comments
Please Login to comment...