Amazon Web Services (AWS) is a comprehensive cloud computing platform offering many services, including storage, computing, databases, and more. Amazon Route 53 is a highly available and scalable cloud domain name system (DNS) web service. It is designed for developers and corporations to route end users to Internet applications by translating human-readable names like www.geeksforgeeks.org into the numeric IP addresses like 54.240.162.89 that computers use to connect. You cannot use Amazon Route 53 to connect your on-premises network with AWS Cloud.

AWS Route53
In this article, you will learn how to utilize AWS CLI to manage Route53 Domain Name System (DNS).
AWS CLI
Amazon’s command-line interface (CLI) is a powerful tool that allows users to interact with various AWS services through a command-line interface. AWS CLI offers a robust and flexible way to manage your AWS resources directly from your terminal, automating tasks and streamlining workflows.
Installation & Setup
Assuming you already have an AWS account, follow the steps below to install AWS CLI on your system (these steps are based on Ubuntu OS). Or you can run the below commands in your terminal to install AWS CLI in your system
sudo apt-get install awscli -y
-1024.png)
Install AWS CLI
Configure AWS Credentials
- Login to AWS Console
- Click on your username at top right corner and click on Security Credentials
- Under Access keys click on Create access key –> Choose Command Line Interface (CLI) –> add some description for it -> Create
- Either copy Access key ID and Secret access key displayed on the screen or download csv file.
aws configure --profile <profile-name>
For example:
aws configure --profile dillip-tech
-1024.png)
Configure AWS for custom profile
Fill the prompts for access key and secret you’ve copied in above steps, and now you’re all set to tryout AWS Route53 through CLI.
Manage Route53 DNS with CLI
The AWS CLI provides a comprehensive set of commands for managing hosted zones and DNS records in Route 53. Here’s a glimpse into some essential commands, along with explanations:
DNS stands for Domain Name System whose responsibility is to translate human-readable names like www.geeksforgeeks.org into the numeric IP addresses like 54.240.162.89 that computers (browsers) understand and use to interact with the website.
When you type some website in the browser, the process involves DNS translating the domain name into IPAddress and then the browser making request to the IP Address, and upon receving the response from the server.
Create Hosted Zone
A hosted zone is a directory for records, and records contain information about how you want to route traffic for a specific domain, such as example.com, and its subdomains (abc.example.com, xyz.example.com). While creating the hostedzone you should keep the name same as your domain name.
There are two types of hosted zones:
Public hosted zones: This is hostedzone used often, it can contain records that specify how you want to route traffic on the internet.
Private hosted zones: In this hosted zone you can create records that route traffic to resources within the Amazon VPC.
Let’s create a hostzone, by running the below command in the cli (replace the name accordingly)
aws route53 create-hosted-zone --name mywebsite.in --caller-reference someUniqueTextHere
–name: Here you’re creating the hostedzone with name mywebsite.in which is basically your TLD (domain name)
–caller-reference: This is a random string which is used to track the request and we can use this string to retry if the task fails, you can simply pass a timestamp here for keeping it unique across requests.
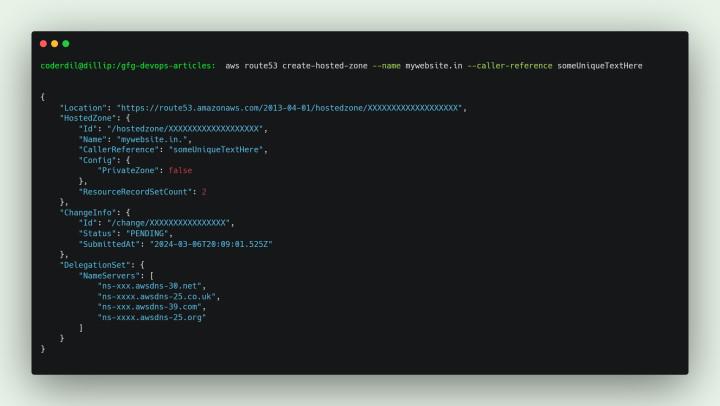
Create a Hostzone
List Host Zones
To list the all the hosted zones in the Account, run the below command, this will list the both public & private hosted Zones.
aws route53 list-hosted-zones
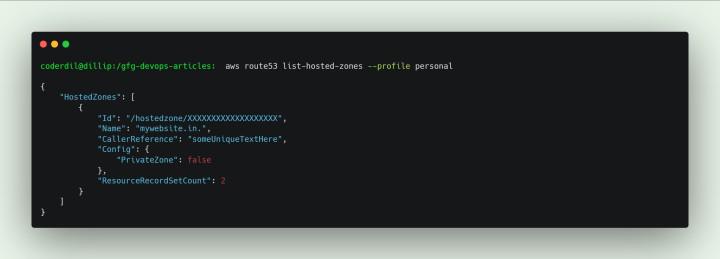
List Hosted Zones
Get Host Zone Details
Host zone consists of various records, of which Nameservers are the primary records, which you use to configure at registrar to say you’re using route53 (or some other) as DNS provider (which stores all your domain records).
To get the hostzone details along with the name servers, run the command below:
aws route53 get-hosted-zone --id <HostZoneID>
–id: It is the hostedZone id of your domain, you can get it by running list-hosted-zones command.

Get Hosted Zone
Create a Record
And the much awaited command, i.e creating the DNS record in our domain for some subdomain (or domain itself), for example you can create a record in your mywebsite.in i.e you can configure test.mywebsite.in to point to 1.2.3.4 ip address. (this is how this www.geeksforgeeks.org also works)
To create the record in your hostedzone run the below command:
aws route53 change-resource-record-sets --hosted-zone-id <HOSTZONE-ID> --change-batch file://my-record-details.json
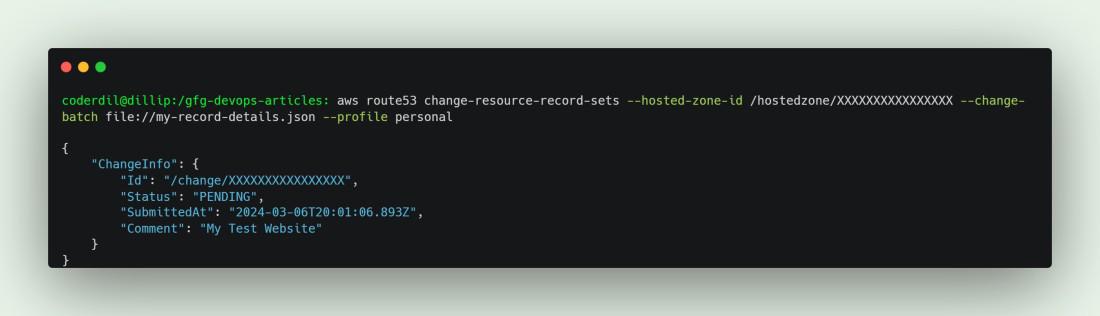
Add New Record
–host-zone-id: Host Zone id in which you wanna create a new record.
–change-batch: Pass the details of the record through file, refer below sample content
{
  "Comment": "My Test Website",
  "Changes": [
    {
      "Action": "CREATE",
      "ResourceRecordSet": {
        "Name": "test.mywebsite.in",
        "Type": "A",
        "TTL": 300,
        "ResourceRecords": [
          {
            "Value": "54.240.162.89"
          }
        ]
      }
    }
  ]
}
Action: CREATE | UPSERT | DELETE (choose one based on your purpose)
Name: Your record sub domain (or domain name)
Type: Type of the record, there are several types of DNS records, refer below record types
|
Record Type
|
Description
|
|
A
|
Maps a domain name (e.g., https://www.geeksforgeeks.org/) to an IPv4 address (e.g., 192.0.2.1), allowing users to access your website or service.
|
|
AAAA
|
Similar to A records, but translates domain names to IPv6 addresses, the next-generation internet protocol.
|
|
CNAME
|
Acts like an alias, pointing a domain name (e.g., https://www.geeksforgeeks.org/introduction-to-electronic-mail/) to another domain name (e.g., https://www.geeksforgeeks.org/email-concept/). Essentially, it avoids the need to manage the IP address directly on the CNAME record.
|
|
MX
|
Directs incoming emails for a domain name (e.g., https://www.geeksforgeeks.org/) to specific mail servers responsible for handling them.
|
|
TXT
|
Stores additional text information associated with a domain name. This can be used for various purposes, such as verifying ownership for domain validation.
|
|
NS
|
Points to the authoritative name servers responsible for a specific domain, indicating which servers hold the DNS records for that domain.
|
Value: It is the value your records should point to.
Update Record:
Upadting the record is similar to create but mention the Action as UPSERT, look into the example below:
aws route53 change-resource-record-sets --hosted-zone-id <HOSTZONE-ID> --change-batch file://my-record-details.json

Update Record
{
  "Comment": "My Test Website",
  "Changes": [
    {
      "Action": "UPSERT",
      "ResourceRecordSet": {
        "Name": "test.mywebsite.in",
        "Type": "A",
        "TTL": 300,
        "ResourceRecords": [
          {
            "Value": "54.240.162.89"
          }
        ]
      }
    }
  ]
}
Delete Record:
Deleting the record is similar to create but mention the Action as DELETE, look into the example below:
aws route53 change-resource-record-sets --hosted-zone-id <HOSTZONE-ID> --change-batch file://my-record-details.json

Delete Record
{
  "Comment": "My Test Website",
  "Changes": [
    {
      "Action": "DELETE",
      "ResourceRecordSet": {
        "Name": "test.mywebsite.in",
        "Type": "A",
        "TTL": 300,
        "ResourceRecords": [
          {
            "Value": "54.240.162.89"
          }
        ]
      }
    }
  ]
}
Conclusion
In this article you’ve learnt basic concepts in Route53 and tried out route53 essential operations using the AWS CLI.Now you can confidently manage your domain’s DNS settings with CLI with ease.
Route 53 Realities: AWS CLI for DNS – FAQ’s
What are various record Types supported by Route53?
- A
- AAAA
- CAA
- CNAME
- DS
- MX
- NAPTR
- NS
- PTR
- SOA
- SPF
- SRV
- TXT
Does route53 provide me a domain?
Yes, Route53 also provides domains, you can buy one by visiting https://us-east-1.console.aws.amazon.com/route53/domains/home
Can i use Route53 if my Domain was registered in some other registrar?
Yes, you can use here you need to do onething, after creating the hostedzone with your domain name, copy the name servers from hosted zone records (With type NS), and update those nameservers in the registrar.
Share your thoughts in the comments
Please Login to comment...