DatePicker in Kotlin
Last Updated :
21 Jan, 2022
Android DatePicker is a user interface control which is used to select the date by day, month and year in our android application. DatePicker is used to ensure that the users will select a valid date.
In android DatePicker having two modes, first one to show the complete calendar and second one shows the dates in spinner view.
We can create a DatePicker control in two ways either manually in XML file or create it in Activity file programmatically.
First we create a new project by following the below steps:
- Click on File, then New => New Project.
- After that include the Kotlin support and click on next.
- Select the minimum SDK as per convenience and click next button.
- Then select the Empty activity => next => finish.
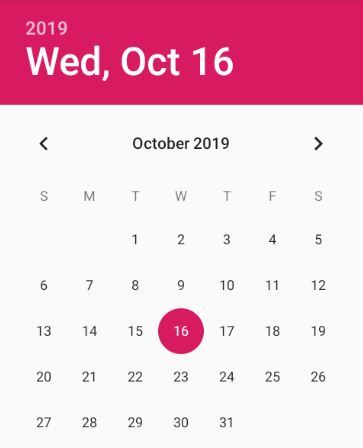
Android DatePicker with Calendar mode
We can use android:datePickerMode to show only calendar view. In the below example, we are using the DatePicker in Calendar mode.
XML
<DatePicker
android:id="@+id/datePicker"
android:layout_width="wrap_content"
android:layout_height="wrap_content"
android:datePickerMode="calendar"/>
|
The above code of DatePicker can be seen in android application like this
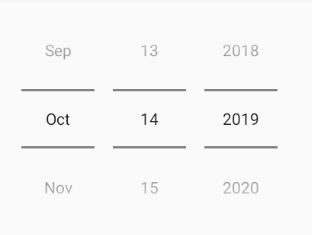
Android DatePicker with Spinner mode
We can also show the DatePicker in spinner format like selecting the day, month and year separately, by using android:datePickerMode attribute and set android:calendarViewShown=”false”, otherwise both spinner and calendar can be seen simultaneously.
XML
<DatePicker
android:id="@+id/datePicker1"
android:layout_width="wrap_content"
android:layout_height="wrap_content"
android:datePickerMode="spinner"
android:calendarViewShown="false"/>
|
The above code of DatePicker can be seen in android application like this
Different attributes of DatePicker control –
| XML Attributes |
Description |
| android:id |
Used to uniquely identify the control. |
| android:datePickerMode |
Used to specify the mode of datepicker(spinner or calendar) |
| android:calendarTextColor |
Used to specify the color of the text. |
| android:calendarViewShown |
Used to specify whether view of the calendar is shown or not. |
| android:background |
Used to set background color of the Text View. |
| android:padding |
Used to set the padding from left, right, top and bottom. |
To use Calendar DatePicker in activity_main.xml
In this file, we will add the DatePicker and Button widget and set their attributes so that it can be accessed in the kotlin file.
XML
android:orientation="vertical"
android:layout_width="match_parent"
android:layout_height="match_parent"
android:id="@+id/linear_layout"
android:gravity = "center">
<DatePicker
android:id="@+id/date_Picker"
android:layout_width="match_parent"
android:layout_height="match_parent"/>
</LinearLayout>
|
To use Spinner DatePicker in activity_main.xml
In this file, we will add the DatePicker and Button widget and set their attributes so that it can be accessed in the kotlin file.
XML
android:orientation="vertical"
android:layout_width="match_parent"
android:layout_height="match_parent"
android:id="@+id/linear_layout"
android:gravity = "center">
<DatePicker
android:id="@+id/date_Picker"
android:layout_width="match_parent"
android:layout_height="match_parent"
android:datePickerMode = "spinner"
android:calendarViewShown="false"/>
</LinearLayout>
|
Modify the strings.xml file to add the string-array
Here, we will specify the name of the activity.
XML
<resources>
<string name="app_name">DatePickerInKotlin</string>
</resources>
|
Access the DatePicker in MainActivity.kt file
First of all, we declare a variable datePicker to access the DatePicker widget from the XML layout.
val datePicker = findViewById<DatePicker>(R.id.date_Picker)
then, we declare another variable today to get the current get like this.
val today = Calendar.getInstance()
    datePicker.init(today.get(Calendar.YEAR), today.get(Calendar.MONTH),
    today.get(Calendar.DAY_OF_MONTH)
To display the selected date from the calendar we will use
 { view, year, month, day ->
            val month = month + 1
            val msg = "You Selected: $day/$month/$year"
            Toast.makeText(this@MainActivity, msg, Toast.LENGTH_SHORT).show()
 }
We are familiar with further activities in previous articles like accessing button and set OnClickListener etc.
Kotlin
package com.geeksforgeeks.myfirstkotlinapp
import androidx.appcompat.app.AppCompatActivity
import android.os.Bundle
import android.widget.*
import java.util.*
class MainActivity : AppCompatActivity() {
override fun onCreate(savedInstanceState: Bundle?) {
super.onCreate(savedInstanceState)
setContentView(R.layout.activity_main)
val datePicker = findViewById<DatePicker>(R.id.date_Picker)
val today = Calendar.getInstance()
datePicker.init(today.get(Calendar.YEAR), today.get(Calendar.MONTH),
today.get(Calendar.DAY_OF_MONTH)
) { view, year, month, day ->
val month = month + 1
val msg = "You Selected: $day/$month/$year"
Toast.makeText(this@MainActivity, msg, Toast.LENGTH_SHORT).show()
}
}
}
|
AndroidManifest.xml file
XML
<?xml version="1.0" encoding="utf-8"?>
package="com.geeksforgeeks.myfirstkotlinapp">
<application
android:allowBackup="true"
android:icon="@mipmap/ic_launcher"
android:label="@string/app_name"
android:roundIcon="@mipmap/ic_launcher_round"
android:supportsRtl="true"
android:theme="@style/AppTheme">
<activity android:name=".MainActivity">
<intent-filter>
<action android:name="android.intent.action.MAIN" />
<category android:name="android.intent.category.LAUNCHER" />
</intent-filter>
</activity>
</application>
</manifest>
|
Run as Emulator:
Share your thoughts in the comments
Please Login to comment...