Best Methods to Organize Photos on Mac
Last Updated :
29 Nov, 2023
If you have a Mac Desktop, it might be a MacBook or iMac, then the stress might be reduced to some folds. Fortunately, the Mac operating comes with some Best Photo Organizing methods that reduce the stress of the users to arrange photos. All of your Clicked Mac Photos can get easily settled in albums using the Mac Photos Application.
In this article, we will discuss a handful of methods that should be executed to well organize your photos in the Mac device.
Methods to Organize Photos on Mac
For organizing photos on Mac, the series of methods discussed below should be used. We will start with simply creating the Album on Photos.
Method 1: Organize Photos by Creating a Normal Album
Step 1: Open the Photos Application & you will find the option My Albums. Click on the Plus Sign beside it.

Step 2: A few options will be presented. Click on the Album to create a blank new album.
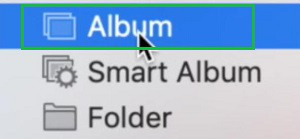
Hence, we have successfully organized photos on Mac by creating a New Album.
Method 2: Organize Photos by Importing Photos to Mac
Now, if you want to import photos that you have taken from your Mac or any external device like Camera, then insert the device into the Mac. If you have taken photos from a Mac, insert the SD Card of the device to the Mac. You will get the option to Import All New Photos. Select that to get newly clicked photos in the album automatically.

Hence, we have successfully organized photos on Mac by importing Photos to Mac.
Method 3: Organize Photos by Creating a Smart Album
Step 1: Again, click on the My Albums Plus Sign & you will get a few options. Click on the Smart Album option.

Step 2: Now, provide a Name to the Smart Album & select some Filters by which the photos will get checked. And the photos that will pass the filter will get entered into the Album. You can use different filters in the Smart Album.
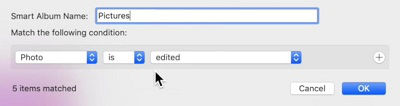
Hence, we have successfully organized photos on Mac by creating a New Smart Album.
Method 4: Organize Photos by Choosing Frequent Opened Album
If you want to choose the photo album that you opened frequently using the application, there is no need to manually search it in the Application. While opening the application, hold down the Option Key, and a new window will arrive. Select the photo album that you want to access.
Hence, we have successfully organized photos on Mac by choosing Frequently Opened Album.
Method 5: Organize Photos by Merging Albums
Step 1: Open any one of the albums that should be merged with the other one. Select all the photos & click on the File option, next Export. You will get the option to Export Photos.

Step 2: Next, you will get a few options to change photo quality & others. Leave them & click on the Export option. You will get other Photo Libraries that are present in the app to merge it.

Hence, we have successfully organized photos on Mac by merging Two Albums.
Method 6: Organize Photos by Doing Favourite a Picture
Step 1: Hold down the Command Key & select any picture from your album. You will notice the Love Sign will be enabled there. That means the photos are added to the Favorite list.

Step 2: You can get the favorite lists under the Library Favorites option.
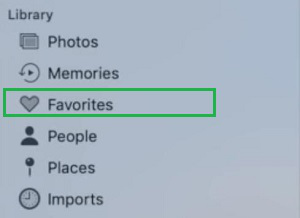
Hence, we have successfully organized photos on Mac by doing Favorite a Picture.
Method 7: Organize Photos by Sharing Any Album
Step 1: Open Photos & go the Preferences. Under the Preferences, select the iCloud option. Under it enable the Shared Albums.
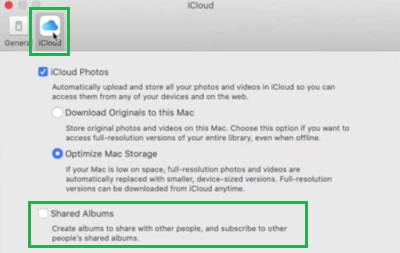
Step 2: You will get a Share Album option. Click on it & a new window will arrive. Provide the Album Name & invite some individuals to the Album & select Create some photos there.
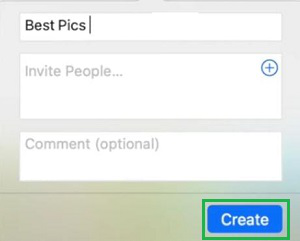
Hence, we have successfully organized photos on Mac by Sharing an Album.
So, these are the simple methods you can use to easily organize photos on the Mac. One of the useful tools is the Smart Album feature where you don’t need to pick up any picture based on its time & other categories. It will filter the photos automatically & save them into a certain folder.
Also Read
FAQs to Organize Photos on Mac
1. How can I create a Smart Album on Mac?
To create a Smart Album on Mac, the following steps should be executed.
- Open Photos & click on the Plus Sign of My Albums.
- Select the Smart Album option.
- Provide Necessary Filters and Names to create it.
2. What is the process to make any photo favorite on Mac?
To create any Photos Favourite on Mac, the following steps can be used.
- Hold Down the Command Key.
- Select the Photo.
- The Love Sign will get enabled as it is marked as Favorite.
3. Can I import photos clicked my by Camera to Mac?
Yes, you can import photos clicked by your Camera to Mac using the following steps.
- Connect the Camera to a Mac or use the SD Card of the Caemra for the same.
- Get an option at the corner to Import All New Photos.
- Select that option to import all images.
Share your thoughts in the comments
Please Login to comment...