How to use gpu in google colab?
Last Updated :
25 Sep, 2023
Google colab is a service provided by Google for a lot of researchers and developers around the globe. It is a Jupyter Notebook-like environment in one single place without any prerequisites. It is free to use with a limited number of computer resources and engines including free access to GPUs i.e. Graphics Processing Units for accelerated parallel processing of code. It also comes with a premium version with more readily available resources computational resources. It is one of the best platforms for all students interested in the field of computer science especially machine learning, data science, artificial intelligence, etc. Colab provides a free workspace in the form of Python3 or R notebooks. These notebooks can be used to implement various compute-heavy tasks in a very easy manner.
In this article, we will learn to use GPU i.e. Graphics Processing Unit in our google colab notebook. You can also refer to the video solution for this end which is attached at the end of this article.
What is GPU (Graphics Processing Unit)?
It is a very specialized computation technology to boost a number of different tasks by utilizing parallel processing. The GPUs can work along with CPUs to do all the tasks in a concurrent manner. Similarly, most of the ML/AI tasks require a lot of complex mathematical calculations and hence, take a lot of time. By using GPUs, these tasks can be accelerated to be done in a much faster way.
Prerequisite – A Google Account. Refer to this article which explains How to Create a New Gmail Account? (2023), which is equivalent to creating a Google Account.
Let’s get started :
Step 1: Go to Google Colab website on the browser of your choice and click on the “Open Colab” option on the right-hand side top menu bar. This will open up a google colab notebook.
.jpg)
Step 2: Let’s first sign in into our google account, if you are not already signed in.

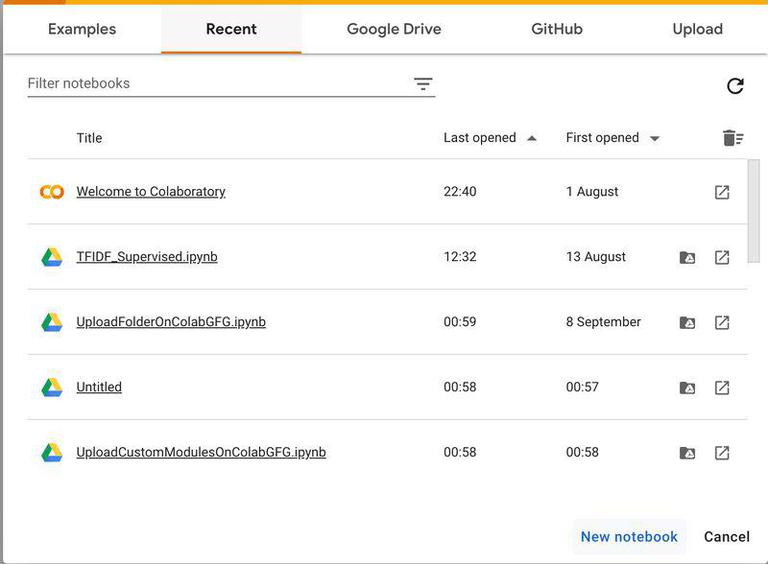
Step 3: A dialog box will be open which will mention all your recent notebooks on colab. Click on “New notebook” in the bottom menu bar to create a new notebook.
Step 4: In order to connect and start a colab session, click on “connect” button on the right-hand top side of the notebook. It will initialize a session, allocate some resources and start a session for us.

Step 5: But, in this session only CPU engines are allocated. In order to connect to GPU, click on the small down arrow icon, just besides the Connect button, go to “Change runtime type” option.
Step 6: In the dialog box, select the “T4 GPU” radio button, and then click on “Save” button. This will reinitialize a session for us, but, now with GPU computational resources.

Step 7: As we can see now, the GPU RAM is also allocated to our notebook.
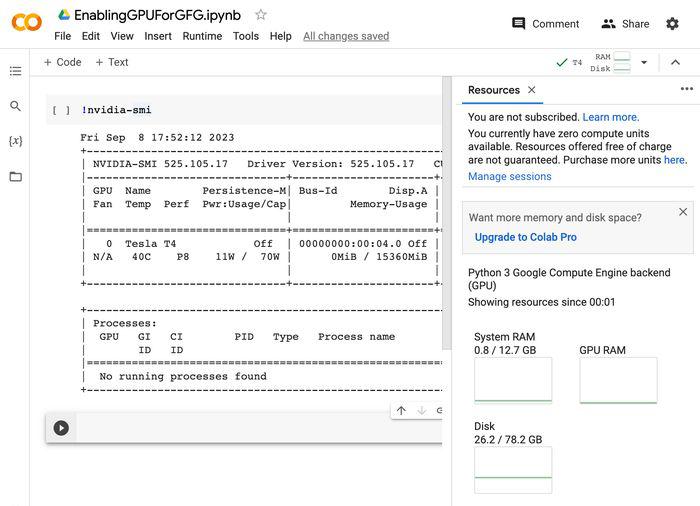
Step 8: To check the type of GPU allocated to our notebook, use the following command.
!nvidia-smi

As can be seen in the above image, a Tesla T4 GPU is allocated to us with a RAM size of almost 15GBs. By following the above steps, we can easily connect to the colab notebook with GPU resources.
Please refer to the following video, to get a more detailed idea about the process which showcase all the steps mentioned above.
Share your thoughts in the comments
Please Login to comment...