How to Convert Photos to PDF on iPhone and iPad?
Last Updated :
17 Apr, 2024
In this digital era, smaller file sizes play a big role in transferring larger files. One of the most common ways to reduce size is by converting pictures to PDF on iPhone, whether high-quality images in JPEG, JPG, or PNG format. People don’t realize that they don’t need a third-party application to perform this conversion, especially not on their iPhones.
In this article, you can go through how to convert a picture to PDF on iPhone and store them in the cloud and locally in different ways. Here are a few simple methods to convert photos to PDF on your iPhone/ iPad. Overall, it is a very simple process with which you can save time and storage space instead of using any third-party apps.
How to Convert Pictures to PDF on Iphone
Method 1: Convert Photos to PDF on iPhone Using Print Option
To Convert Photos to PDF on iPhone, you can use the Print option from the Photos app . This method is straightforward and doesn’t require any extra apps. Here’s how you can do it:
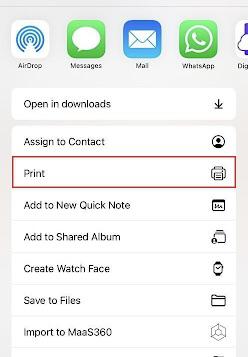
Step 1 : Select the image that you want to convert into pdf. Click on the Share option at the bottom left corner. Just scroll down and select the Print option as shown below:
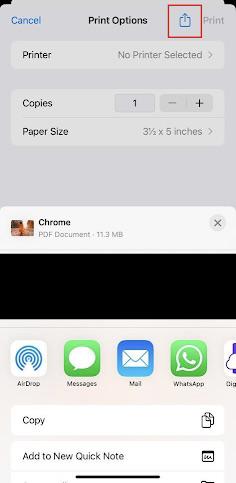
Step 2 : When you click “Print” you can see the preview of the picture to be printed. In the preview page, select the Share button icon on the top-left corner. Now, scroll through the available apps and select “Drive” as shown in the image below. This will save the image in your Google Drive in PDF format automatically.
Step 3 : After selecting Google Drive, click on the “upload” button on the top-right corner of the screen. With this, you have successfully stored the PDF file format of the image in cloud storage.
Alternate Method
We’ll follow the same steps to navigate to the Print option, but we’ll instead be storing the PDF file locally, instead of storing it in cloud storage.
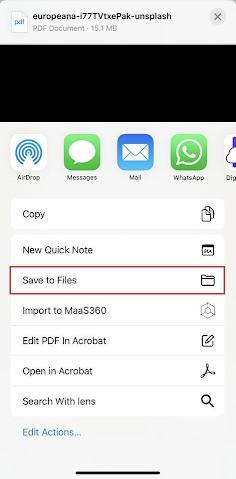
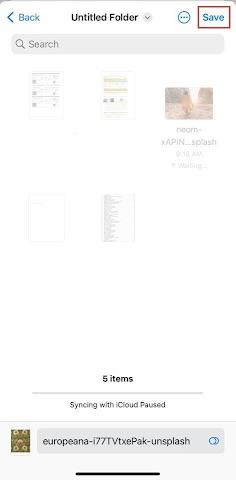
Step 1 : Upon navigating to the Print option, select the Share button icon on the corner. Now, select the Save to Files option as shown below. This option would save the image locally on your iPhone or iPad and the file type automatically changes to PDF format.
Step 2 : Now, save your image file in your desired folder locally and click on Save.
With this, you have successfully converted an image to PDF and stored it locally on your device.
Method 2: Convert Photos to PDF on iPhone Using Files
To Convert Photos to PDF on iPhone and iPad, This method is by far the simplest way out of all the options we’ve given you here. It takes you less than five taps. This method will save the PDF file with the exact dimensions of your image. So there’s no need to worry about any whitespace, or resolution loss due to the stretching of the image.
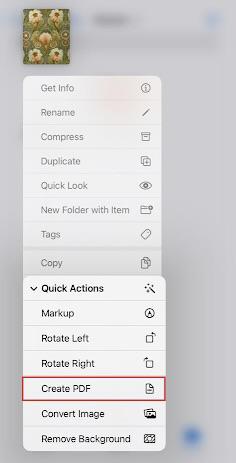
Step 1 : To start with, go to the “Files” app on your iPhone. Now, go to the folder where the image that is to be converted to PDF is present. Now, a long press on the image and a dropdown would appear. Select “Quick Actions” and select “Create PDF” as shown in the image below:
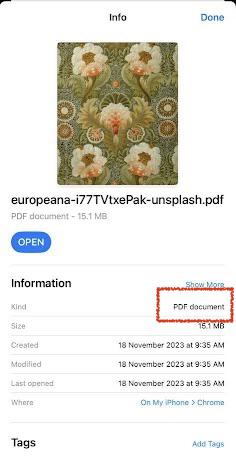
Step 2 : In the same folder, the PDF version of the image will be created. Simply long-press on the file and select “Get Info” on the top and you can see that the PDF file has been created.
Now, you’ve successfully learnt the third method on how to convert images to PDF on iPhone.
Conclusion
As technology advances, Apple service providers have found ways to increase privacy and security on their products. They now offer methods to convert Photos to PDF on iPhone and edit images in different formats, encouraging users to avoid third-party apps that might not have strong security measures and could access your data without permission. Apple’s goal is to make editing and saving images on your phone simple and easy, so you don’t have to rely on extra apps to get the job done.
How to Save a Photo as a PDF on iPhone- FAQs
How do I convert a photo to PDF on iPad
To convert images to PDF’s in iPhone try the following ways:
- Go to “Files” navigate to the folder you have the image in. Then, long press the image, this would display a few options. Click on Convert to PDF.
- You can select the image from gallery and tap on the Share button at the bottom-left corner. This will show you a few option, click on Print. So, this by default would convert your image to PDF format.
- You can also use third-party applications if that is your preferred method.
What are the best 3rd party apps to convert photos to PDF on iPhone or iPad?
The best third-party apps as used by most common iPhone users are:
Mostly, many people recommend the Adobe Acrobat app due to its flexibility and ability to convert not only images but other file types to PDFs using their online services.
Why should I convert my images to PDFs?
Smaller file sizes play a big role while transferring larger files. Often people opt to reduce image size by converting a high-quality image (JPEG, JPG or PNG) into a PDF file to make the data transfer easy.
Can iPhone photos be converted to PDF?
Yes, you can convert photos to PDF on your iPhone. In the Photos app, select the photos, tap Share, choose Print, and pinch the preview to convert to PDF. In the Files app, select images and choose the option to create a PDF. Both are simple and don’t need extra apps.
How do I convert iPhone photos to PDF without app?
You can convert iPhone photos to PDF without an app by using the Photos app:
- Open Photos and select the photo(s).
- Tap Share and choose Print.
- In the print preview, pinch the image to convert it to PDF.
- Tap Share again and choose Save to Files.
This converts photos to PDF quickly and easily.
Share your thoughts in the comments
Please Login to comment...