How to Record Screen in Windows 11?
Last Updated :
27 Feb, 2024
Screen recording is the method that helps to show activities on a laptop or PC screen to any other individual in video format to make any tutorial easier for them. The use of Screen Recording is increasing day by day on both Desktop & Mobile devices. That is why the latest feature to Record Screen in Windows 11 is introduced.
However, the process of Recording Screens on Windows has existed even before the Windows 11 version. In the Windows 11 version, some more alternatives are provided to Capture Windows 11 Screen Activities in the Video Format. All of these alternatives come up with Windows, so they are not flagged as Third-Party Applications.
In this article, we will discuss How to Record Screens in Windows 11. Let us try to find some easy methods to do the same.
Quick Preview to Record Screen on Windows 11:
- Press the Windows + G Keys to open the Xbox Game Bar.
- Click on the Camera Icon to start recording.
- Later, click on the Stop button to end the recording.
Methods To Record Screen in Windows 11
To Get Screen Activities in Video Format on Windows 11, the following guidelines should be used. We will start with the Xbox Game Bar application.
Method 1: Record the Screen on Windows using the Xbox Game Bar
Step 1: First, open the Search Menu in Windows 11, & then search for the Xbox Game Bar application. The application will become visible on the device. Click on that option.

Step 2: Now, a small bar will open in the window. Click on the Camera Like button present there. It is the Capture function.

Step 3: Now, another small bar will be opened. There a lot of options will be present. A button with a Recorder Sign will be visible there. Click on the Record button to start screen recording in Windows 11.
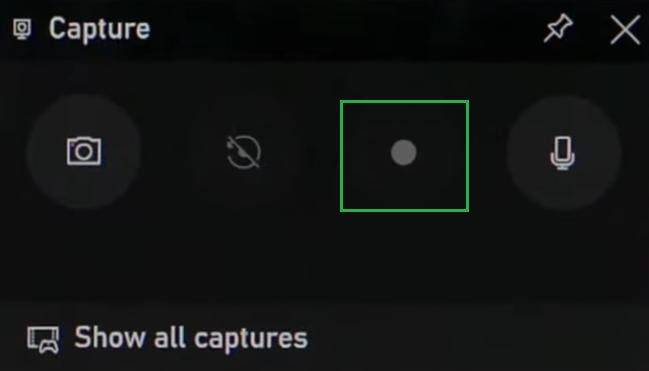
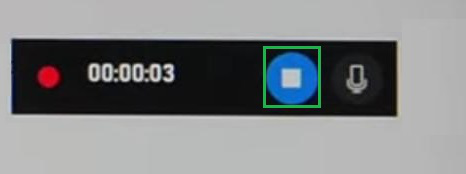
Step 4: As soon as the recording starts another small window will appear. And all other windows will disappear. In the end, when the recording is completed, click on the Blue Stop Button to finish the recording & save it.
Hence, we have successfully recorded the screen in the Windows 11 operating system using the Xbox Game Bar application.
Method 2: Record the Screen on Windows using the Snipping Tool
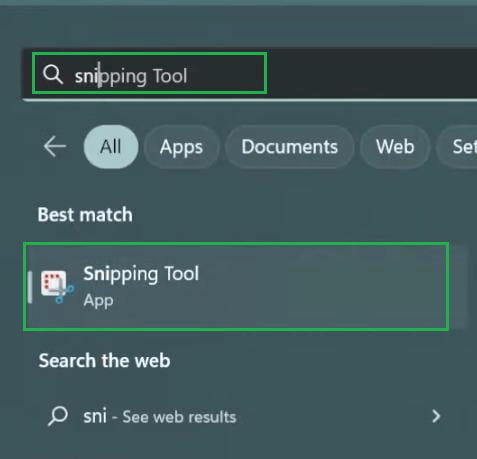
Step 1: First, again open the Search Menu or Search Bar in Windows 11, & then search for the Snipping Tool application. The application will be shown on the screen. Simply click over that to move ahead.
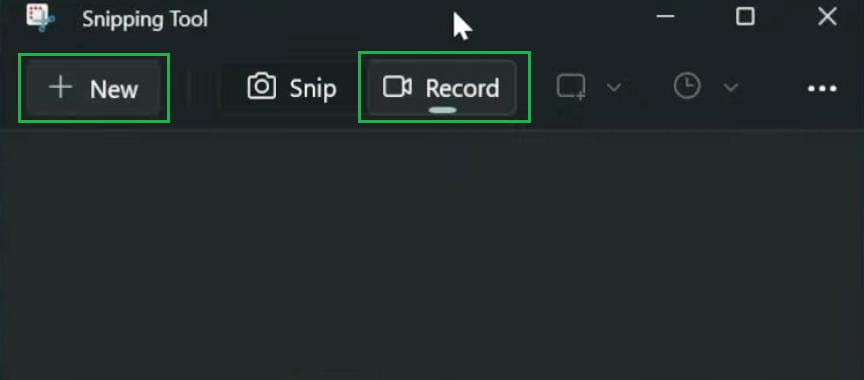
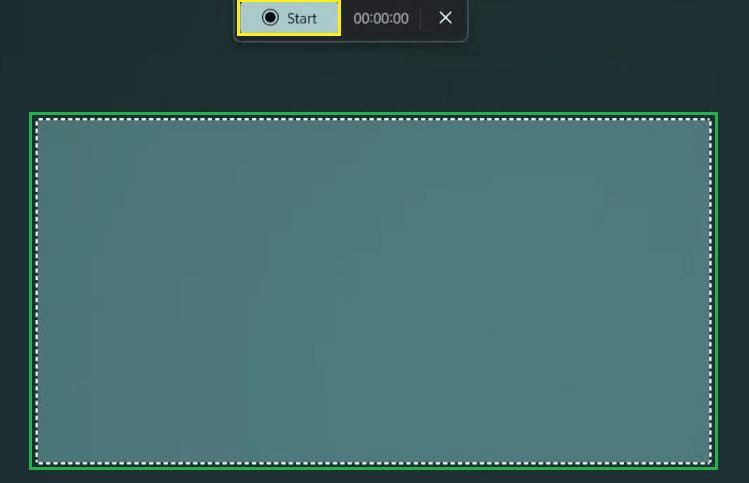
Step 2: The window for Snipping Toll will be opened. First, click on the Record Button to enable the screen recording option. After that, click on the New Button to start the screen recording Windows 11.
Step 3: Now, drag the area on the screen where the snipping tool will work. After dragging the area, click on the Start Button present on the top to begin the recording.
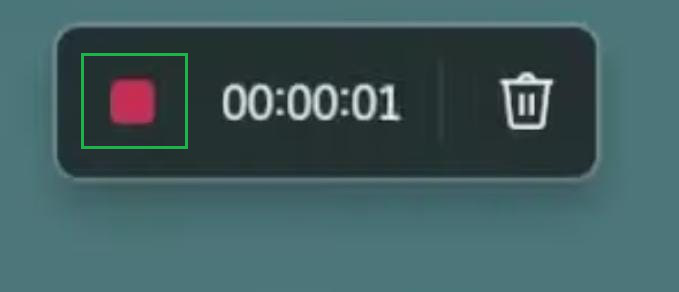
Step 4: After the recording is started, the stop button will replace the position of the Start button. After completion of the recording, click on the Stop Button to finish the process.
Hence, we have successfully recorded the screen in the Windows 11 operating system using the Snipping Tool application.
Method 3: Record Screen on Windows using Third-Party Applications
Lastly, many such applications help to Record Screens in Windows. And they are quite good in their domain. Any application can be checked from the internet but you should download that from a trusted source only.
Otherwise, there are a few online platforms that can also Record Screen on Windows OS by accessing the screen of the device. You can use them as well. Also, there are some Chrome Extensions present that can also Record Screens and Audio which can also be a good alternative.
Disclaimer: Download & install any third-party application from their official website only. And you should be very careful while installing any such application on the machine. The antivirus should be enabled in the machine & need to be activated while installing the such application. Otherwise, malicious elements can damage the machine.
Conclusion
These are a few tips that help to easily Record the Activities of Screens in Windows 11 Operating System. As per your choice, you can pick up ay one of the above-mentioned methods. With emerging new tools, some more new methods might land on earth to do screen recording in Windows. We should stay updated on such technologies and tips always.
Also Read
Frequently Asked Questions to Record Screen on Windows 11
How to record the screen in Windows 11?
To record the screen on Windows 11, the following guidelines can be used properly.
- Press the Windows + G Keys to open XBox Game Bar.
- Now, click on the Camera Icon.
- Do your activities to record.
- Click on the Stop button.
Where Can I find saved Screen Recording on Windows?
You will find all of your Saved Screen Recording on Windows inside the Videos folder. Under This PC option, there is a Videos folder present. You can access it from the Left-side panel. Click on it & you will see Screen Recording mentioned with Date & Time.
Will it be right to use a third-party application to record the screen?
Yes! There will be no issue while working with any third-party application. You can record the screen with any kind of application. You just have to download it from the official page to get the original one. Also, if there are any Terms & Conditions present, look at them carefully before accepting.
Share your thoughts in the comments
Please Login to comment...