How to Set Up Windows 11 Remote Desktop Access?
Last Updated :
15 Feb, 2024
If you used to work on different laptops or desktops in your home and office to complete different tasks, it is very obvious that you need files & folders of those devices every time. However, working on two or more devices at the same time will be a hectic job. The easiest way to resolve such issues is to Enable Remote Desktop Access on Windows.
Using Windows 11 Remote Desktop Access you can access different desktops on the same devices without any issues. There will be a window on the second device that will open on the first device where you are working using Remote Desktop on Windows 11. To perform such an operation, we have to first Start the Remote Desktop Access Service on Windows.
In this article, we will discuss different methods needed to Set Up Windows 11 Remote Desktop Access along with its connection process.
Quick Preview to Set Up Remote Desktop Access on Windows 11:
- Open Windows Settings.
- Under the System Option, search for Remote Desktop.
- Open the settings & Enable Remote Desktop button.
Quick Highlights on Remote Desktop Access:
- The Remote Desktop Access helps to open another Desktop Window on another device.
- The Remote Desktop Access should be opened on the Desktop that will be shared.
- Remote Desktop Connection is the inbuilt application present to access computers.
- The Desktop that is being accessed will be logged out automatically.
- The Accessed Desktop will not be used while it is being shared.
- All the files & folders can be accessed & made modifications there.
How to Set Up Windows 11 Remote Desktop Access?
To Operate Remote Desktop Access on Windows 11, the following guidelines should be used. We will start with the Windows Settings.
Method 1: Set Up Windows 11 Remote Access using Windows Settings
Step 1: Open Windows Settings & go for the Remote Desktop section.
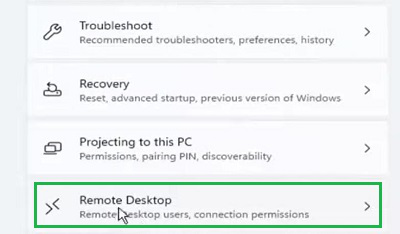
Step 2: Enable the Button to start the system.
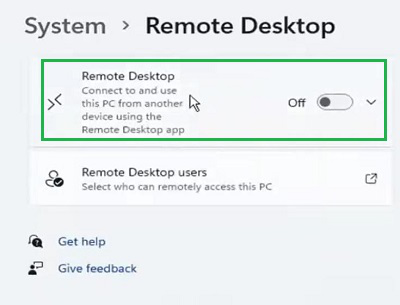
Hence, the Remote Desktop Access on Windows is started using the steps executed under the Windows Settings.
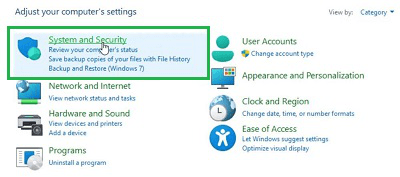
Method 2: Set Up Windows 11 Remote Access using Control Panel
Step 1: Open the Control Panel & select the System and Security option.
Step 2: Click on the Allow Remote Access option.
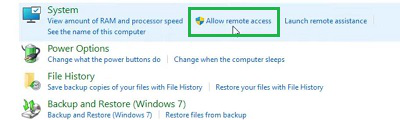
Step 3: Enable the button & press OK.
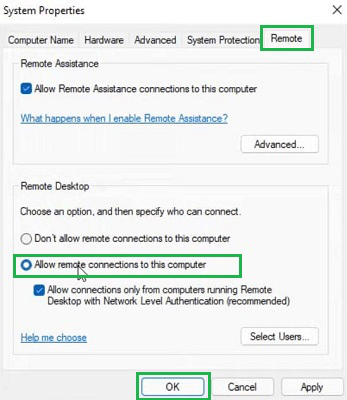
Congratulation! The Desktop Access By Remote on Windows can easily be created using a Control Panel.
Method 3: Set Up Windows 11 Remote Access using Command Prompt
Open Command Prompt & execute the following command to promptly open the Windows Remote Access Service.
Command: reg add “HKEY_LOCAL_MACHINE\SYSTEM\CurrentControlSet\Control\Terminal Server” /v fDenyTSConnections /t REG_DWORD /d 0 /f

Hooray! Using a simple Command on Command Prompt, the Remote Access System on Windows is now enabled.
Method 4: Set Up Windows 11 Remote Access using Windows Powershell
Open the Windows Powershell service & execute the following command. It will not show any output. But, the service will be enabled.
Command: Set-ItemProperty -Path ‘HKLM:\System\CurrentControlSet\Control\Terminal Server’ -name “fDenyTSConnections” -value 0

So, these are the methods needed to Execute Windows 11 Remote Desktop Access before starting the establish the connection with other devices.
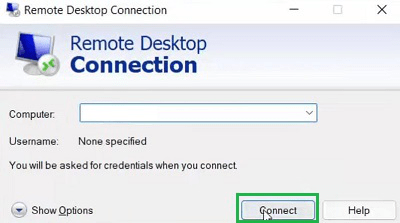
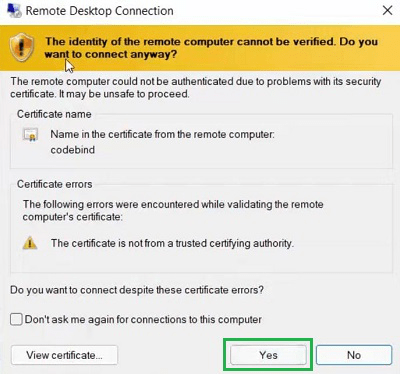
How to Connect Two Devices Using Windows 11 Remote Desktop Access?
Step 1: Open the Remote Desktop Connection. And provide the IP Address of the device that should be shared. Click Connect.
Step 2: Click on Yes to move ahead in the process.
Conclusion
The above discussion will be enough to clarify the concept of the Remote Windows 11 Desktop Access process, We have to remember that the Desktop that will be shared with the Remote Access of Windows should be opened there. To view & edit information on that desktop on the second one, the Windows Remote Desktop Connection should be executed.
Frequently Asked Questions to Set Up Windows 11 Remote Desktop Access
How to Setup Remote Desktop Access on Windows?
To set up Remote Desktop Access on Windows 11, the following guidelines should be used.
- Open Control Panel
- Go to the System & Security option.
- Click on Allow Remote Access.
- Press the button Allow Remote Connection.
Can I use two Remote Desktop on Windows at the same time?
Yes! Windows 11 provides permission to use two Remote Desktop on any single device at a time. You can use the same process to add two devices. After two devices, the Remote Connection app will not help to execute the process.
Where Can I find the IP Address of the Windows 11 laptop?
To find the IP Address of Windows 11 Laptop to add Remote Desktop Access on Windows, the following steps can be used.
- Open Command Prompt.
- Execute the command ipconfig.
- Get the IP Address under IPv4.
Share your thoughts in the comments
Please Login to comment...