How to Allow Microphone and Camera In Chrome?
Last Updated :
15 Apr, 2024
Chrome is a popular web browser that lets you use web apps and services like video calls and online games. It offers features like mic and camera access. Sometimes, issues with these settings can arise, so if you’re having trouble, know you’re not alone.
In this article, we’ll provide you with a simple and straightforward guide on how to allow a microphone and camera in Chrome, ensuring you can make video calls, participate in online meetings, and use web-based applications without any hassle.
How to Enable Microphone and Camera on chrome
How to Allow Access to Microphone and Camera in Chrome?
Many websites ask for your permission to access your system’s microphone and camera. This is important for security because it lets you know which sites are using these devices. Here’s how you can quickly allow mic and camera in Chrome:
- Visit the website that needs microphone and camera access.
- Click the icon to ‘view site information’ located right next to the URL bar
- Click on “Site Settings“
- From the Microphone and Camera dropdown, select “Allow“.
Hence, your microphone and camera are enabled, allowing you to start your tasks. However, there are other methods as well to turn on the microphone and camera. Let’s see how to enable them with a proper demonstration. We have discussed three methods to enable mic and camera.
Enable Microphone and Camera in Chrome
If you cannot allow the mic and camera in chrome settings, Here is a simple guide for you. This article will show you how to allow a microphone and camera in google chrome using permission dialog box, site settings, and chrome menu. By following our easy-to-follow steps, you’ll be able to configure Chrome settings to grant the necessary permissions for microphone and camera usage, enhancing your browsing experience
Method 1: Turn on Mic and Camera Using Permission Dialog Box
When you visit a website that wants to use your microphone or camera, Chrome will show you a small box asking for permission to allow mic and camera in Chrome.
Here’s how to allow access:
Step 1: Open Chrome Browser
Step 2: Visit the website that requires microphone access.
Step 3: When prompted, select either “Allow” or “Block” for permissions.
- Allowed sites: Can record when active on the site.
- Chrome: You can then able to use your microphone audio services

That’s it! Once you allow access, the website can use your microphone and camera. Just remember to be careful about which websites you give permission to, and only allow access to sites you trust.
Method 2: Turn on Mic and Camera Using Site Settings
If you want to allow the mic and camera in Chrome for a specific website, you can do this by adjusting the site settings.
Here’s how to allow access:
Step 1: Open Chrome browser
Step 2: Visit the website that requires microphone access.
Step 3: On left side of the website URL click on the the “View Site Information” Icon
Step 4: Then, From that list click on “Site Settings“

Step 5: From the Camera and Microphone dropdown select “Allow”

Now, you’ve successfully set up the website to allow the microphone and camera in Chrome. This will enable you to use video calls, voice recordings, and other features on the site that require these permissions.
By following these steps, you can allow mic and camera in Chrome for a specific site safely and easily.
Method 3: Turn on Mic and Camera Using Chrome Menu
Here are the simple steps to turn on Mic and Camera Using Chrome Menu.
Step 1: Open Google Chrome on your computer.
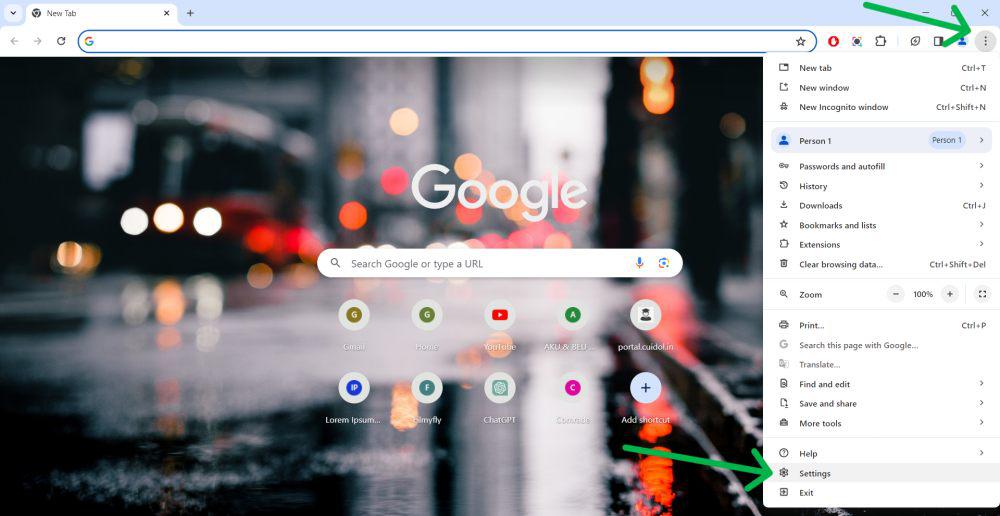
Step 2: Click the three-dot menu icon in the top right corner of the browser.
Step 3: From the drop-down menu, select “Settings”.
Alternatively, press Alt + F / Alt + E to open chorme menu and select Settings.
Step 4: Scroll down and click on “Privacy and security”.
Step 5: Click on “Site Settings”.

Step 6: Under the “Permissions” section, Click on the Camera and Microphone ( one by one )

Step 7: Now, select ‘Sites can ask to use your Camera’ and ‘Sites can ask to use your Microphone’ options respectively.
.png)
By following these steps, you can easily allow mic and camera in Chrome for the websites you want to use them on.
Conclusion
In conclusion, you can easily enable the microphone in Google Chrome, whether on a computer or a mobile phone. Follow the steps given in this article on how to allow microphone and camera In Chrome to make sure your web applications work correctly and your voice comes through clearly. So, these are the simple methods you can try to allow microphone and camera in Chrome using the permission dialog box, site settings, and Chrome menu. Remember, Chrome prioritizes your safety and security during browsing, so it will always request your permission before accessing sensitive features like your microphone.
How to Allow Microphone and Camera In Chrome? – FAQs
How to enable Microphone in Chrome?
To enable microphone in google chrome, Follow these steps:
- Go to the website that needs access to your microphone.
- Click the “View Site Information” icon on the right side of the website URL.
- From the list, select “Site Settings”.
- In the Microphone dropdown, select “Allow”.
Why is My Microphone Not Working on Chrome?
Here are some reasons why your microphone might not work on Chrome:
- Disabled Microphone: You might have disabled or incorrectly selected the microphone in Google Chrome.
- Blocked Site: The site you’re using might be blocked from accessing your microphone.
- Low Microphone Sensitivity: If your microphone sensitivity is low, it might not work on your Chromebook.
- Outdated Chromebook: If your Chromebook is outdated, it might have issues interacting with the microphone.
- Muted Mic: If your mic is muted, it won’t work.
How to allow camera permissions on Google Chrome?
To enable camera permission on google chrome, Follow these steps:
- Go to the website that needs access to your camera.
- Click the “View Site Information” icon on the right side of the website URL.
- From the list, select “Site Settings”.
- In the Camera dropdown, select “Allow”.
How do I allow my camera and microphone to access my laptop?
Allow camera and microphone access on your laptop:
- Open Settings (Win + I) > Privacy.
- Turn on “Camera” and “Microphone” access.
- Optionally, manage app permissions here.
Share your thoughts in the comments
Please Login to comment...